> ## Documentation Index
> Fetch the complete documentation index at: https://docs.automq.com/llms.txt
> Use this file to discover all available pages before exploring further.
# Azure
> Install AutoMQ on Azure with seamless Kafka compatibility. Enjoy cloud-native scalability and enhanced data privacy with BYOC support for cost-efficient operations.
Refer to [Overview▸](/automq-cloud/getting-started/overview); before using AutoMQ Cloud, you need to set up the environment first. This article outlines how to install the BYOC environment from Azure.
If you're already familiar with the requirements and steps for installing AutoMQ on Azure, you can click Install AutoMQ From Marketplace.
In this document, references to the AutoMQ product service provider, AutoMQ service provider, and AutoMQ all pertain to AutoMQ HK Limited and its subsidiaries.
## Operational Flow
### Step 1: Prepare the Virtual Network
The AutoMQ BYOC environment is deployed within the user's Virtual Network to ensure data privacy and security. When installing the AutoMQ environment, users must specify the Virtual Network and subnet information, and ensure that the Virtual Network meets the following conditions:
* **Subnet CIDR Requirements:** The AutoMQ data plane cluster is deployed within the user's Virtual Network and utilizes IPs from the Virtual Network's subnets. It is recommended to allocate a sufficient number of available IPs in each subnet (preferably no fewer than 1000 per subnet) to avoid potential deployment and cluster expansion issues in the future.
* **Configure Public NAT Gateway for Access to Public Services:** AutoMQ requires access to public services like image repositories. Therefore, the subnet where AutoMQ resides needs to be configured with a public NAT gateway.
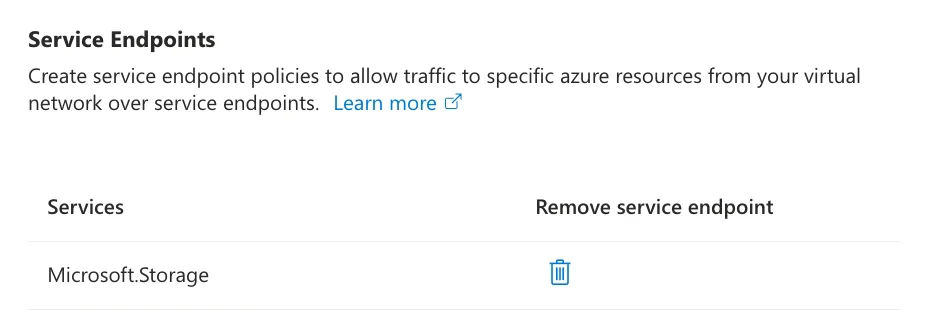
* **Configure Storage Service Endpoint:** AutoMQ requires access to the Azure Storage service, which necessitates configuration of the Service Endpoint. This allows access to object storage services through a private network, thereby avoiding unnecessary public traffic costs. Please refer to the appendix at the end of this document for configuration methods.
Users can refer to the appendix section of this document for guidance on configuring Virtual Networks and Subnets.
### Step 2: Install AutoMQ Using ARM Templates.
1. **Visit** [AutoMQ Installation Link](https://portal.azure.com/#create/Microsoft.Template/uri/https%3A%2F%2Fraw.githubusercontent.com%2FAutoMQ%2Fautomq-labs%2Frefs%2Fheads%2Fmain%2Fbyoc-examples%2Fsetup%2F%2Fazure%2Farm%2Fmain.json/uiFormDefinitionUri/https%3A%2F%2Fraw.githubusercontent.com%2FAutoMQ%2Fautomq-labs%2Frefs%2Fheads%2Fmain%2Fbyoc-examples%2Fsetup%2F%2Fazure%2Farm%2FuiFormDefinition.json)**,** to open the installation interface. The AutoMQ Cloud BYOC environment is installed on Azure by default through an ARM template.
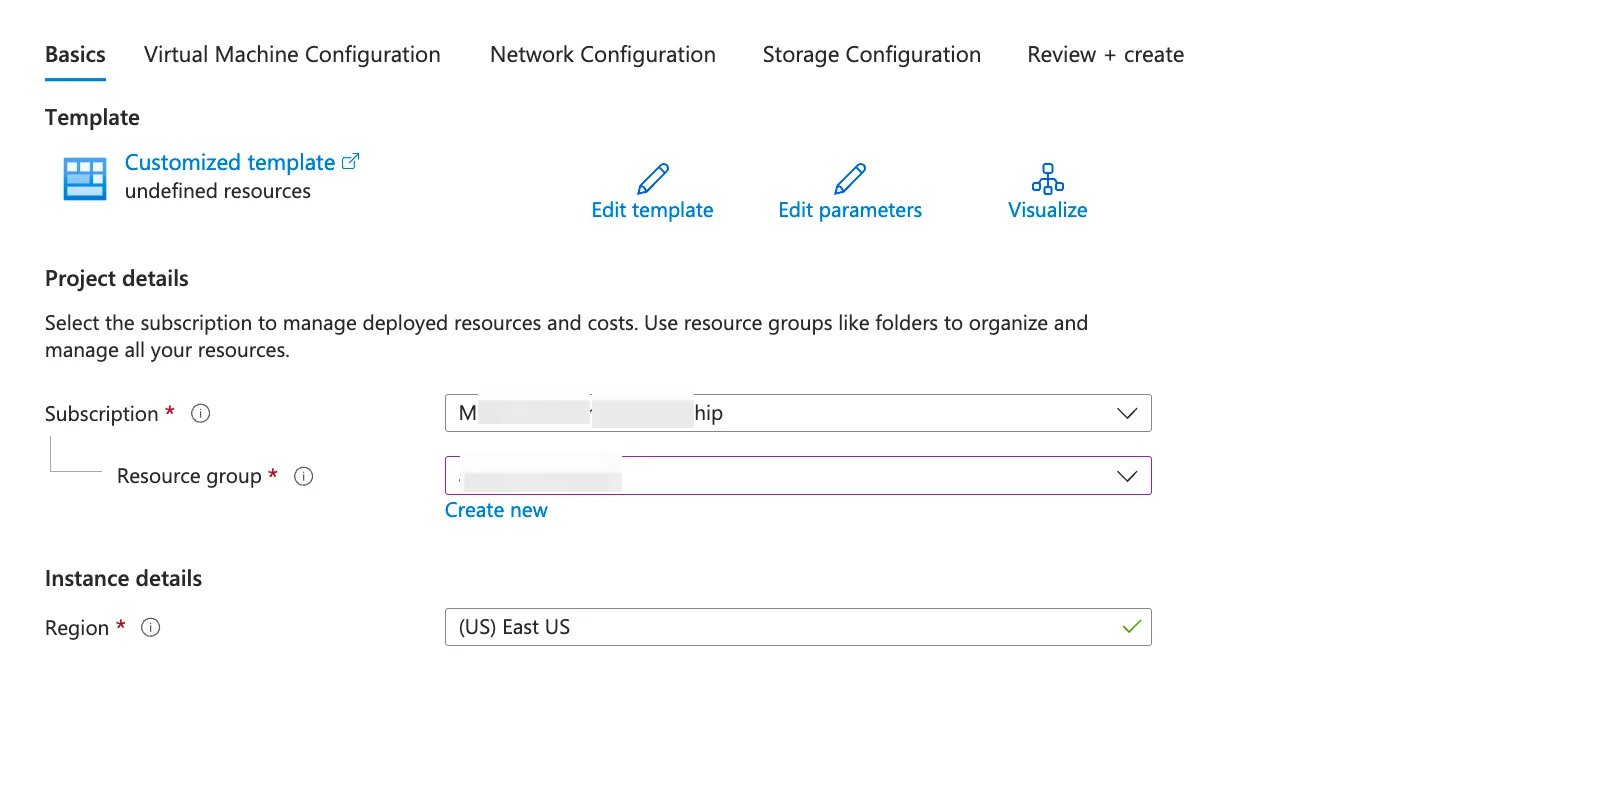
2. **Refer to the parameter description below to set the appropriate Basics parameter values.**
| **Set Parameter**
| **Value Explanation**
|
| ------------------------ | ----------------------------------------------------------------------------------------------------------------------------------------------------------------------------------------------------------------------------------- |
| **Subscription**
| - Description: Select an Azure subscription, all cloud resources used by AutoMQ will be billed using this subscription.
- Recommendation: It is advised to keep it consistent with the application.
|
| **Resource group**
| - Description: Choose the resource group assigned to AutoMQ. It is recommended to place all subsequent cloud resources associated with AutoMQ in the same resource group.
|
| **Region**
| - Description: Select the target region for the AutoMQ deployment, which must be consistent with the region used by your AutoMQ Producer and Consumer applications. Cross-region access to AutoMQ is not supported.
|
 3. **Refer to the parameter descriptions below and set appropriate values for the Virtual Machine Configuration parameters.**
| **Set Parameter**
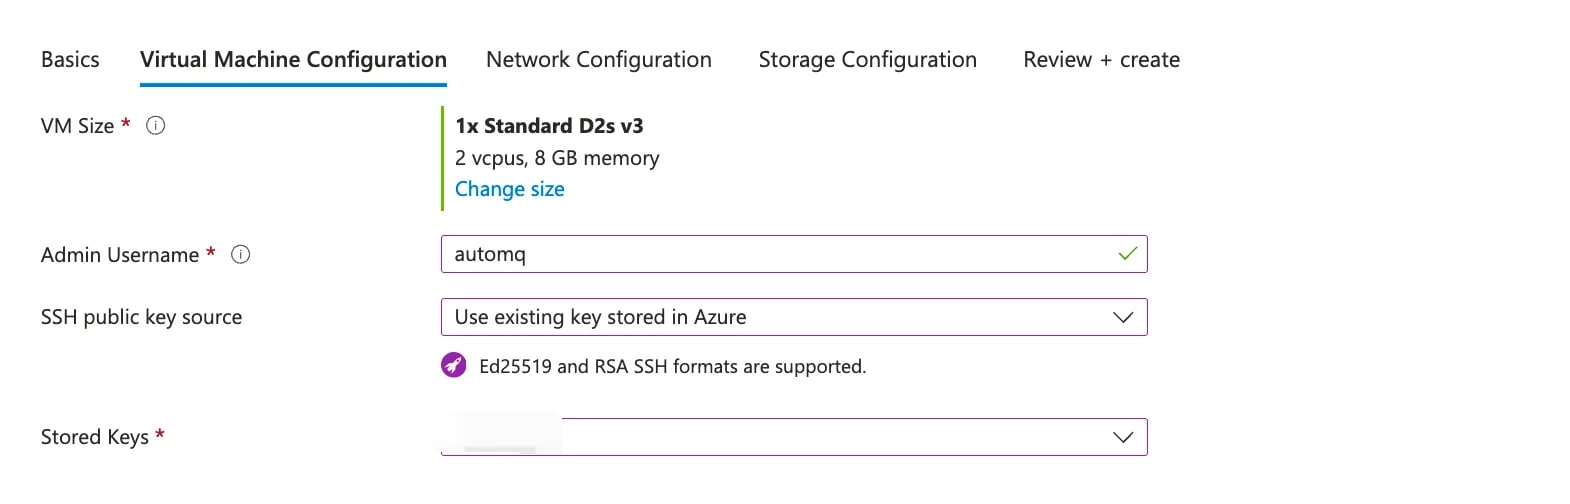
3. **Refer to the parameter descriptions below and set appropriate values for the Virtual Machine Configuration parameters.**
| **Set Parameter**
| **Value Explanation**
|
| ------------------------------- | ----------------------------------------------------------------------------------------------------------------------------------------------------------------------------------- |
| **VM Size**
| - Description: Select the VM instance size used by the AutoMQ console. It requires at least 2vCPU and 8GB of memory. It is recommended to keep the default setting.
|
| **Admin Username**
| - Description: Set the host username for subsequent SSH logins to the console VM.
|
| **SSH public key source**
| - Description: Set the SSH Key-Pair used for subsequent SSH login to console VM. Supports creating a new Key or using an existing one.
|
 4. **Refer to the parameter descriptions below to appropriately configure Network Configuration parameter values.**
| **Set Parameter**
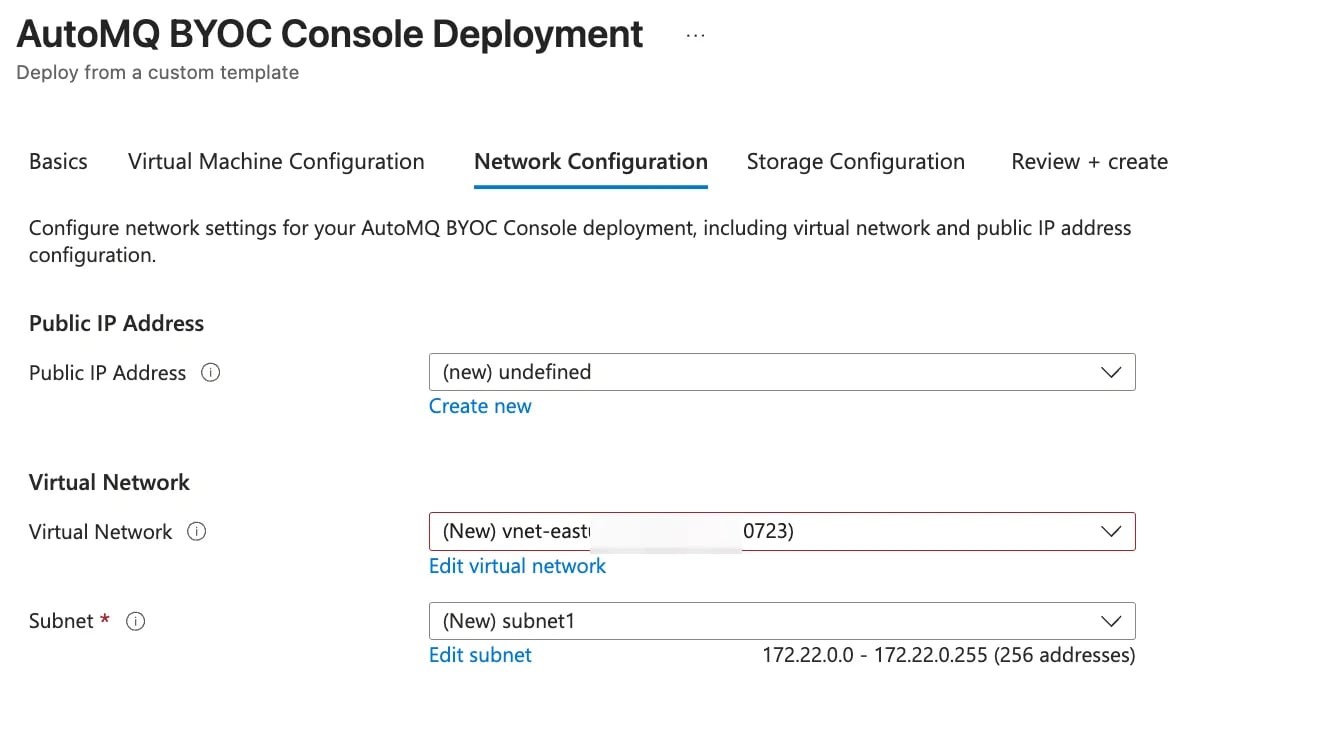
4. **Refer to the parameter descriptions below to appropriately configure Network Configuration parameter values.**
| **Set Parameter**
| **Value Explanation**
|
| --------------------------- | ------------------------------------------------------------------------------------------------------------------------------------------------------------------------------------------------------------------------------------------------------------------------------------------------------------------------------------------------------------------------------------------------------------------------------------------------------------------------------------------------------------------------------------------------------------------------------------------------------------------------------------------------------------------ |
| **Public IP Address**
| - Description: Set the public IP used for providing services externally via the AutoMQ console. Users can access the AutoMQ console through this public IP later on.
- Optional parameter values:
- **None:** No need to assign a public IP; subsequent access to the console will directly use the private IP address. This mode is suitable for enterprises with VPN, dedicated line, etc., connecting to the Virtual Network.
- **(New) xxx:** Create a new public IP; the name should be set manually.
- **Select an existing public IP:** Choose a public IP that has already been created and is available.
|
| **Virtual Network**
| - Description: Set the target Virtual Network where the AutoMQ console will be deployed. It needs to be consistent with Producer and Consumer applications.
- Optional parameter values:
- **Select an existing Virtual Network:** Choose the private network where the application resides. This mode is suitable for production scenarios.
|
| **Subnet**
| - Description: Set the target subnet for AutoMQ console that is about to be deployed.
- Optional parameter values:
- Subnet must be set to select an existing Subnet.
Refer to the appendix section of this document, the subnet needs to configure a public NAT gateway, as the AutoMQ console requires access to public networks.
|
 5. **Refer to the parameter descriptions below to set suitable Storage Configuration parameter values.**
| **Set Parameter**
5. **Refer to the parameter descriptions below to set suitable Storage Configuration parameter values.**
| **Set Parameter**
| **Value Explanation**
|
| ------------------------- | ------------------------------------------------------------------------------------------------------------------------------------------------------------------------------------------------------------------------------------------------------------------------------------------------------------------------------------------------------------------------------------------------------------------------------------------------------------------------------------------------------------------------------------------------------------------------------------------ |
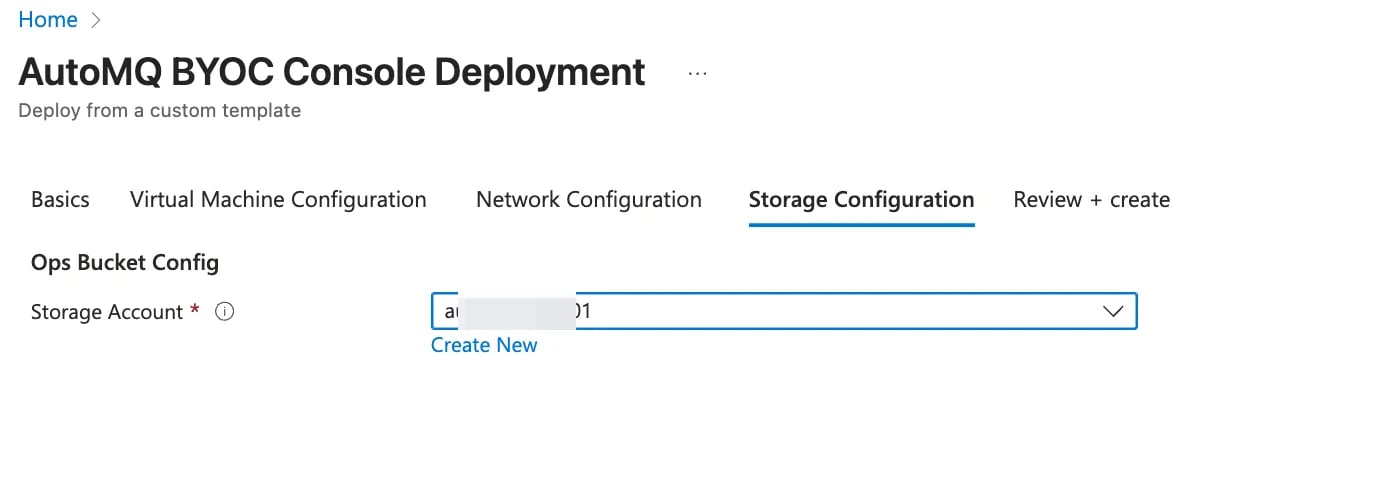
| **Storage Account**
| - Description: Set up the Storage Account used by AutoMQ Ops Bucket. Subsequently, AutoMQ will collect system logs, Metrics, and other data to upload to this Storage Account for alerts and analysis.
- Optional parameter values:
- **(New) xxx:** Create a new Storage Account.
- **Select existing value**: Choose an already created, available Storage Account.
For the working principle of the Ops Bucket, refer to [Overview▸](/automq-cloud/manage-environments/manage-environment-ops-authing/overview).
|
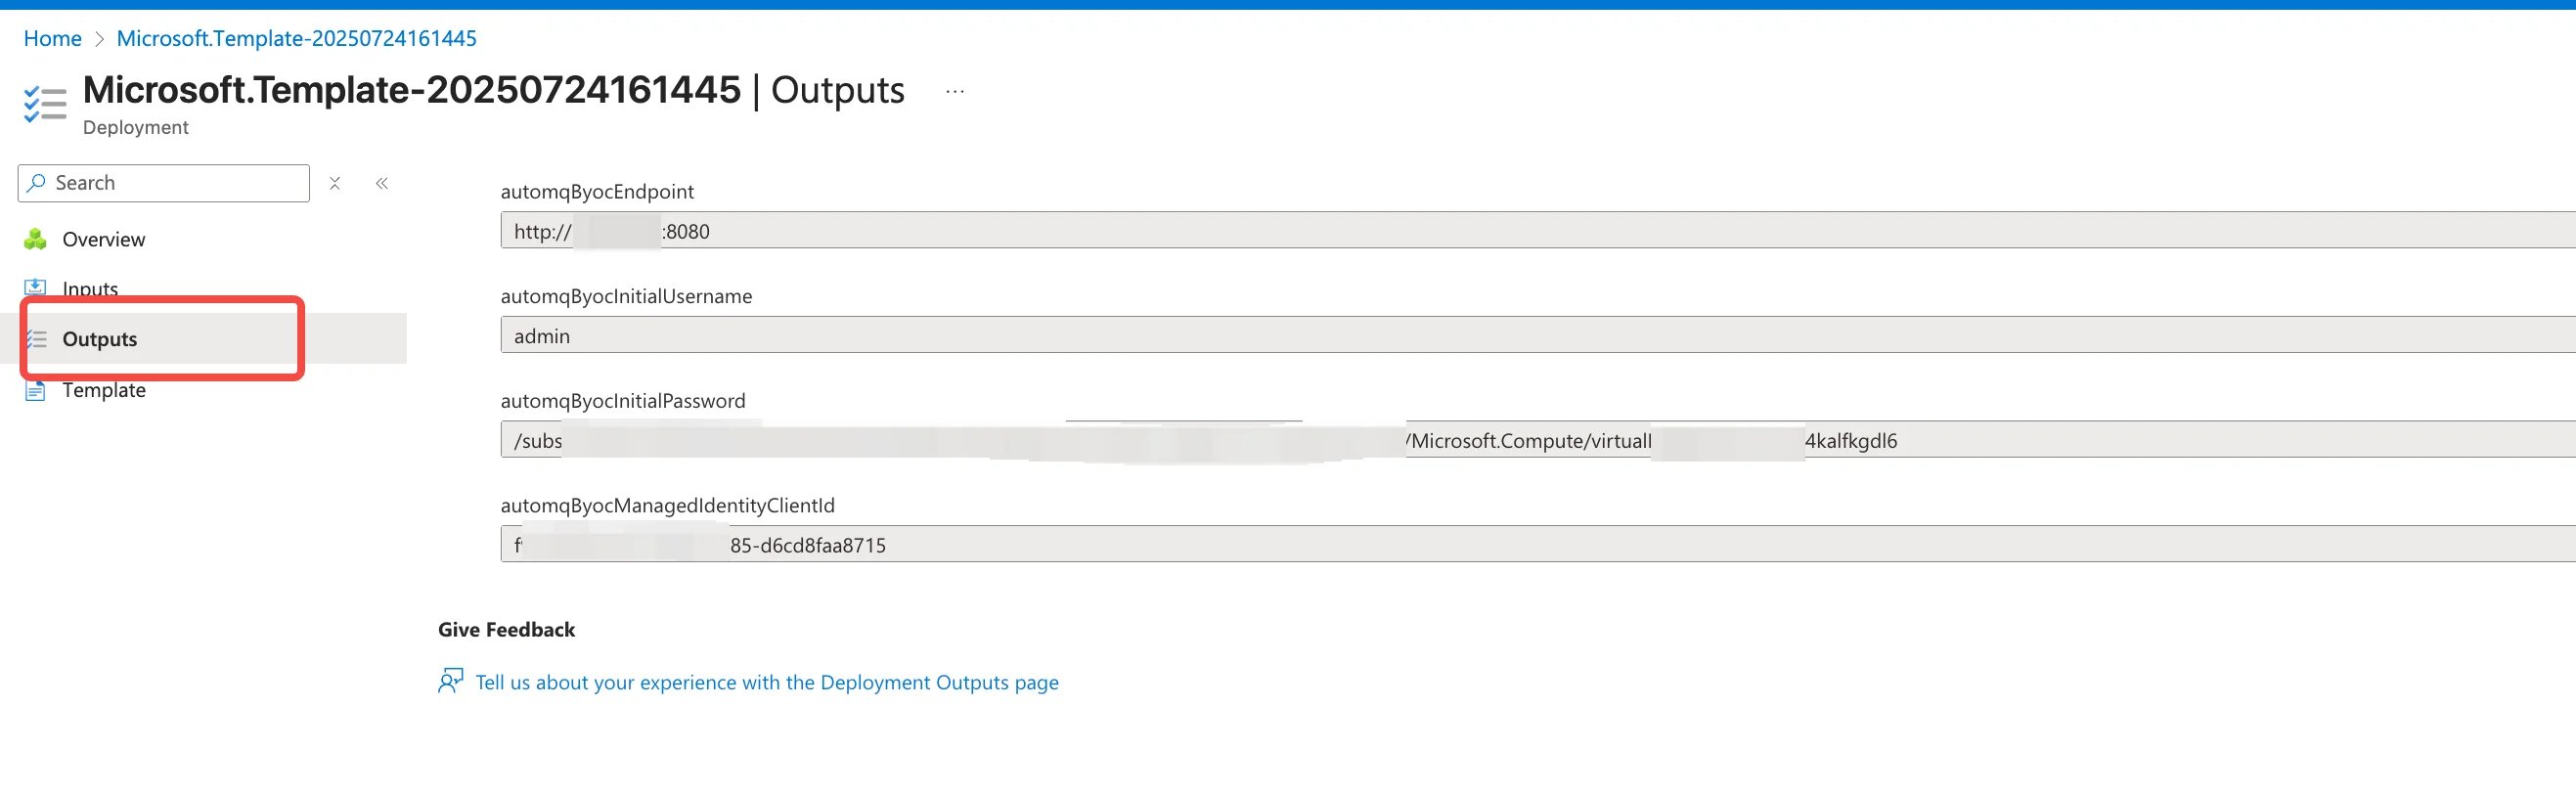
 6. **Preview the configuration and create it. View the initial account passwords and console address output on the console.**
| **Output**
6. **Preview the configuration and create it. View the initial account passwords and console address output on the console.**
| **Output**
| **Output Description**
|
| ----------------------------------------------- | -------------------------------------------------------------------------------------------------------------------------------------------------------------------------- |
| **Automq Byoc Endpoint**
| - The URL address of the AutoMQ BYOC environment console, which users can access via a browser or through APIs and Terraform to interact with the service.
|
| **Automq Byoc Initial Username**
| - The initial username for the environment console.
|
| **Automq Byoc Initial Password**
| - The initial password for the environment console. Users are required to change it immediately upon first login.
|
| **Automq Byoc Managed Identity ClientID**
| - The Managed Identity ClientID bound to the AutoMQ console, which the console uses to authenticate and access cloud resources.
|
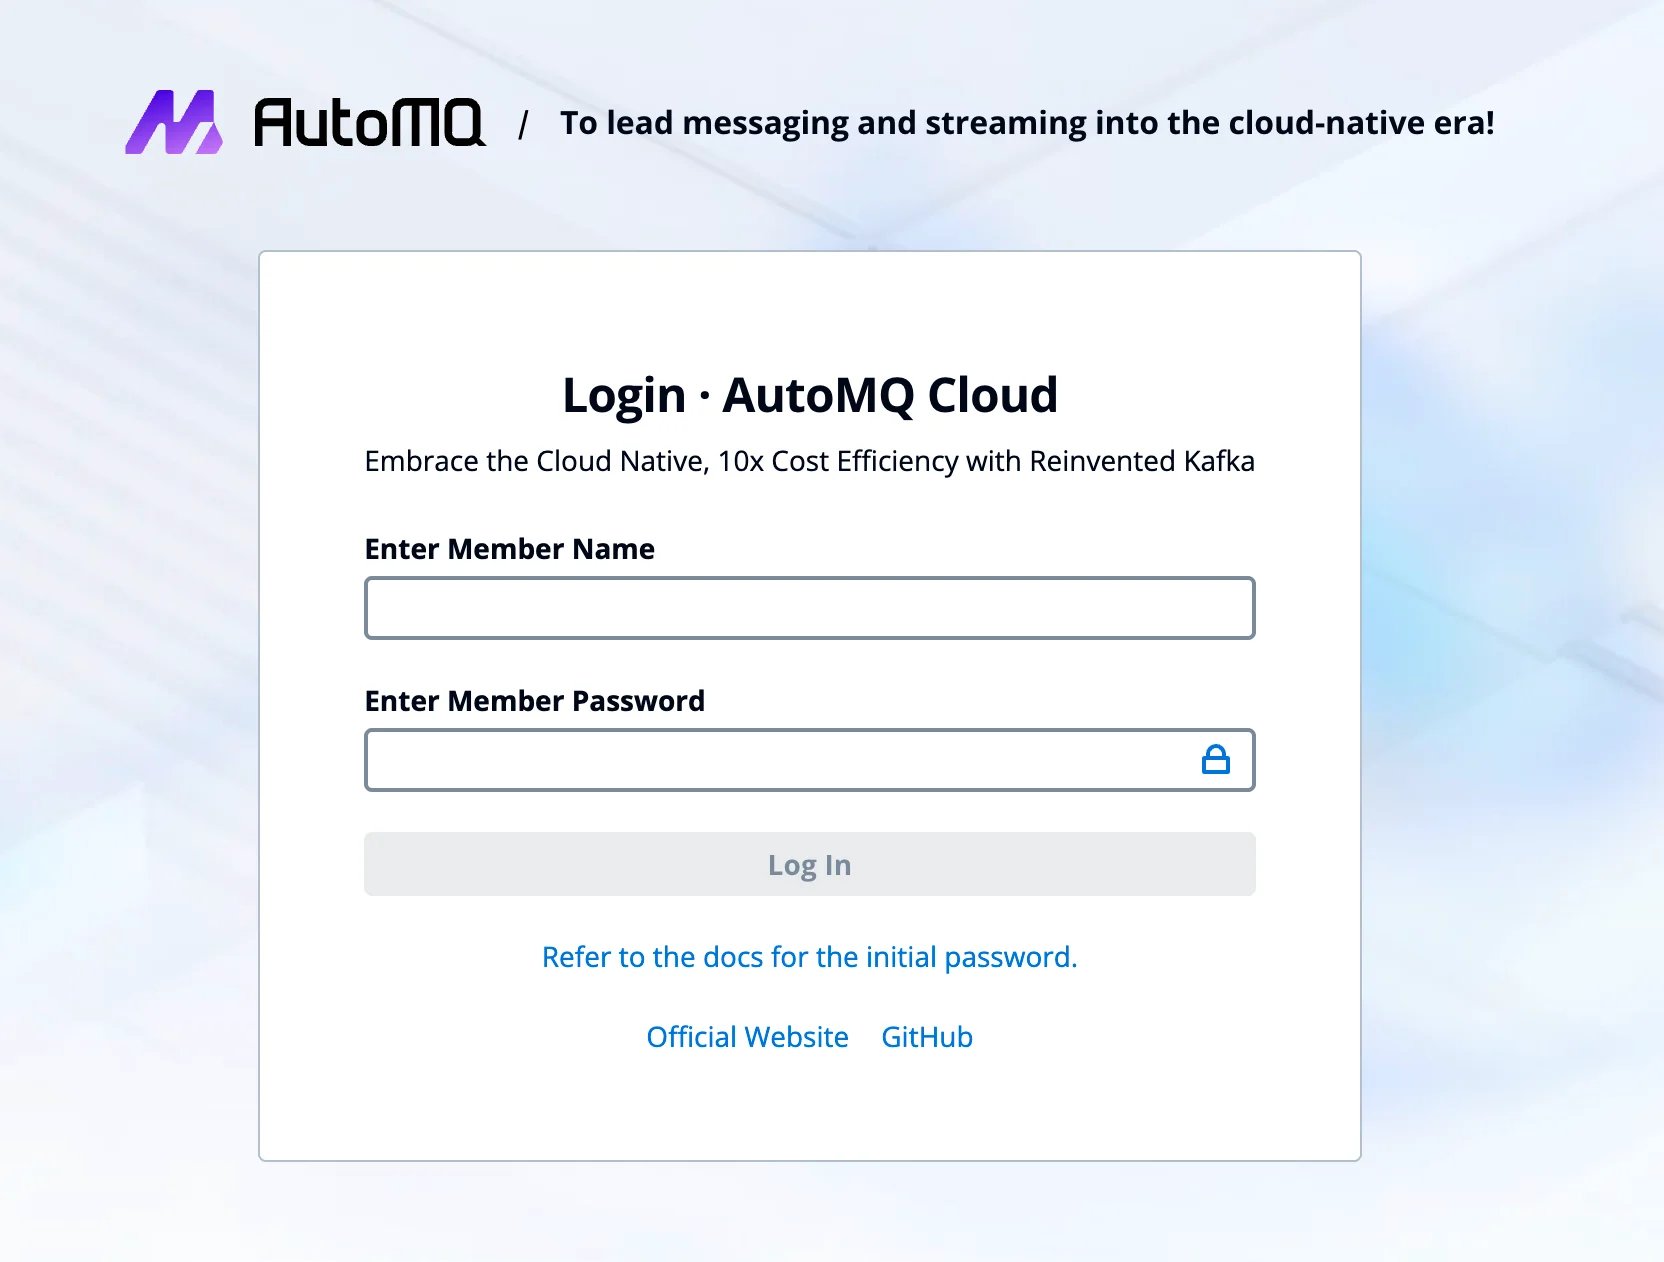
 7. Use the information above to sign into the AutoMQ console.
 ### Step 3: **Complete Operations Authorization for BYOC Environment**
The BYOC environment is deployed in the user's VPC, providing security and privacy isolation for the data. However, system logs, metrics, and other non-business-related system data will be generated within the BYOC environment. After the environment is installed, users need to refer to [Overview▸](/automq-cloud/manage-environments/manage-environment-ops-authing/overview) to understand the necessary operational and maintenance permissions for AutoMQ service providers. This facilitates system stability monitoring and fault self-healing maintenance operations by the AutoMQ service provider.
## Next Steps
AutoMQ only supports deployment on an AKS cluster in Azure. Therefore, once the environment installation is complete, users must first prepare the AKS cluster and then configure it in the AutoMQ console to deploy the AutoMQ cluster to AKS.
Prepare AKS and complete the subsequent deployment documentation. Please refer to [Deploy to Azure AKS▸](/automq-cloud/deploy-automq-on-kubernetes/deploy-to-azure-aks).
## Appendix
### Configure Virtual Network and Subnet
#### Configure the Subnet, Ensuring There Are Enough IP Addresses Available.
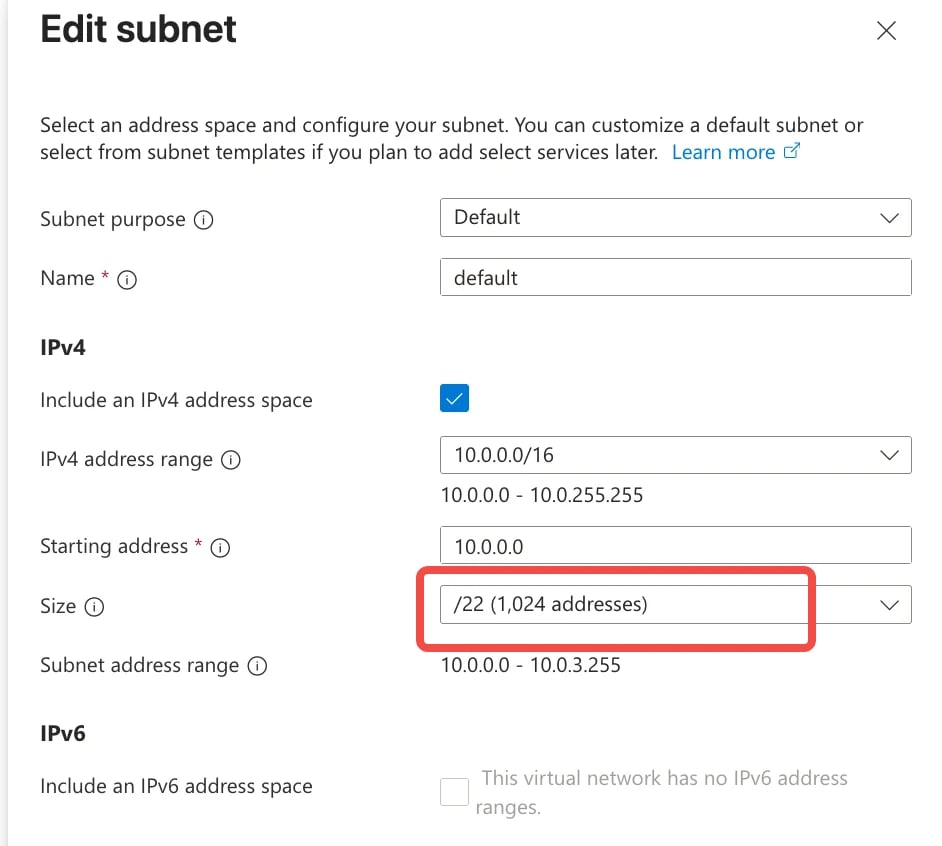
When creating a subnet in the Azure Virtual Network console, it is advisable to select at least a /22 subnet, as illustrated in the figure below, to ensure sufficient IP availability.
### Step 3: **Complete Operations Authorization for BYOC Environment**
The BYOC environment is deployed in the user's VPC, providing security and privacy isolation for the data. However, system logs, metrics, and other non-business-related system data will be generated within the BYOC environment. After the environment is installed, users need to refer to [Overview▸](/automq-cloud/manage-environments/manage-environment-ops-authing/overview) to understand the necessary operational and maintenance permissions for AutoMQ service providers. This facilitates system stability monitoring and fault self-healing maintenance operations by the AutoMQ service provider.
## Next Steps
AutoMQ only supports deployment on an AKS cluster in Azure. Therefore, once the environment installation is complete, users must first prepare the AKS cluster and then configure it in the AutoMQ console to deploy the AutoMQ cluster to AKS.
Prepare AKS and complete the subsequent deployment documentation. Please refer to [Deploy to Azure AKS▸](/automq-cloud/deploy-automq-on-kubernetes/deploy-to-azure-aks).
## Appendix
### Configure Virtual Network and Subnet
#### Configure the Subnet, Ensuring There Are Enough IP Addresses Available.
When creating a subnet in the Azure Virtual Network console, it is advisable to select at least a /22 subnet, as illustrated in the figure below, to ensure sufficient IP availability.
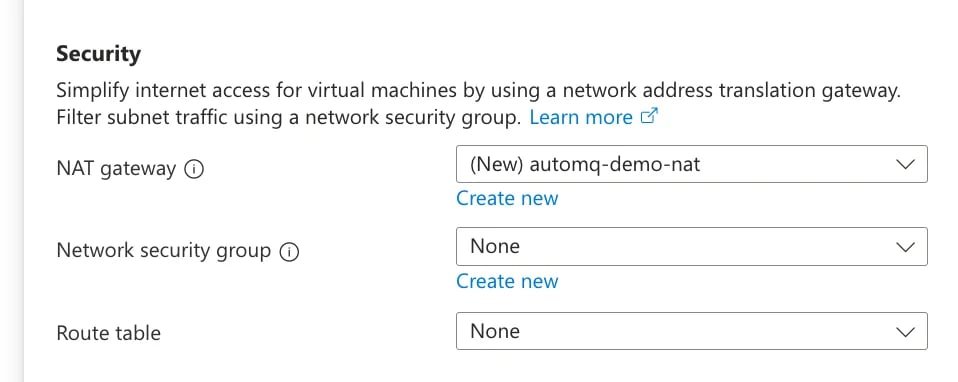
 #### Configuring a Subnet to Enable NAT Gateway for Accessing Public Services
Users can enable the NAT Gateway during the creation or editing of a Subnet in the Virtual Network console.
#### Configuring a Subnet to Enable NAT Gateway for Accessing Public Services
Users can enable the NAT Gateway during the creation or editing of a Subnet in the Virtual Network console.
 #### Configure a Subnet to Enable a Storage Service Endpoint for Accessing the Blob Storage Service.
AutoMQ requires access to Azure Storage Service; therefore, all Subnets deploying AutoMQ must have the Storage Service Endpoint enabled. Refer to the diagram below and select `Microsoft.Storage`.
#### Configure a Subnet to Enable a Storage Service Endpoint for Accessing the Blob Storage Service.
AutoMQ requires access to Azure Storage Service; therefore, all Subnets deploying AutoMQ must have the Storage Service Endpoint enabled. Refer to the diagram below and select `Microsoft.Storage`.