> ## Documentation Index
> Fetch the complete documentation index at: https://docs.automq.com/llms.txt
> Use this file to discover all available pages before exploring further.
# Manage Environment License
> Obtain and activate a prepaid license for an AutoMQ BYOC environment.
This document applies only to the prepaid billing model. If you are using an AWS environment, we recommend [Usage-Based Billing](/automq-cloud/subscriptions-and-billings/byoc-env-billings/usage-based-billing), which does not require License management.
Use this document to manage the environment license when you select prepaid billing for AutoMQ BYOC (Bring Your Own Cloud).
In this document, AutoMQ product service provider, AutoMQ service provider and AutoMQ each specifically refer to AutoMQ HK Limited.
## Obtaining a License
When a new user installs an AutoMQ BYOC environment for the first time, the environment includes a free trial license by default.
The default free trial license is valid for 14 days and provides 24 AKUs. For the definition of AKU, see [Billing Instructions for BYOC](/automq-cloud/subscriptions-and-billings/byoc-env-billings/billing-instructions-for-byoc).
Formal production environment users can purchase a license through the following channels:
Users can contact the AutoMQ technical team to purchase a license through [Obtaining Services▸](/automq-cloud/support/obtaining-services).
The AutoMQ BYOC subscription license is available on **AWS Marketplace** as [AutoMQ for Kafka (BYOC Monthly Subscription License)](https://aws.amazon.com/marketplace/pp/prodview-5jgdxi4mhl4rg). Use the following procedure:
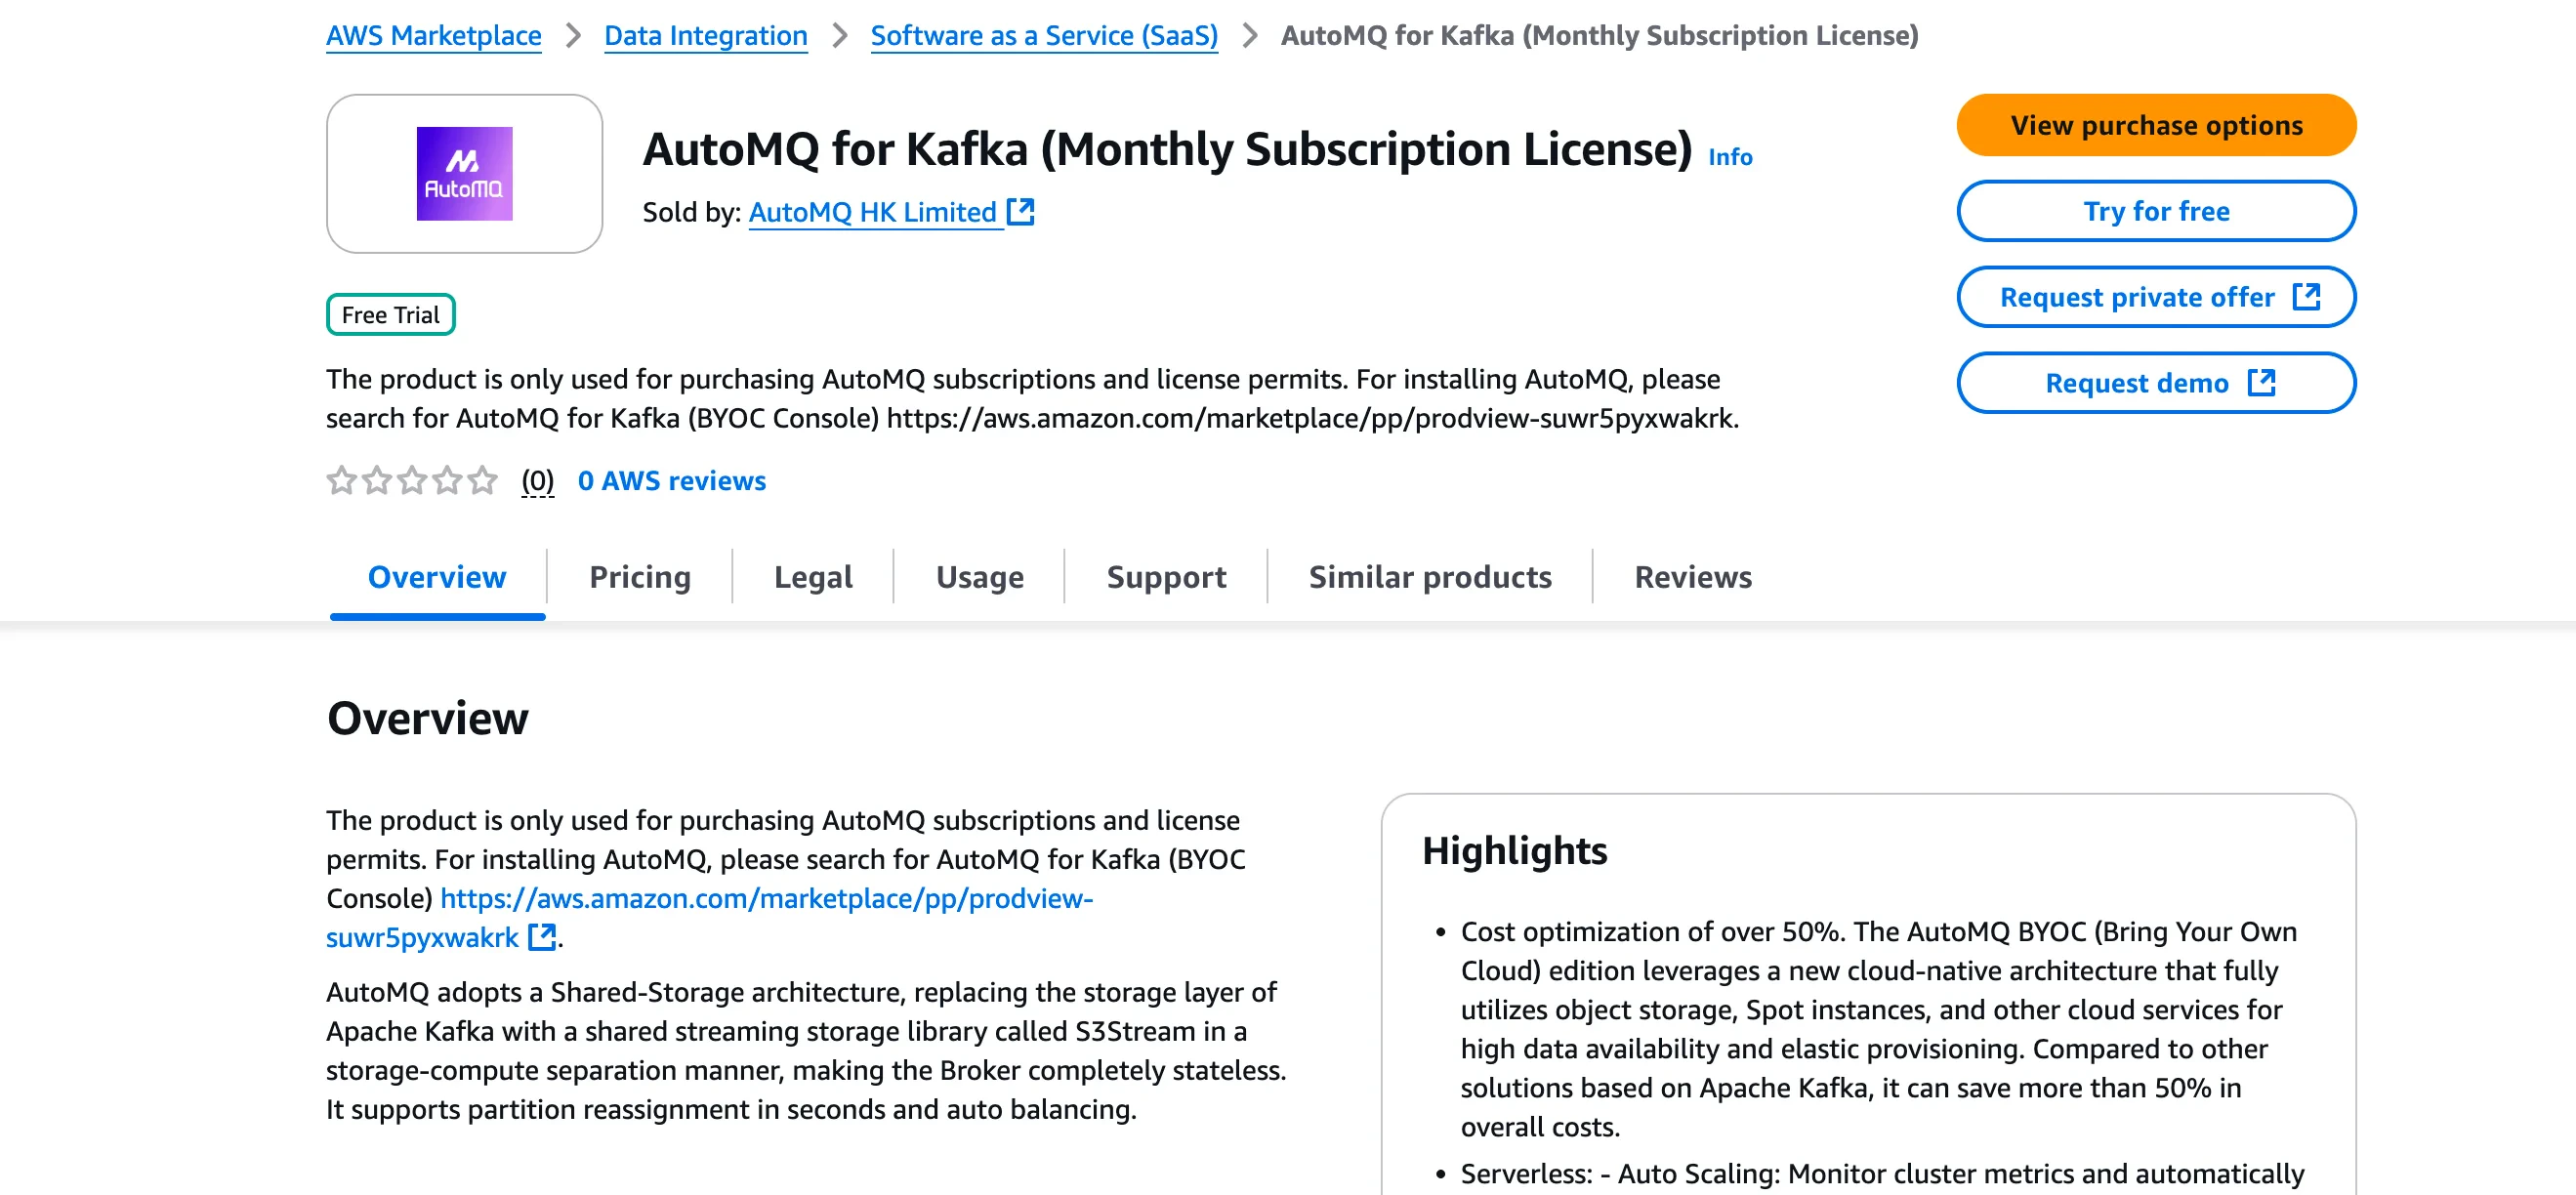
1. AWS users can visit Marketplace, search for AutoMQ or Kafka, locate [AutoMQ for Kafka (BYOC Monthly Subscription License)](https://aws.amazon.com/marketplace/pp/prodview-5jgdxi4mhl4rg), select the appropriate specification version and subscription period, then activate the subscription.
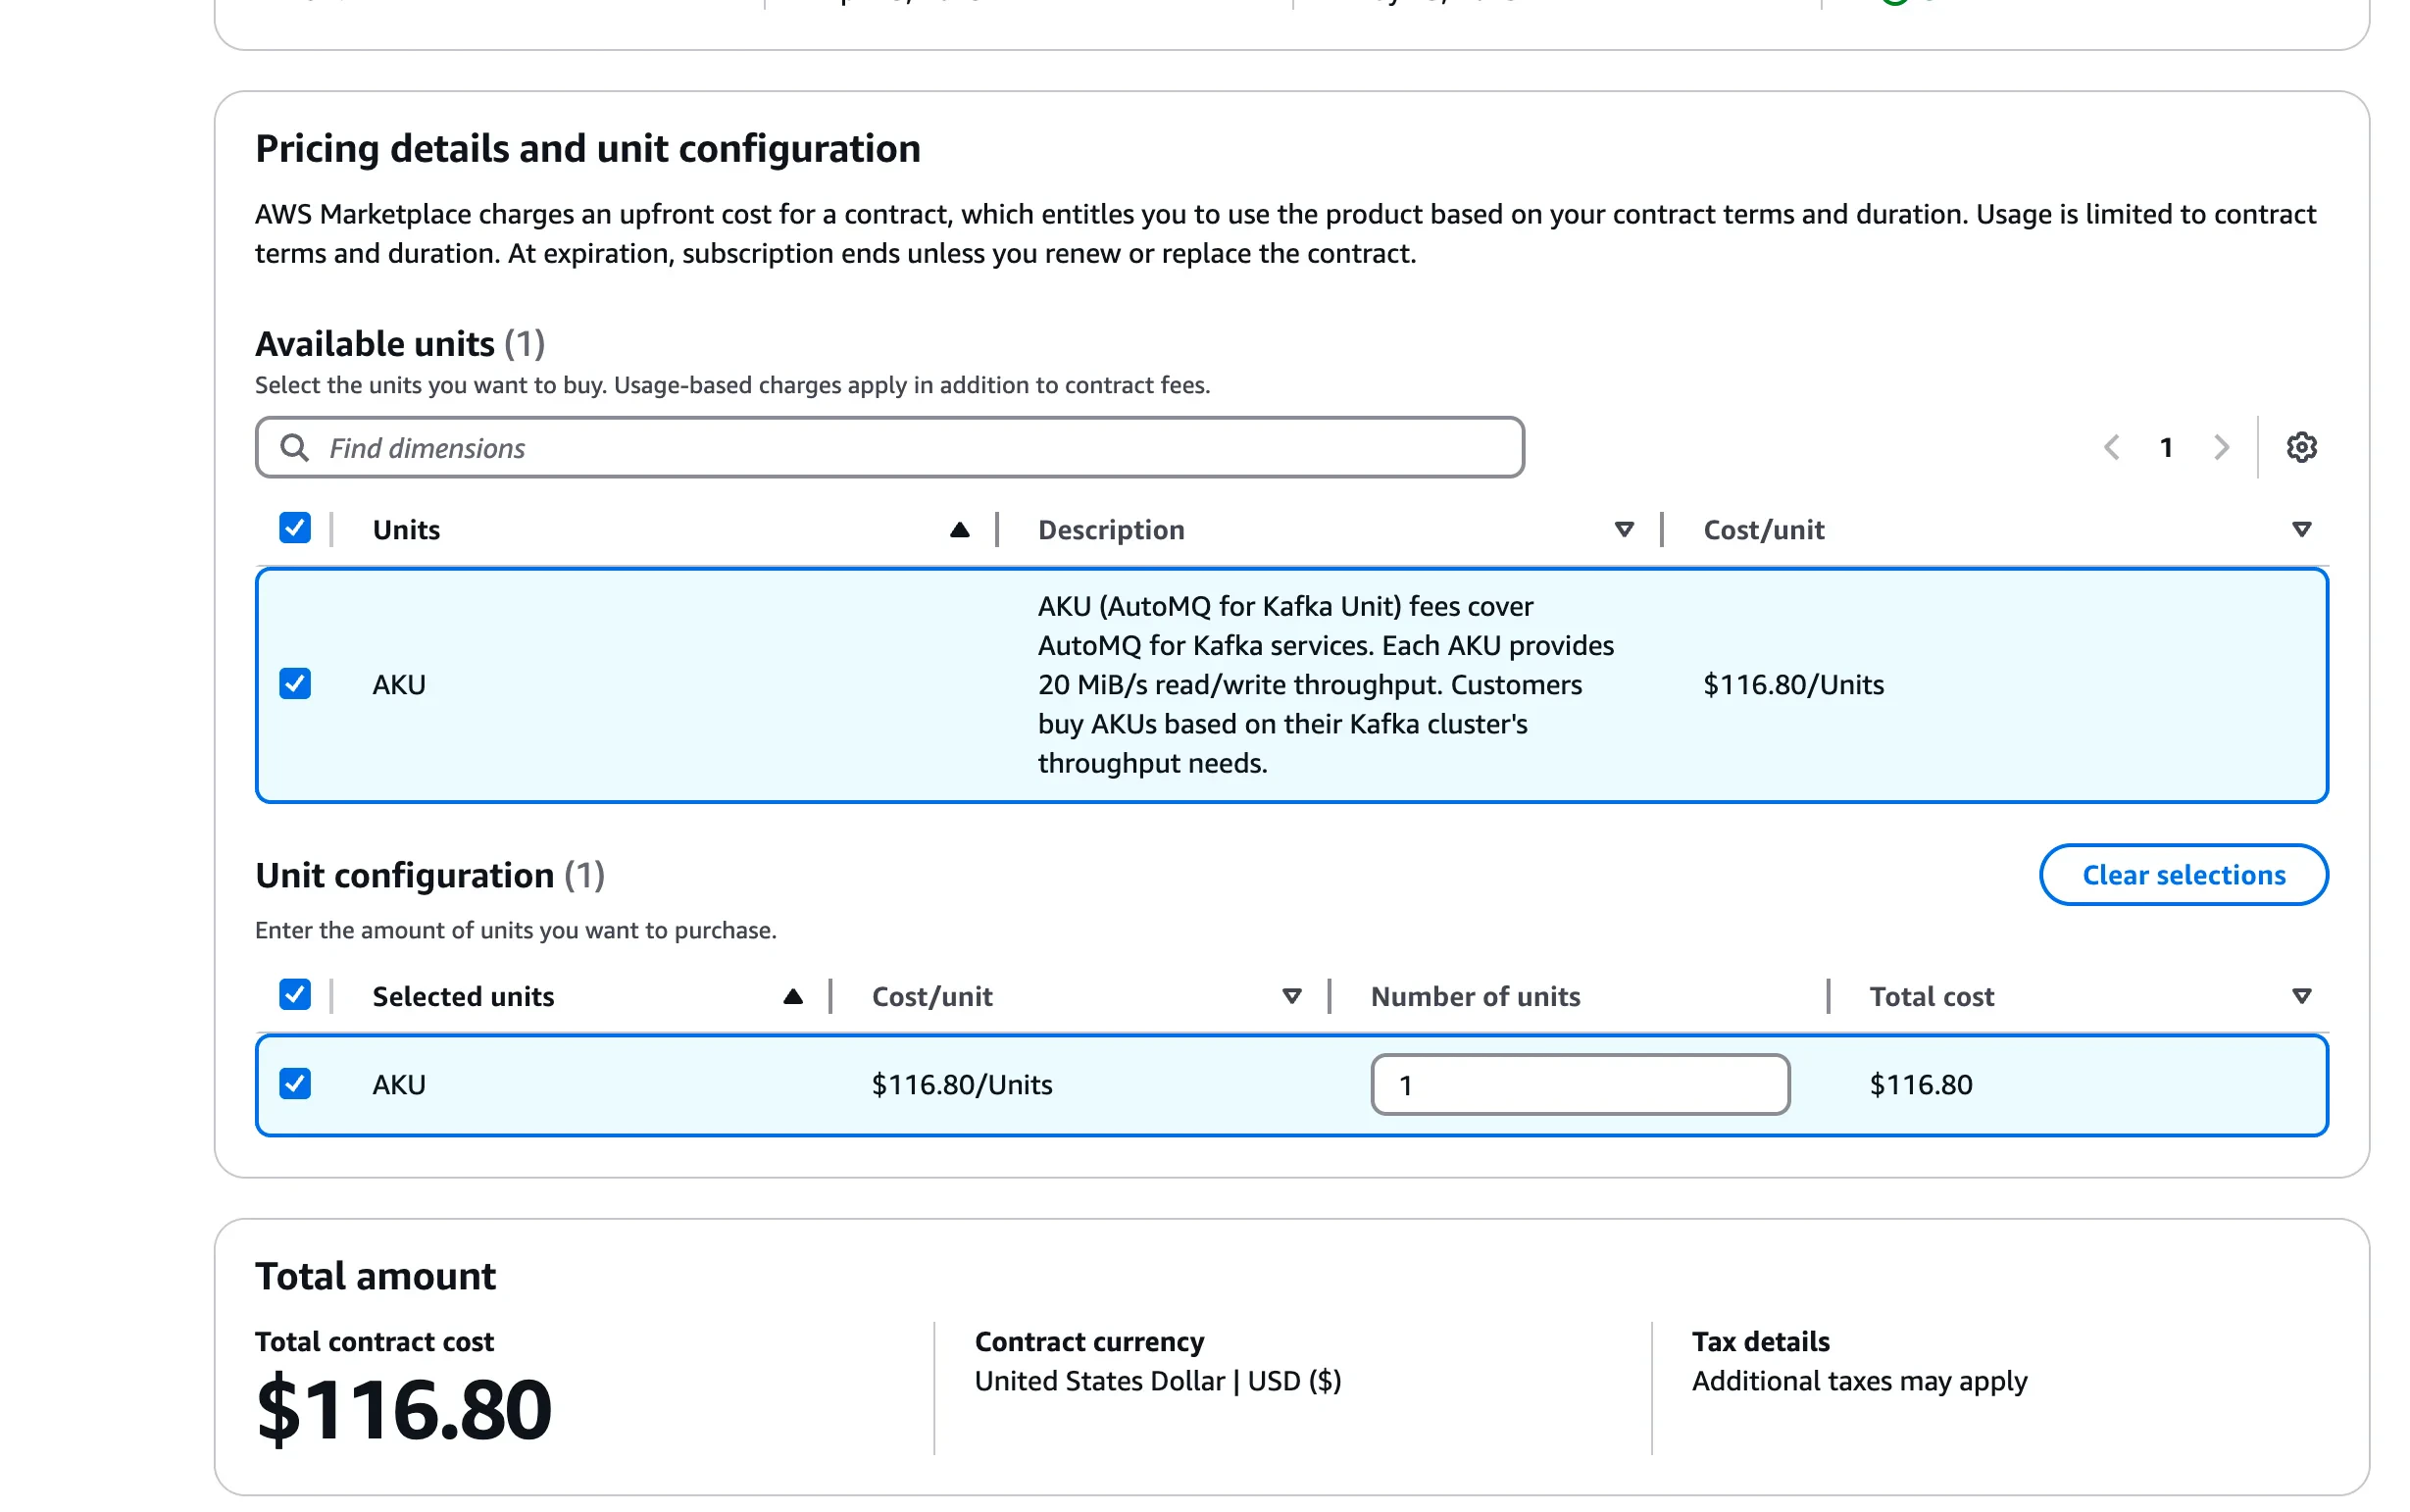
 2. Choose the desired subscription quantity and duration.
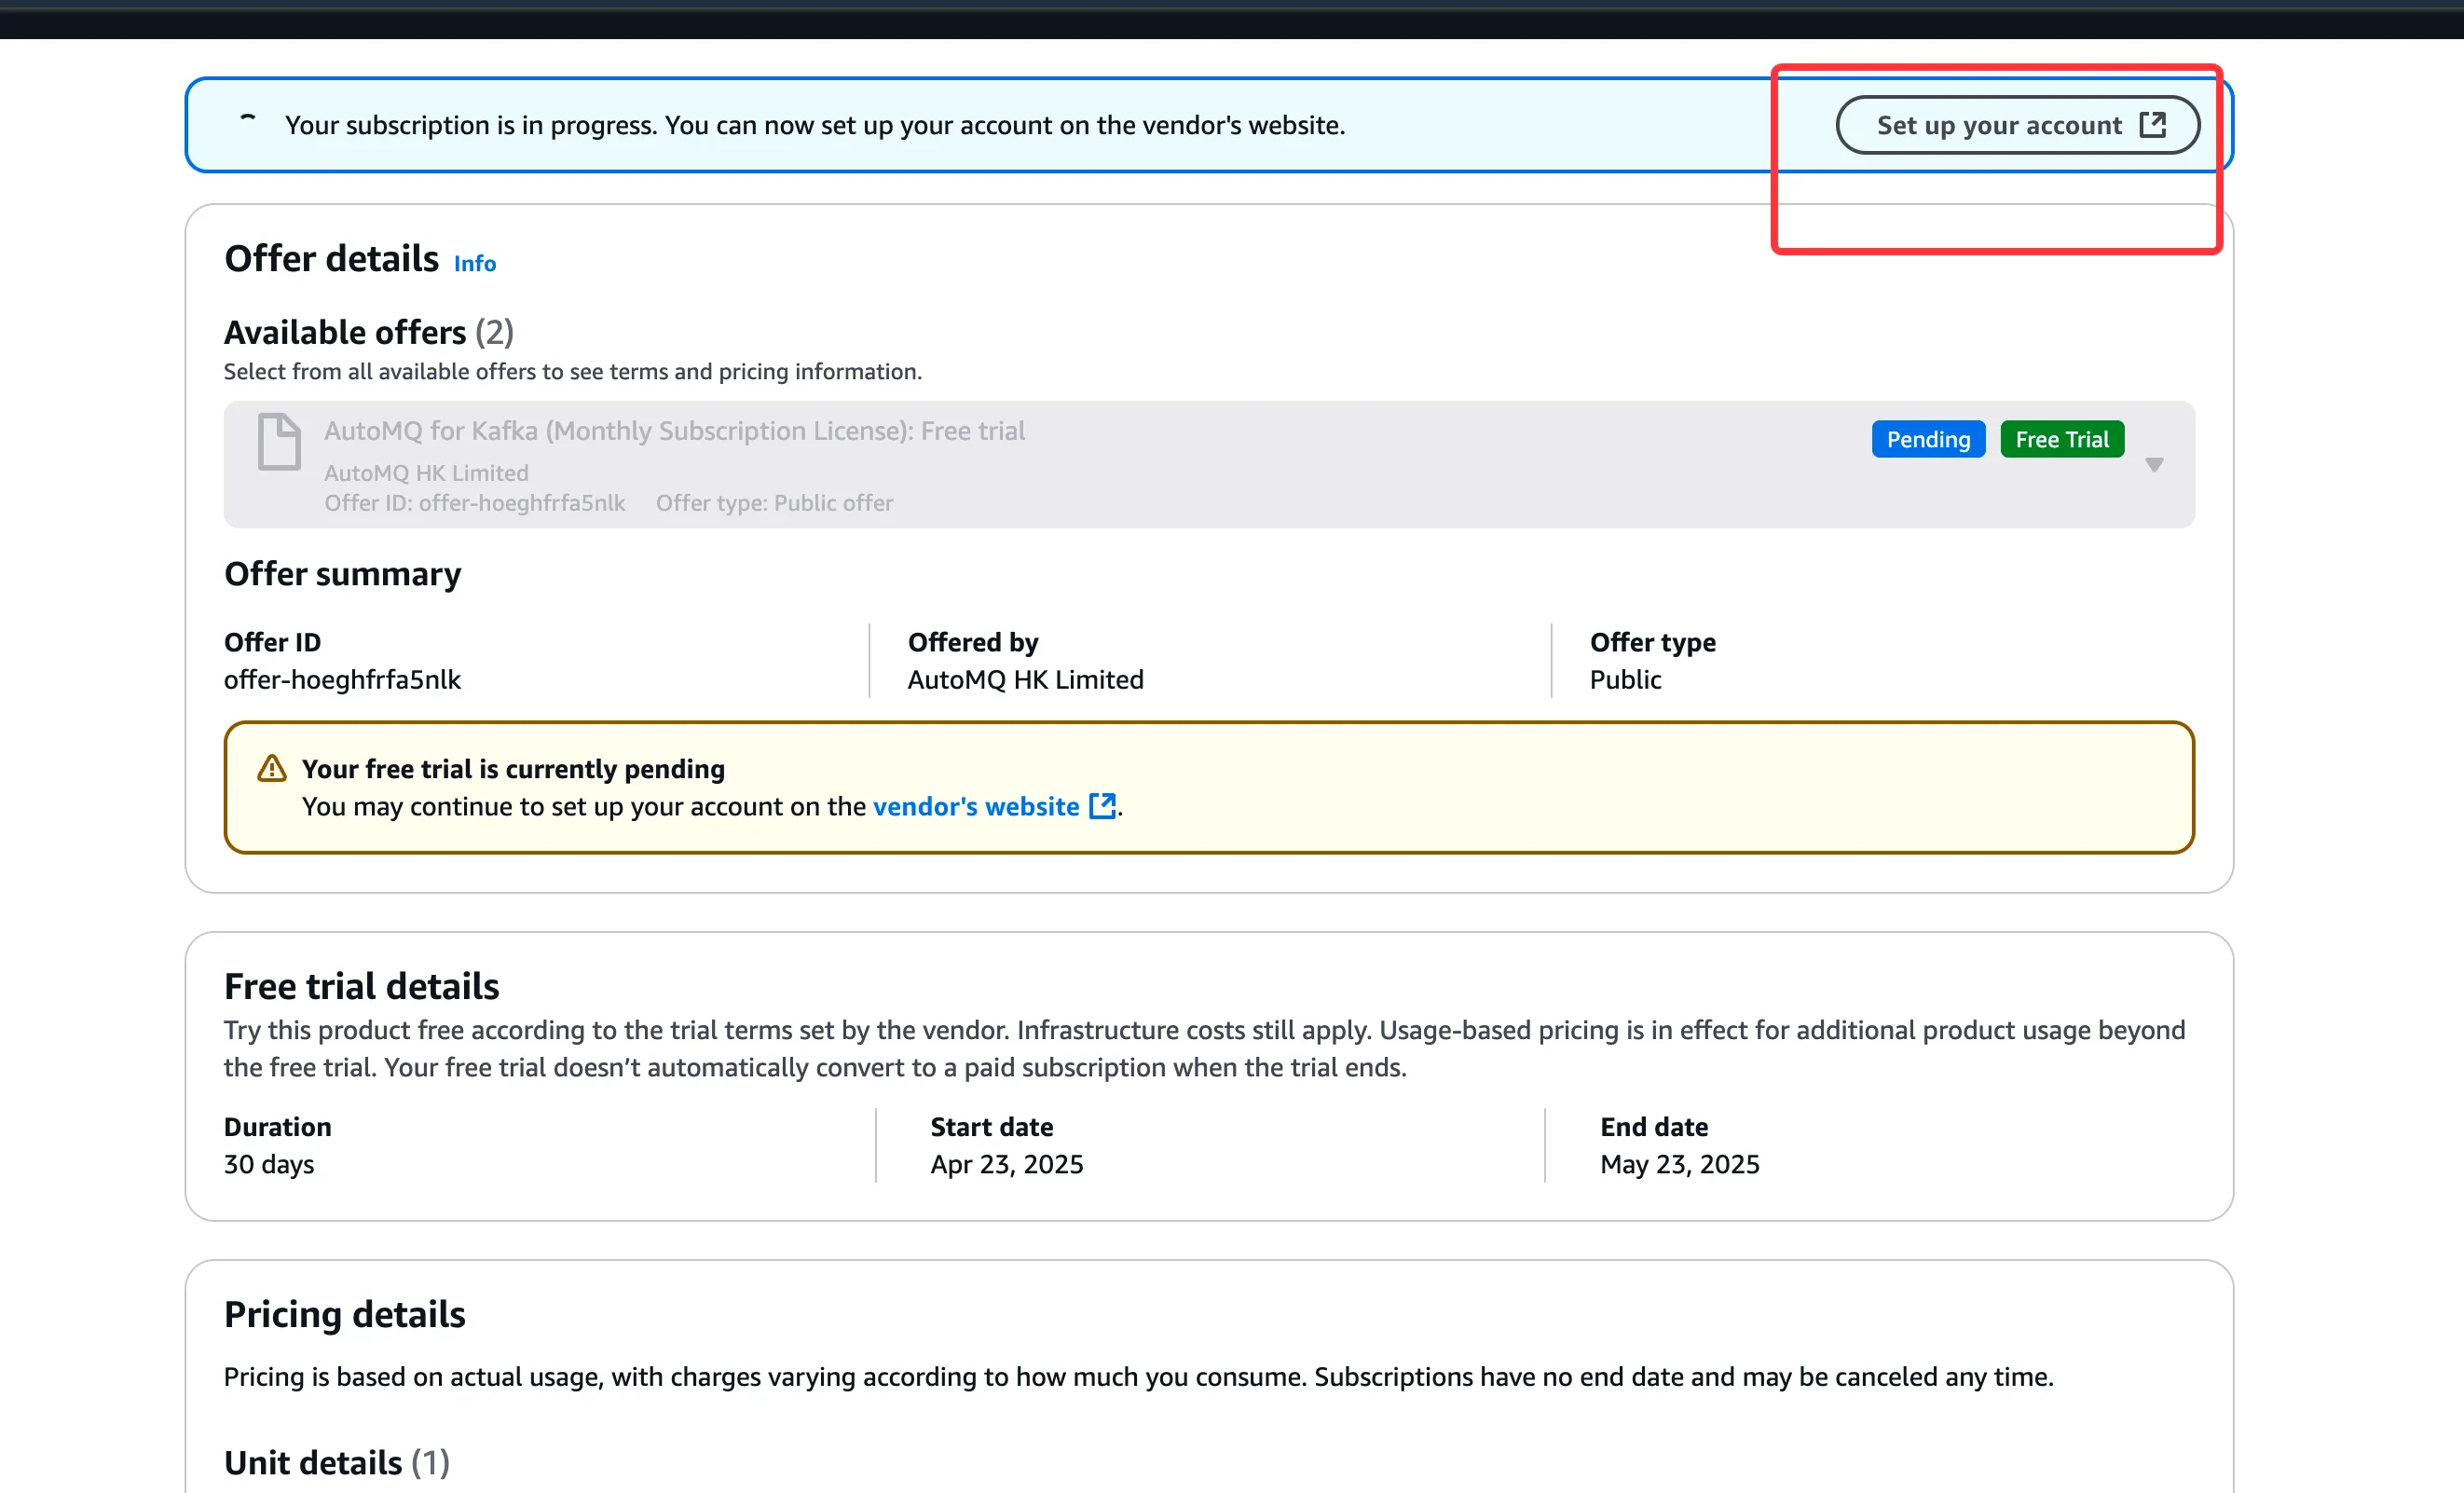
 3. After completing the purchase, click **Setup Product** to be redirected to the AutoMQ Contact page. Complete the License information and reach out to AutoMQ technical support to obtain the product key.
 Azure Marketplace provides the AutoMQ BYOC prepaid license as a SaaS offer. Azure Marketplace is the purchasing and billing channel; the AutoMQ control plane and data plane remain in your cloud environment.
1. Sign in to Azure and verify that your account can manage the applicable Billing Profile. For role details, see [Understand Microsoft Customer Agreement administrative roles in Azure](https://learn.microsoft.com/en-us/azure/cost-management-billing/manage/understand-mca-roles).
2. Open the [AutoMQ BYOC offer in Azure Marketplace](https://portal.azure.com/#view/Microsoft_Azure_Marketplace/GalleryItemDetailsBladeNopdl/id/automq.automq-byoc-license/selectionMode~/false/resourceGroupId//resourceGroupLocation//dontDiscardJourney~/false/selectedMenuId/home/launchingContext~/%7B%22galleryItemId%22%3A%22automq.automq-byoc-licenseaku%22%2C%22source%22%3A%5B%22GalleryFeaturedMenuItemPart%22%2C%22VirtualizedTileDetails%22%5D%2C%22menuItemId%22%3A%22home%22%2C%22subMenuItemId%22%3A%22Search%20results%22%2C%22telemetryId%22%3A%22de8e32d0-4735-4d9d-bc96-23813e277828%22%7D/searchTelemetryId/faa4a435-a76d-4e3b-ac22-138f431b9a50).
3. Choose **Subscribe**, select the Resource Group, enter a subscription name, and configure renewal according to your procurement policy.
4. After Azure creates the subscription, choose **Set up product account** and complete the requested account synchronization.
5. Contact [AutoMQ Support](/automq-cloud/support/obtaining-services) with the subscription information and Environment Installation ID to obtain the product key.
For negotiated pricing or discounts, request an Azure Marketplace Private Offer from AutoMQ before subscribing.
## Using the License to Activate the Environment
After installing the user BYOC environment and purchasing the License, refer to the documentation below for environment activation.
### Operational Steps
1. Log in to the BYOC environment console and navigate to the **Settings** page.
Azure Marketplace provides the AutoMQ BYOC prepaid license as a SaaS offer. Azure Marketplace is the purchasing and billing channel; the AutoMQ control plane and data plane remain in your cloud environment.
1. Sign in to Azure and verify that your account can manage the applicable Billing Profile. For role details, see [Understand Microsoft Customer Agreement administrative roles in Azure](https://learn.microsoft.com/en-us/azure/cost-management-billing/manage/understand-mca-roles).
2. Open the [AutoMQ BYOC offer in Azure Marketplace](https://portal.azure.com/#view/Microsoft_Azure_Marketplace/GalleryItemDetailsBladeNopdl/id/automq.automq-byoc-license/selectionMode~/false/resourceGroupId//resourceGroupLocation//dontDiscardJourney~/false/selectedMenuId/home/launchingContext~/%7B%22galleryItemId%22%3A%22automq.automq-byoc-licenseaku%22%2C%22source%22%3A%5B%22GalleryFeaturedMenuItemPart%22%2C%22VirtualizedTileDetails%22%5D%2C%22menuItemId%22%3A%22home%22%2C%22subMenuItemId%22%3A%22Search%20results%22%2C%22telemetryId%22%3A%22de8e32d0-4735-4d9d-bc96-23813e277828%22%7D/searchTelemetryId/faa4a435-a76d-4e3b-ac22-138f431b9a50).
3. Choose **Subscribe**, select the Resource Group, enter a subscription name, and configure renewal according to your procurement policy.
4. After Azure creates the subscription, choose **Set up product account** and complete the requested account synchronization.
5. Contact [AutoMQ Support](/automq-cloud/support/obtaining-services) with the subscription information and Environment Installation ID to obtain the product key.
For negotiated pricing or discounts, request an Azure Marketplace Private Offer from AutoMQ before subscribing.
## Using the License to Activate the Environment
After installing the user BYOC environment and purchasing the License, refer to the documentation below for environment activation.
### Operational Steps
1. Log in to the BYOC environment console and navigate to the **Settings** page.
 2. Gather the environment **Installation ID** and configure the license information purchased in the previous step. Contact AutoMQ technical personnel to obtain the activation **product key**.
The product key for environment activation will be in a format similar to the following:
```text theme={null}
eyJpbnN0YWxsSWQiOiJmMGQzZDRlNmJmMjhjNTBjNGM3M2RjNzdkZTUzYTZiOSIsImVudmlyb25txxxxxxxdXRvTVEgZm9yIEthZmthICggQllPQyBNb250aGx5IFN1YnNjcmlwdGlvxxxxaWNlbnNlICkifX19
```
3. Return to the **Settings** page and click **Update product license**. Enter the product key to complete environment activation. You can then proceed to create instances normally.
2. Gather the environment **Installation ID** and configure the license information purchased in the previous step. Contact AutoMQ technical personnel to obtain the activation **product key**.
The product key for environment activation will be in a format similar to the following:
```text theme={null}
eyJpbnN0YWxsSWQiOiJmMGQzZDRlNmJmMjhjNTBjNGM3M2RjNzdkZTUzYTZiOSIsImVudmlyb25txxxxxxxdXRvTVEgZm9yIEthZmthICggQllPQyBNb250aGx5IFN1YnNjcmlwdGlvxxxxaWNlbnNlICkifX19
```
3. Return to the **Settings** page and click **Update product license**. Enter the product key to complete environment activation. You can then proceed to create instances normally.