> ## Documentation Index
> Fetch the complete documentation index at: https://docs.automq.com/llms.txt
> Use this file to discover all available pages before exploring further.
# Upgrade Environment Version
> Upgrade your AutoMQ BYOC environment version on Alibaba Cloud or AWS for improved functionality and bug fixes. Ensure seamless updates with our step-by-step guide.
When using AutoMQ BYOC, users can refer to this document to upgrade the BYOC environment console version as needed to receive updates and fix bugs.
The terms AutoMQ product service provider, AutoMQ service provider, and AutoMQ mentioned in this document specifically refer to AutoMQ HK Limited.
AutoMQ BYOC environments will produce updated versions as functionalities evolve. Users can refer to the [Release Notes▸](/automq-cloud/release-notes) to view the corresponding versions and choose to upgrade the environment version.
## Upgrade Operation
### AWS
For upgrading the environment version in AWS, this document is divided into two sub-sections, applicable for versions **>= 8.0** and versions **\< 8.0**.
#### Version >= 8.0
Starting from version 8.0, the AutoMQ environment console is installed and managed via Docker. Therefore, upgrading the version only requires updating the Docker image and restarting the container.
**Steps**
1. **Check the version number**
Go to the [Release Notes](/automq-cloud/release-notes) to confirm the target version number you wish to upgrade to.
2. **Get the installation command**
Log in to the AutoMQ official website, find the metadata for your current environment, and copy the `docker run` command used for the initial installation.
3. **Update and restart the container**
On the host machine where the console is located, stop and remove the old container, then re-run the installation command with the new version number.
For example, if your initial installation command was:
```bash theme={null}
# Initial installation command example
sudo docker run -d -v /home/admin:/root \
-p 8080:8080 \
-e CLOUD_PROVIDER=aws \
-e REGION=ap-northeast-1 \
-e OPS_BUCKET=automq-ops-xxxx \
-e CONSOLE_INITIAL_USER=admin \
-e CONSOLE_INITIAL_PASSWORD=admin \
-e CLIENT_ID=env-xxxx \
-e CLIENT_SECRET=xxx \
xxx/automq/automq_byoc_console:8.0.0
```
To upgrade to version `8.0.1`, you can perform the following actions:
```bash theme={null}
# 1. Stop and remove the old container
sudo docker stop automq_byoc_console
sudo docker rm automq_byoc_console
# 2. Start the new container with the new version number
sudo docker run -d -v /home/admin:/root \
-p 8080:8080 \
-e CLOUD_PROVIDER=aws \
-e REGION=ap-northeast-1 \
-e OPS_BUCKET=automq-ops-xxxx \
-e CONSOLE_INITIAL_USER=admin \
-e CONSOLE_INITIAL_PASSWORD=admin \
-e CLIENT_ID=env-xxxx \
-e CLIENT_SECRET=xxx \
xxx/automq/automq_byoc_console:8.0.1
```
After the upgrade is complete, you can log back into the AutoMQ environment console to verify that the new version is active.
#### Version \< 8.0
If your AutoMQ BYOC environment is older than version 8.0 and was installed via Marketplace CloudFormation on AWS, then upgrading to an updated 7.x version also needs to be done via CloudFormation.
If you want to upgrade from a 7.x version to an 8.x version, please refer to the [BYOC Console Upgrade to 8.x Guide](/automq-cloud/appendix/byoc-console-upgrade-to-8.x-guide).
**Steps**
Log in to the cloud account associated with the Console or a sub-account with authorization capabilities, and navigate to the Marketplace Console.
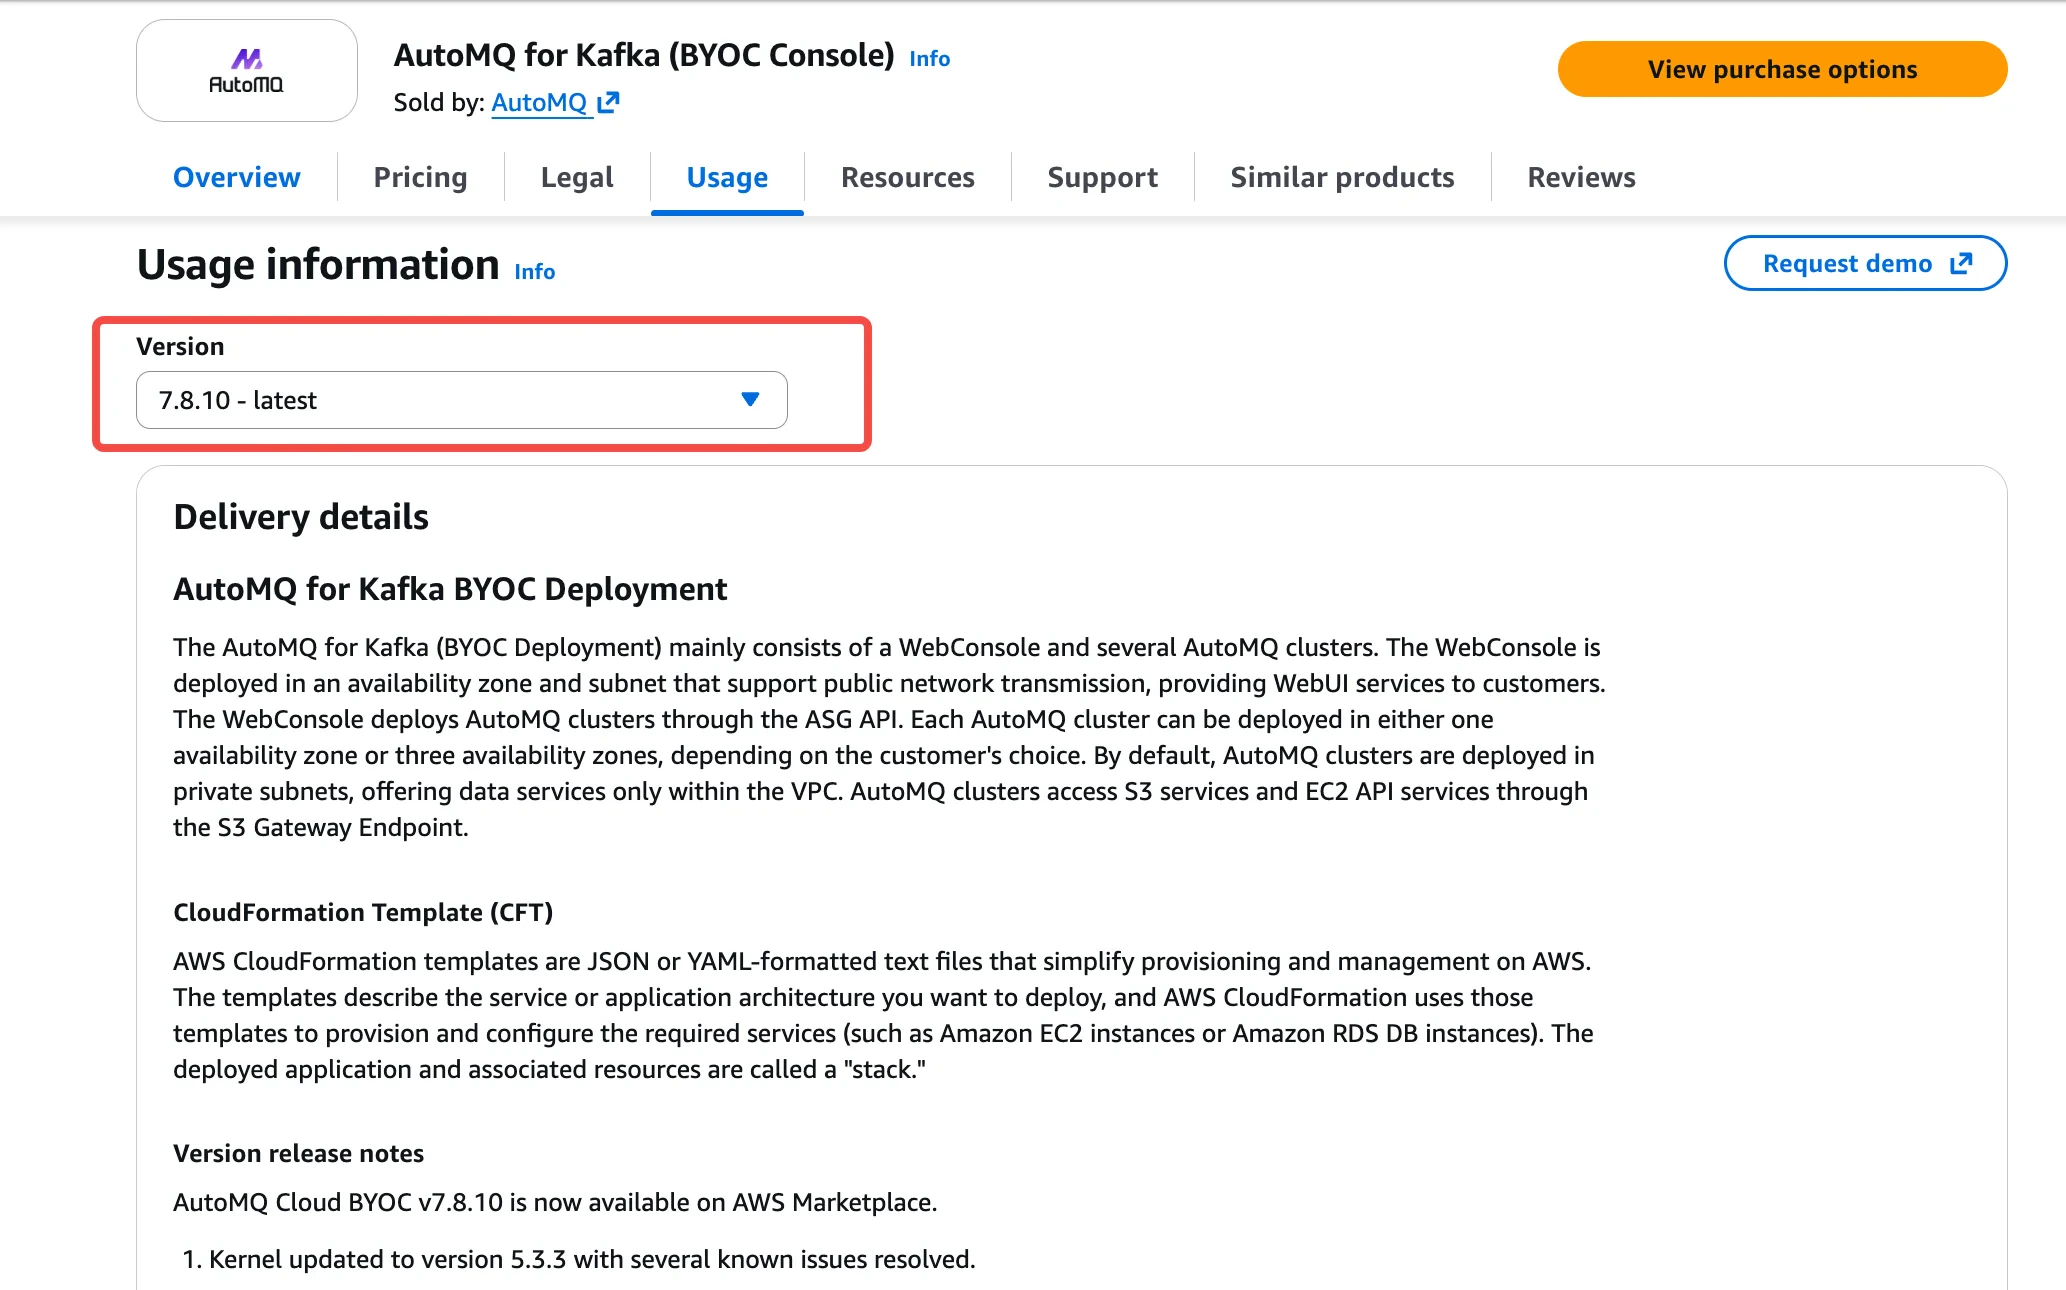
1. **Go to the Marketplace to check the latest version**. Visit the [AWS Marketplace product page](https://aws.amazon.com/marketplace/pp/prodview-suwr5pyxwakrk), select the target version you wish to upgrade to; it is recommended to upgrade to the most recent 'Latest' version.
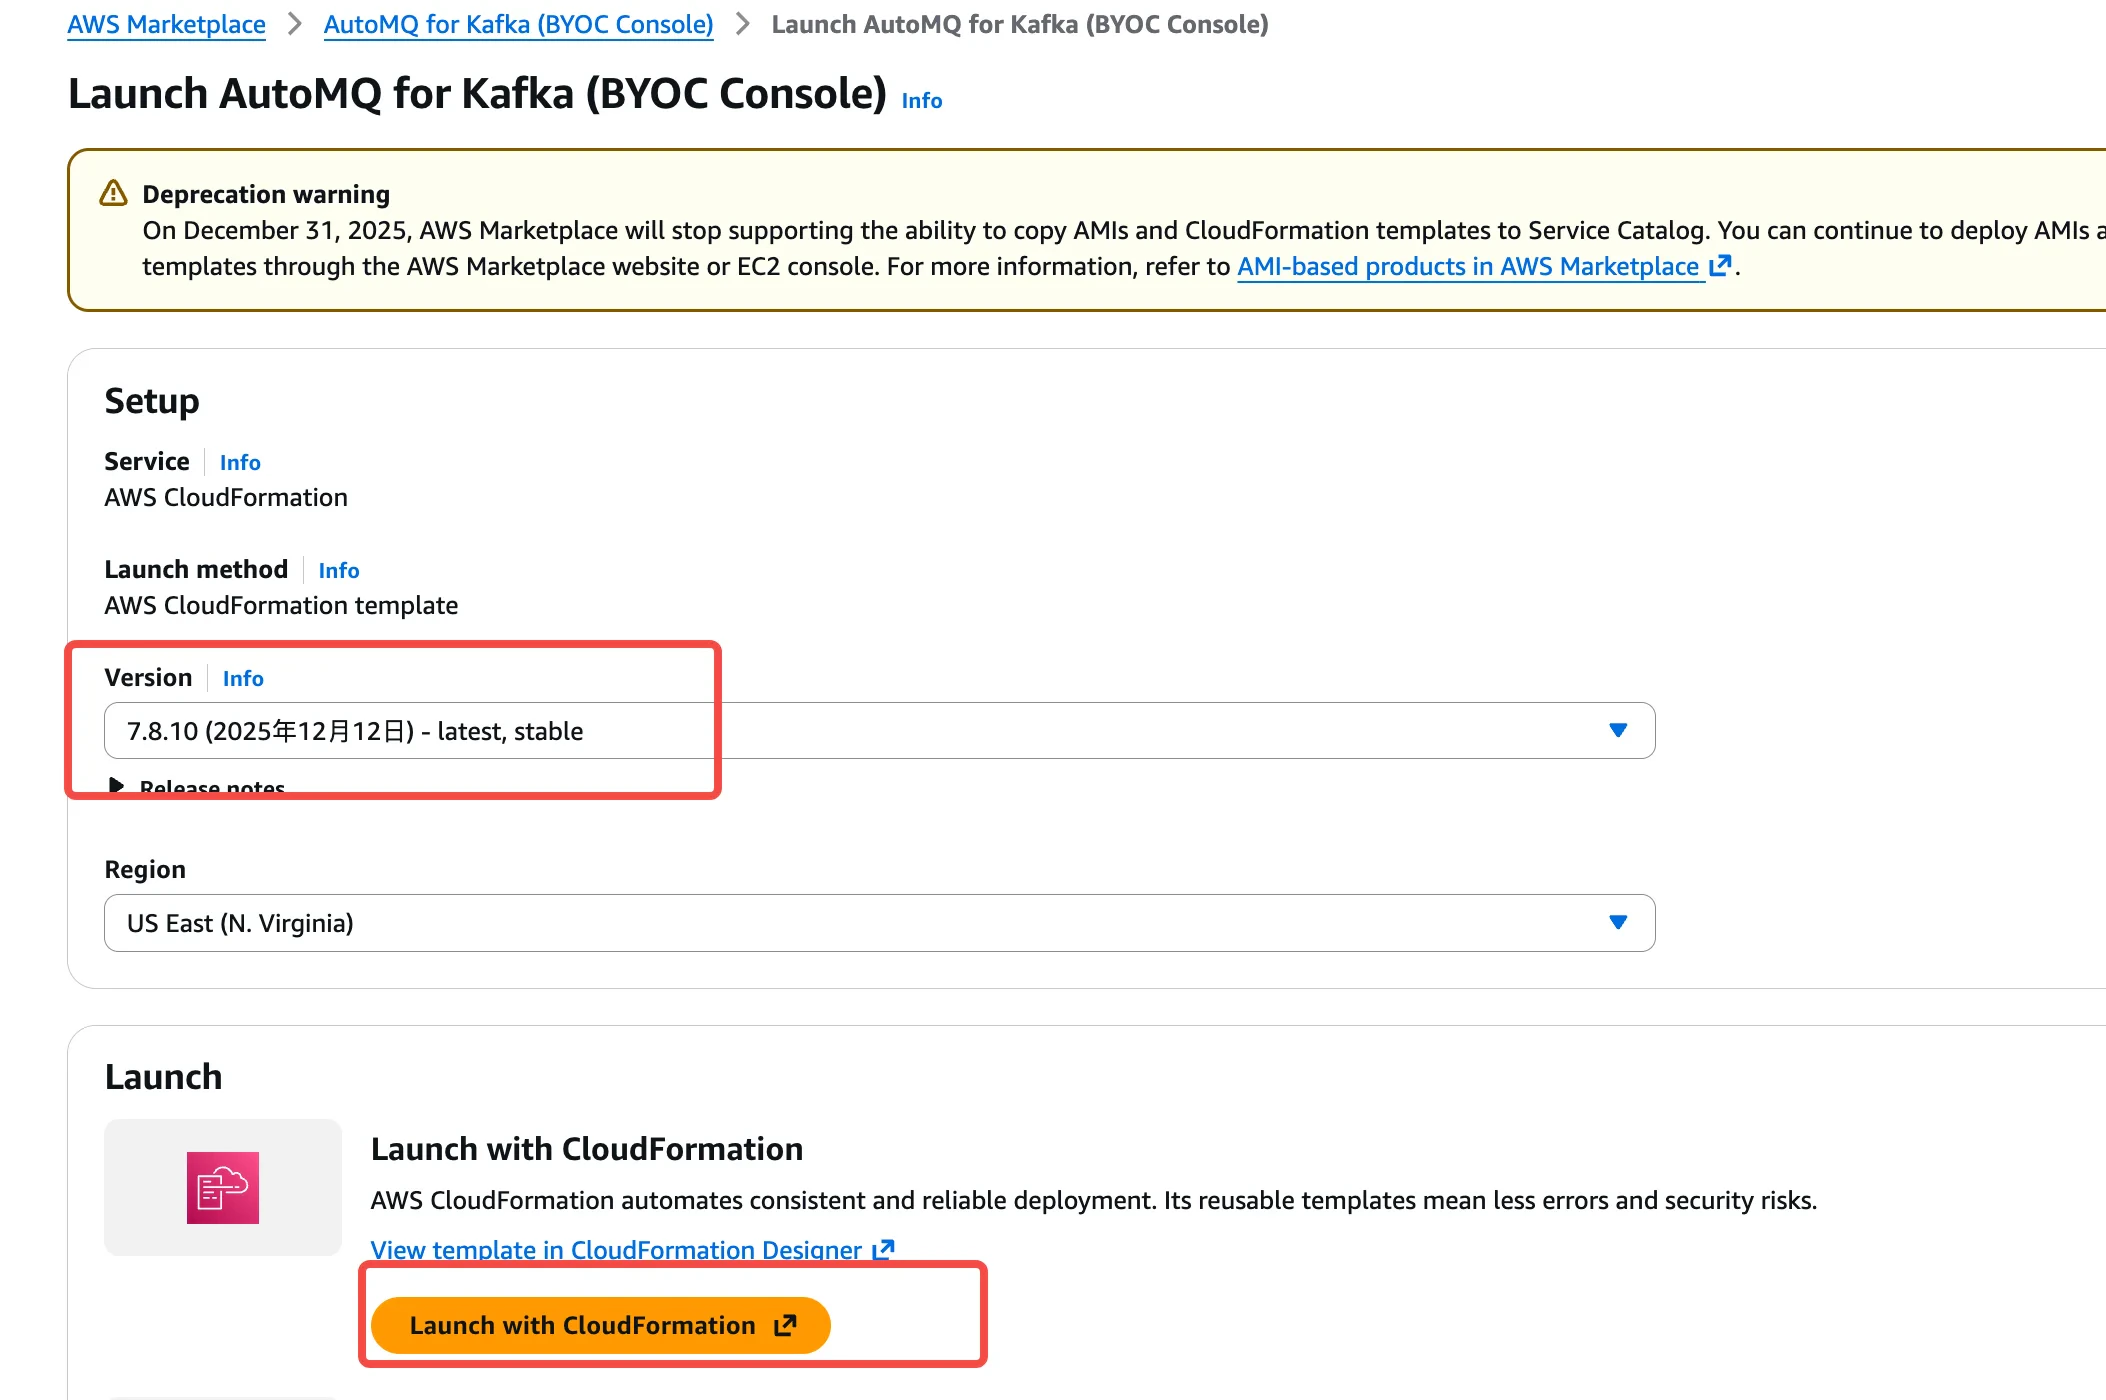
 2. **Select the desired upgrade version.** Click "Launch with CloudFormation".
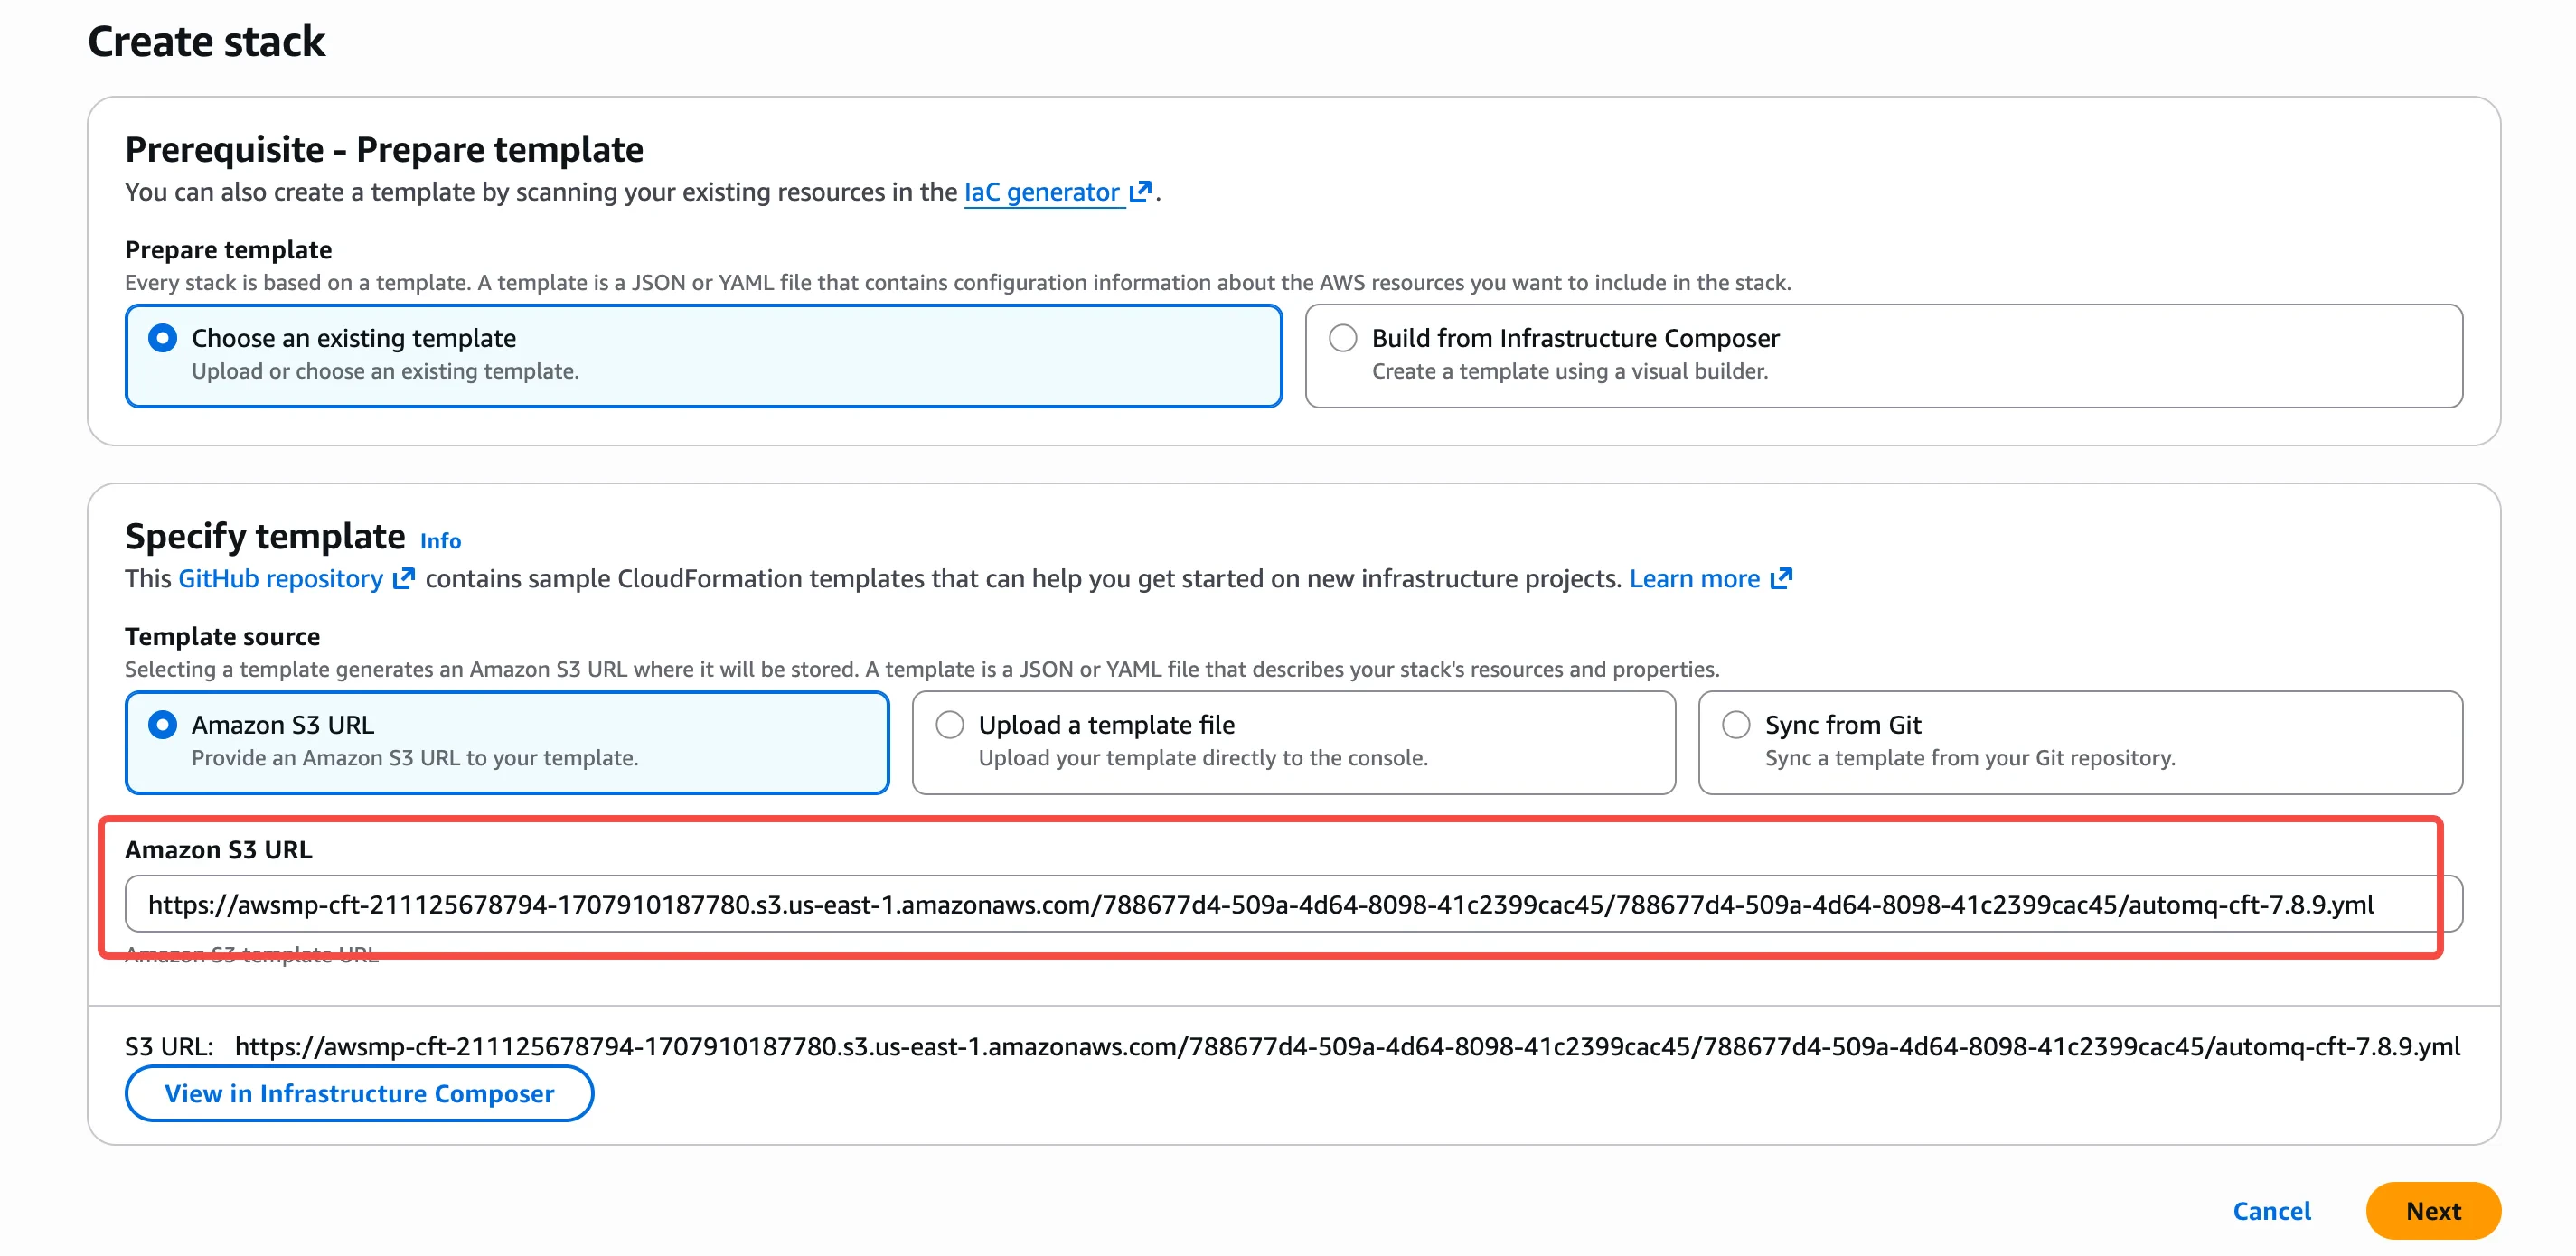
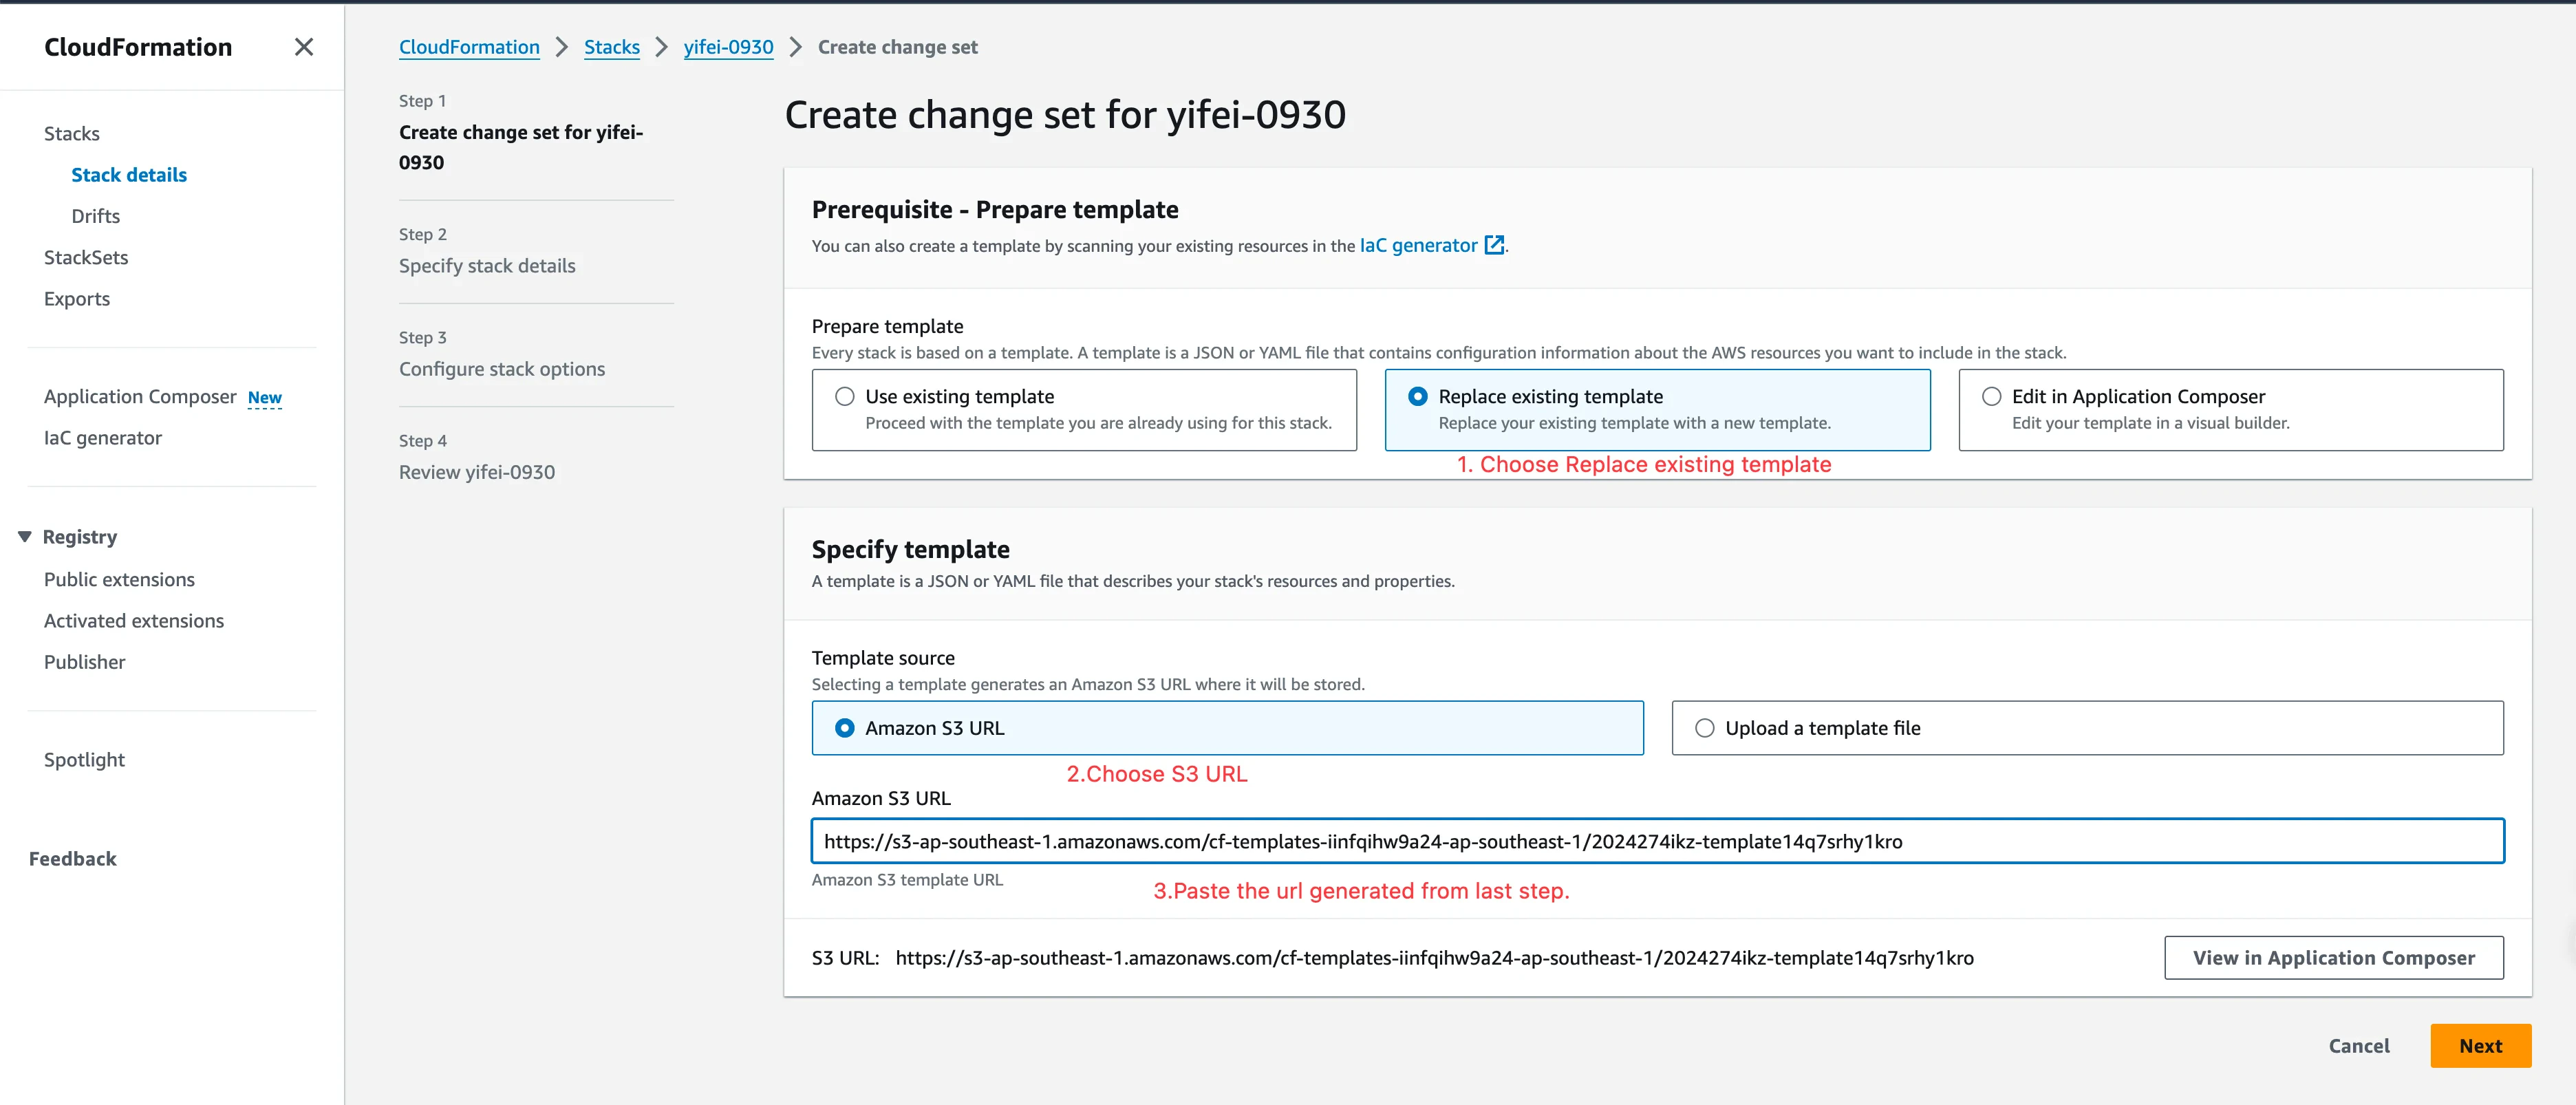
 3. **Copy the new version's CloudFormation Template URL.**
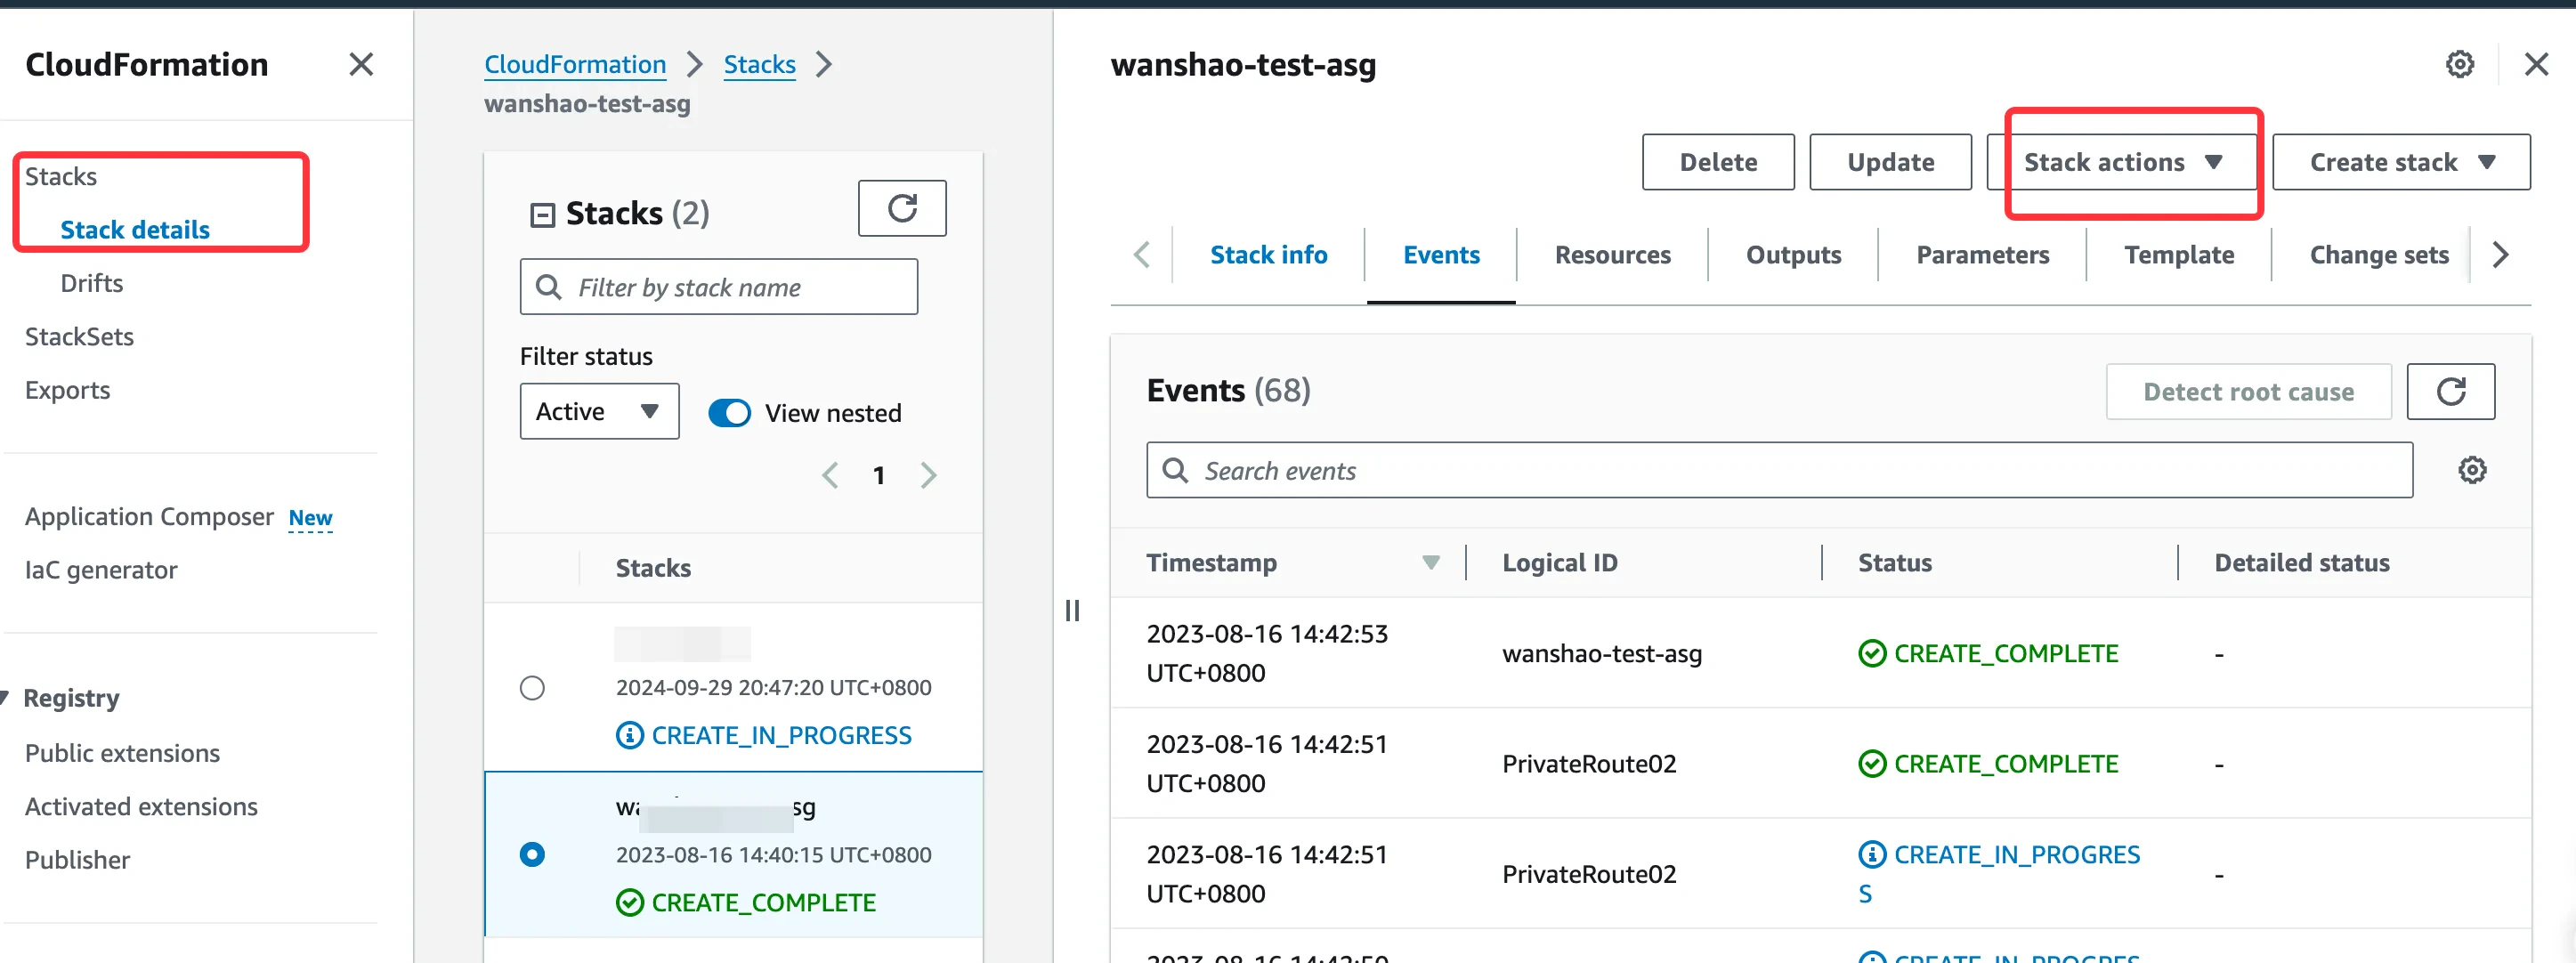
 4. **Go to the Stack list page and find the Stack that deploys the AutoMQ BYOC environment.** Access the CloudFormation console, click on **Stacks** in the left navigation bar to enter the list page. Search for the Stack corresponding to the current environment and click **Stack Actions**.
 5. Find the operations supported by Stack, then click **Replace existing template, create ChangeSet.**
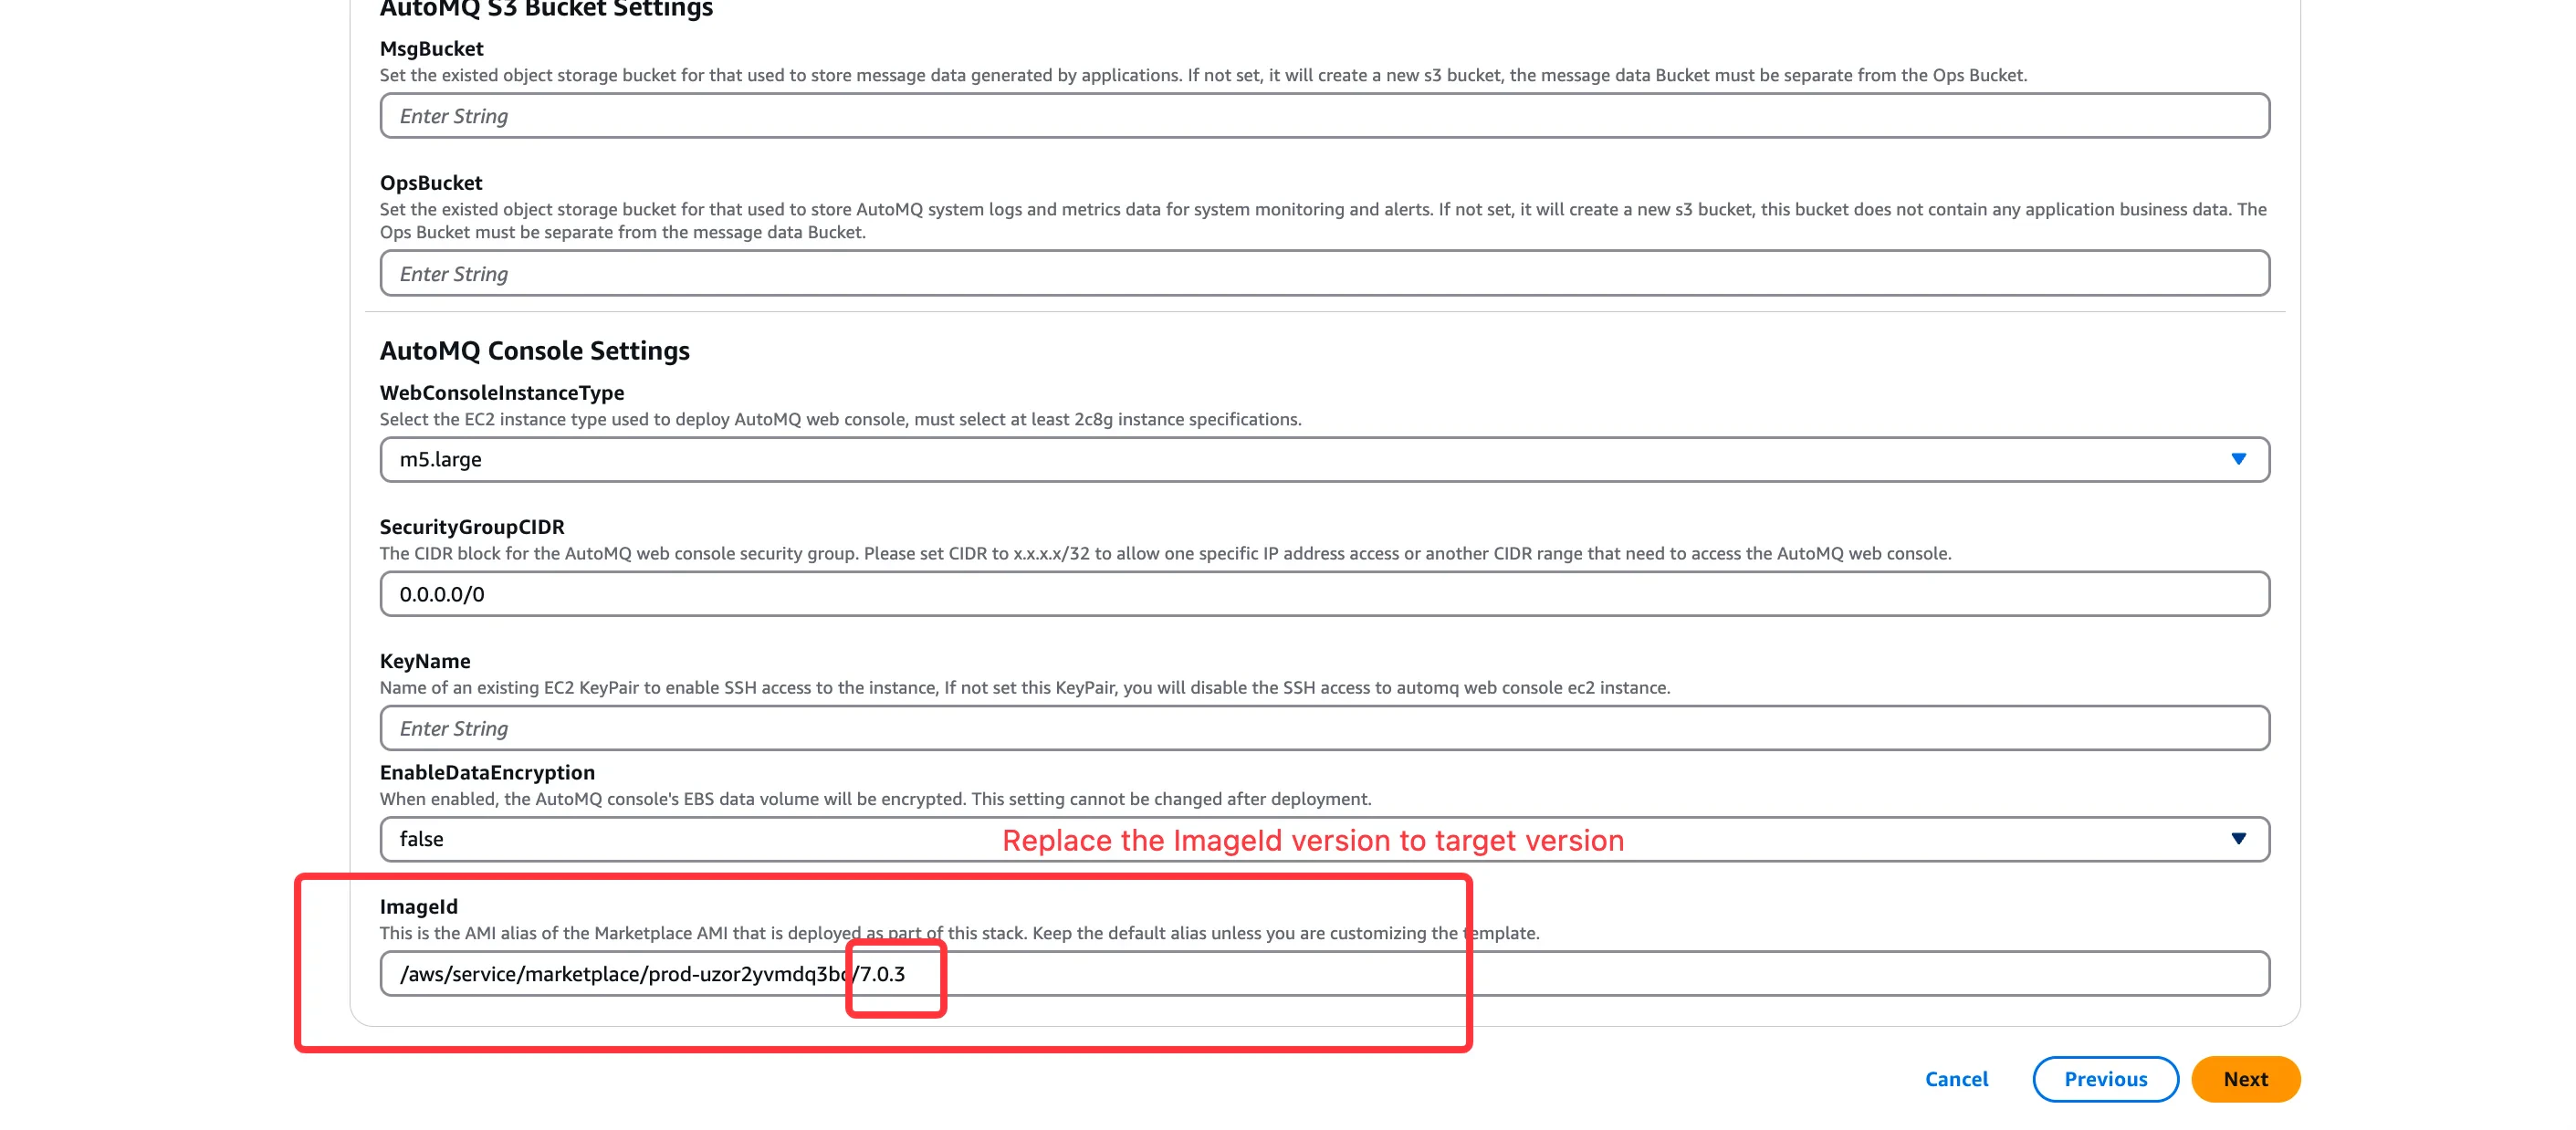
 6. Update the ImageId to the target version. For example, substitute **7.0.3 with 7.1.0**.
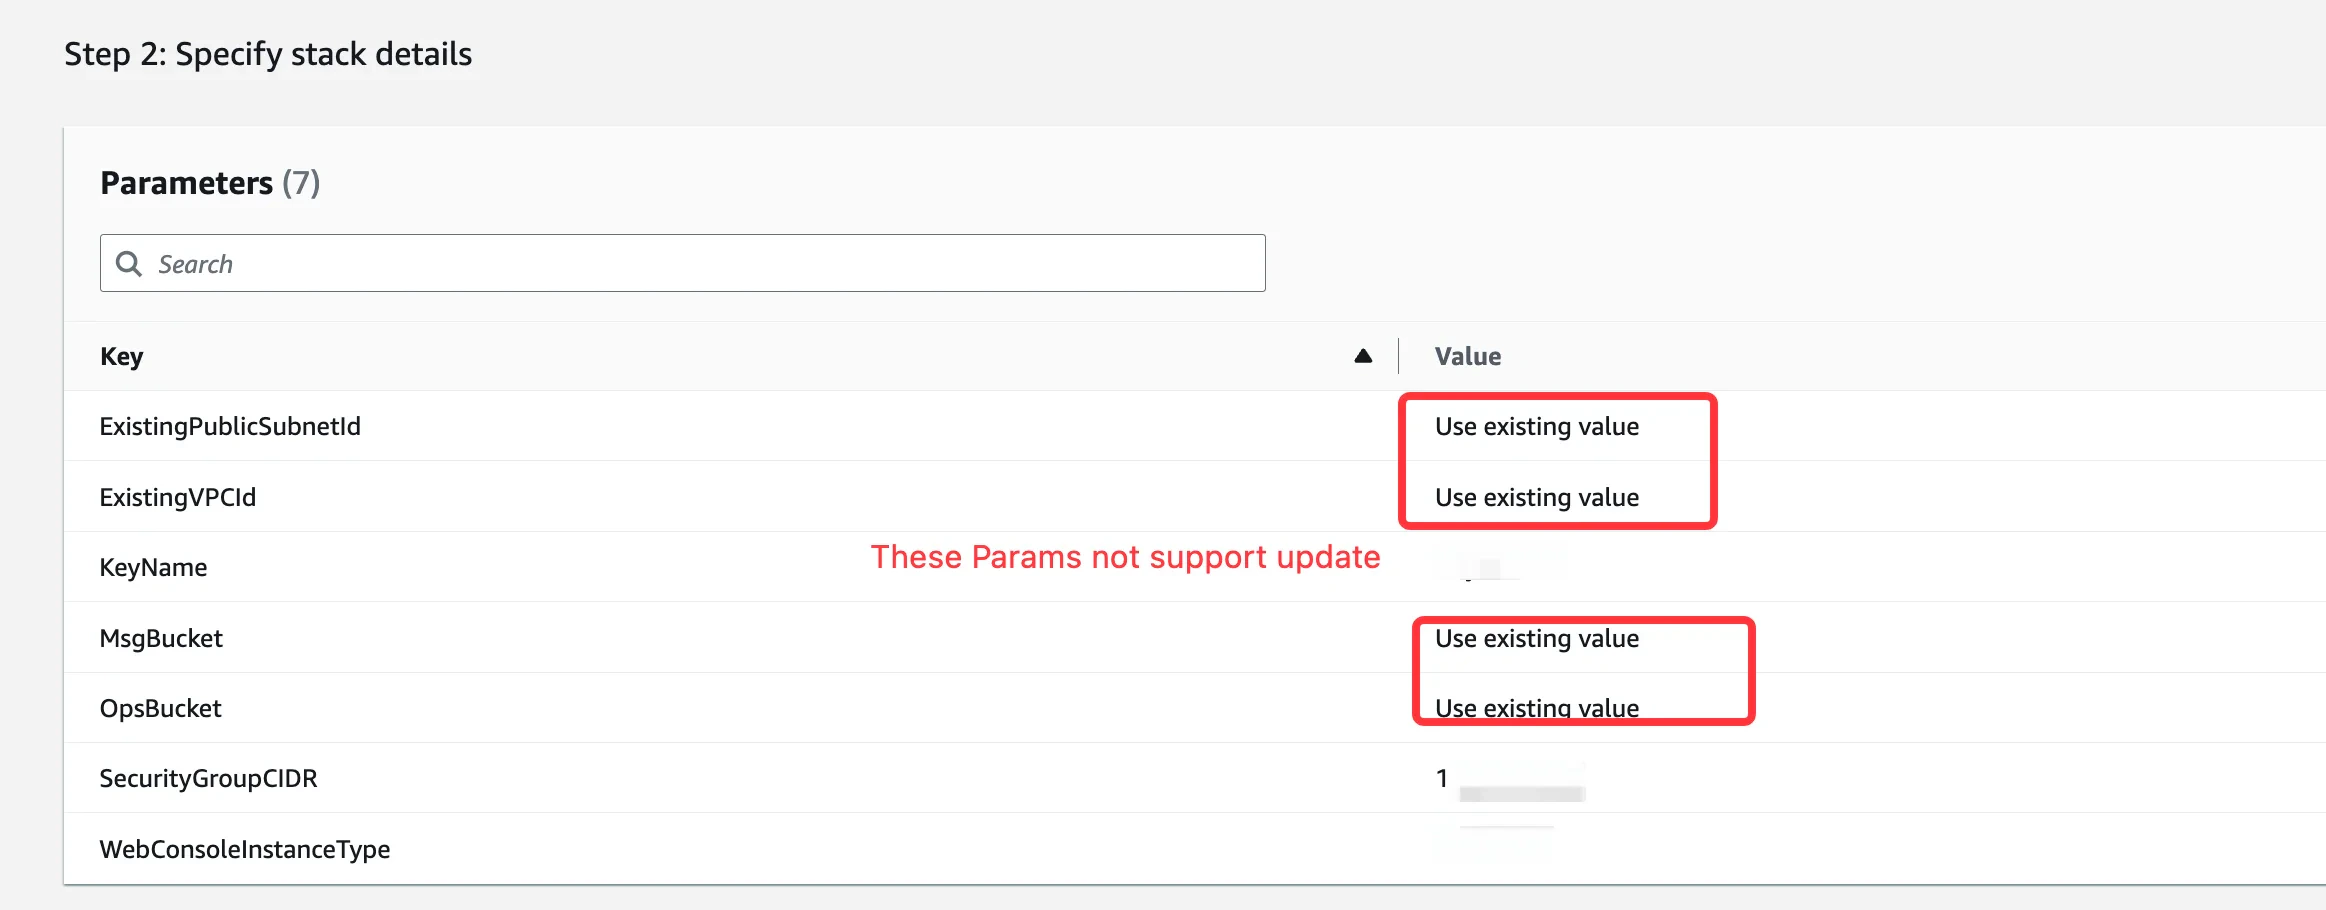
 **Warning:**
When creating the ChangeSet, aside from the new version Template update, the following parameters cannot be changed; otherwise, the environment may become unstable:
ExistingVPCId: After the environment is set up, the VPC cannot be altered.
ExistingPublicSubnetId: Once the environment installation is complete, you cannot modify the subnet where the environment console resides.
MsgBucket: Once the environment installation is complete, the MsgBucket cannot be changed.
OpsBucket: After the installation of the environment is finalized, the OpsBucket is not alterable.
**Warning:**
When creating the ChangeSet, aside from the new version Template update, the following parameters cannot be changed; otherwise, the environment may become unstable:
ExistingVPCId: After the environment is set up, the VPC cannot be altered.
ExistingPublicSubnetId: Once the environment installation is complete, you cannot modify the subnet where the environment console resides.
MsgBucket: Once the environment installation is complete, the MsgBucket cannot be changed.
OpsBucket: After the installation of the environment is finalized, the OpsBucket is not alterable.
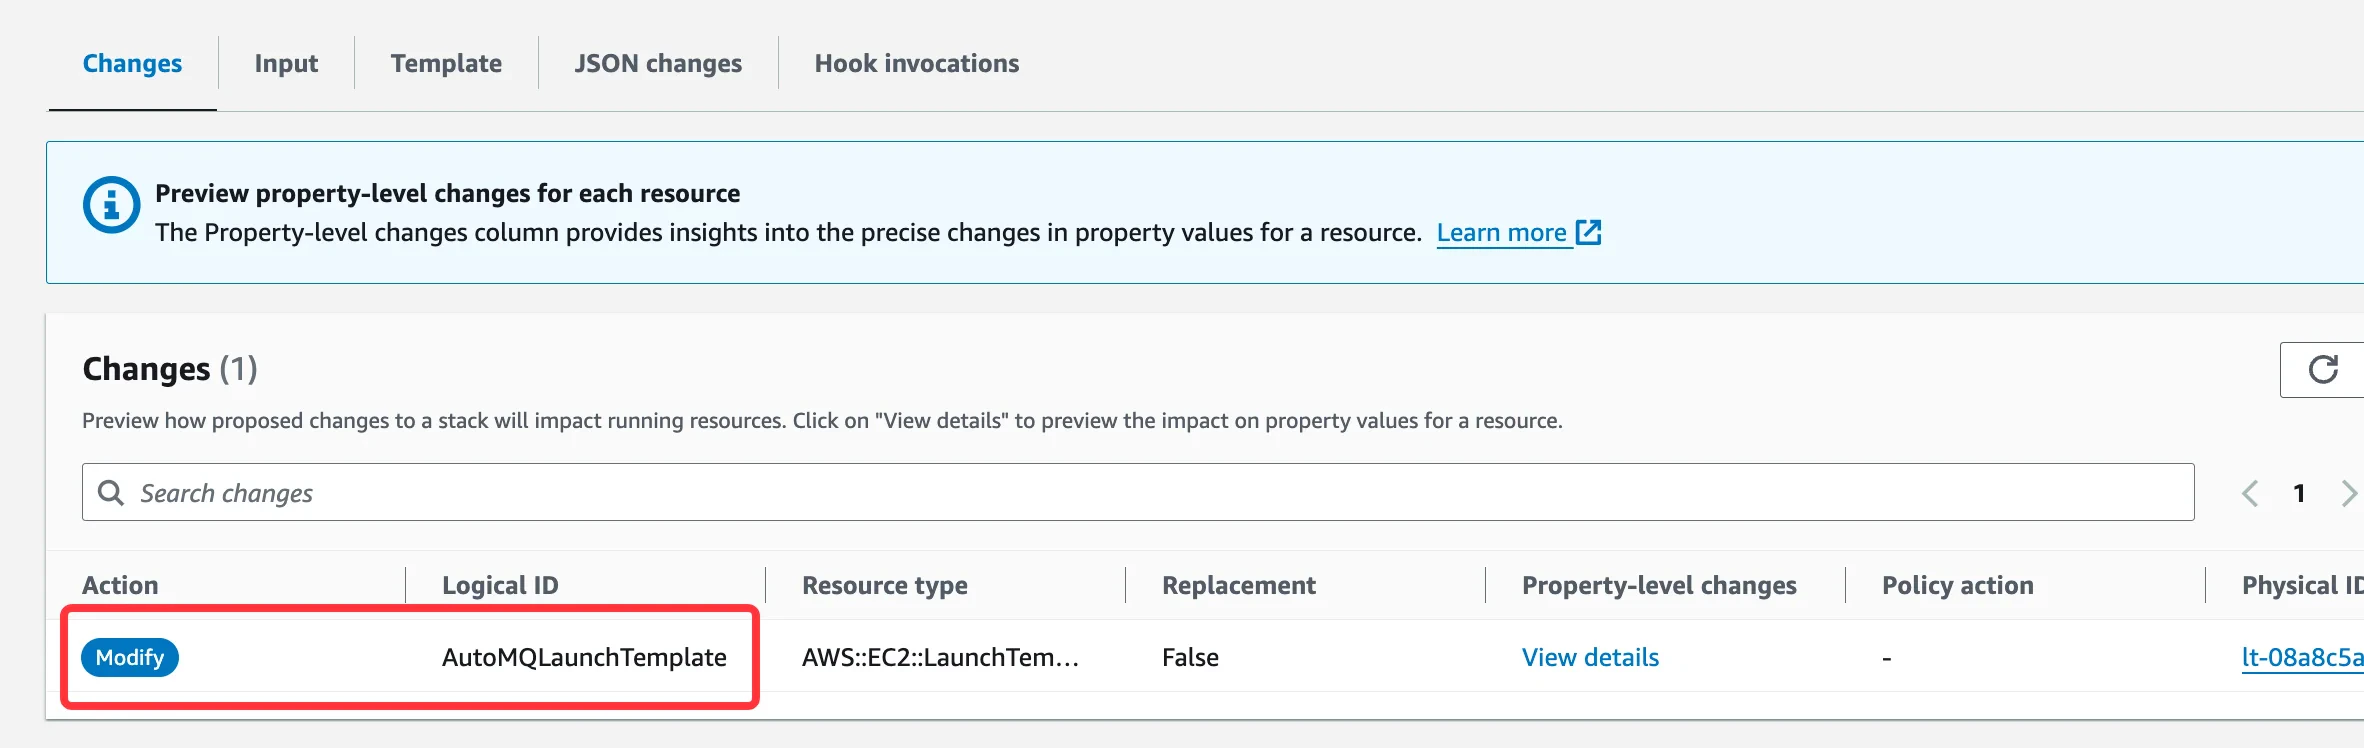
 7. **Submit changes step-by-step for a preview.** After confirming the submission, you can review the scope of resources affected by the current version upgrade.
 8. **Confirm the execution of the ChangeSet.** Wait for the execution to complete and verify whether the upgrade results align with expectations.
### Google Cloud
In the AutoMQ BYOC environment on GCP via Marketplace installation, since Marketplace does not offer a console page for upgrades, it is advised to upgrade versions using the gcloud CLI.
#### Steps
1. Locally, use the gcloud CLI to log into the cloud account linked with the environment console, or a sub-account with authorized operational capabilities.
```bash theme={null}
gcloud auth login
```
2. **Create New Version System Disk**. Check the AutoMQ version logs to determine the environment version that needs an upgrade. Use the following command as a guideline to create a system disk for the new version of the console VM.
```bash theme={null}
gcloud compute disks create $disk_name \
--image projects/mpi-automq-public/global/images/automq-control-center-prod-$version-x86-64 \
--zone $zone
```
The parameter descriptions are as follows:
* disk\_name: You can customize the name of the system disk.
* image: The name of the image used by the system disk. Here, you need to input the corresponding value based on the version number, such as “projects/automq-public/global/images/automq-control-center-prod-**7-3-11**-x86-64”, replacing **7-3-11** with the appropriate **X.Y.Z** version number.
* Zone: Enter the name of the zone where the AutoMQ console is located.
3. **Stop the AutoMQ Console Virtual Machine**. Go to the Compute Engine console and find the virtual machine named AutoMQ Console. Run the following command to power it off.
```bash theme={null}
gcloud compute instances stop $instance_name --zone $INSTANCE_ZONE
```
The parameter descriptions are as follows:
* instance\_name: Enter the instance name in the AutoMQ console.
* Zone: Enter the name of the zone where the AutoMQ console is located.
4. **Unmount the Old System Disk**.
```bash theme={null}
gcloud compute instances detach-disk ${Your VM Instance} \
--disk=${Your Original System Disk} --zone $INSTANCE_ZONE
```
The parameter descriptions are as follows:
* instance\_name: Enter the instance name in the AutoMQ console.
* disk: Enter the current system disk name from the AutoMQ Console.
5. **Mount the new system disk.**
```bash theme={null}
gcloud compute instances attach-disk $INSTANCE_NAME \
--disk $NEW_DISK_NAME \
--zone $INSTANCE_ZONE \
--boot
```
The parameter descriptions are as follows:
* instance\_name: Enter the instance name in the AutoMQ console.
* disk: Enter the new system disk name from the AutoMQ Console. This is the name of the system disk created in step 1.
* Zone: Enter the name of the zone where the AutoMQ console is located.
6. **Restart the AutoMQ Console.**
```bash theme={null}
gcloud compute instances start $INSTANCE_NAME --zone $INSTANCE_ZONE
```
The parameter descriptions are as follows:
* instance\_name: Enter the instance name in the AutoMQ console.
* Zone: Enter the name of the zone where the AutoMQ console is located.
7. Once the upgrade is complete and verified to meet expectations, you can **delete the system disk of the previous version**. After deletion, rolling back to the previous version will not be possible.
```bash theme={null}
gcloud compute disks delete $DISK_NAME --zone $INSTANCE_ZONE
```
The parameter descriptions are as follows:
* DISK\_NAME: Enter the system disk name of the previous version in the AutoMQ console.
* INSTANCE\_ZONE: Enter the name of the zone where the AutoMQ console is located.
8. **Confirm the execution of the ChangeSet.** Wait for the execution to complete and verify whether the upgrade results align with expectations.
### Google Cloud
In the AutoMQ BYOC environment on GCP via Marketplace installation, since Marketplace does not offer a console page for upgrades, it is advised to upgrade versions using the gcloud CLI.
#### Steps
1. Locally, use the gcloud CLI to log into the cloud account linked with the environment console, or a sub-account with authorized operational capabilities.
```bash theme={null}
gcloud auth login
```
2. **Create New Version System Disk**. Check the AutoMQ version logs to determine the environment version that needs an upgrade. Use the following command as a guideline to create a system disk for the new version of the console VM.
```bash theme={null}
gcloud compute disks create $disk_name \
--image projects/mpi-automq-public/global/images/automq-control-center-prod-$version-x86-64 \
--zone $zone
```
The parameter descriptions are as follows:
* disk\_name: You can customize the name of the system disk.
* image: The name of the image used by the system disk. Here, you need to input the corresponding value based on the version number, such as “projects/automq-public/global/images/automq-control-center-prod-**7-3-11**-x86-64”, replacing **7-3-11** with the appropriate **X.Y.Z** version number.
* Zone: Enter the name of the zone where the AutoMQ console is located.
3. **Stop the AutoMQ Console Virtual Machine**. Go to the Compute Engine console and find the virtual machine named AutoMQ Console. Run the following command to power it off.
```bash theme={null}
gcloud compute instances stop $instance_name --zone $INSTANCE_ZONE
```
The parameter descriptions are as follows:
* instance\_name: Enter the instance name in the AutoMQ console.
* Zone: Enter the name of the zone where the AutoMQ console is located.
4. **Unmount the Old System Disk**.
```bash theme={null}
gcloud compute instances detach-disk ${Your VM Instance} \
--disk=${Your Original System Disk} --zone $INSTANCE_ZONE
```
The parameter descriptions are as follows:
* instance\_name: Enter the instance name in the AutoMQ console.
* disk: Enter the current system disk name from the AutoMQ Console.
5. **Mount the new system disk.**
```bash theme={null}
gcloud compute instances attach-disk $INSTANCE_NAME \
--disk $NEW_DISK_NAME \
--zone $INSTANCE_ZONE \
--boot
```
The parameter descriptions are as follows:
* instance\_name: Enter the instance name in the AutoMQ console.
* disk: Enter the new system disk name from the AutoMQ Console. This is the name of the system disk created in step 1.
* Zone: Enter the name of the zone where the AutoMQ console is located.
6. **Restart the AutoMQ Console.**
```bash theme={null}
gcloud compute instances start $INSTANCE_NAME --zone $INSTANCE_ZONE
```
The parameter descriptions are as follows:
* instance\_name: Enter the instance name in the AutoMQ console.
* Zone: Enter the name of the zone where the AutoMQ console is located.
7. Once the upgrade is complete and verified to meet expectations, you can **delete the system disk of the previous version**. After deletion, rolling back to the previous version will not be possible.
```bash theme={null}
gcloud compute disks delete $DISK_NAME --zone $INSTANCE_ZONE
```
The parameter descriptions are as follows:
* DISK\_NAME: Enter the system disk name of the previous version in the AutoMQ console.
* INSTANCE\_ZONE: Enter the name of the zone where the AutoMQ console is located.