> ## Documentation Index
> Fetch the complete documentation index at: https://docs.automq.com/llms.txt
> Use this file to discover all available pages before exploring further.
# Identity Providers and SSO Authentication
> AutoMQ integrates with enterprise identity providers using SAML for SSO authentication. Manage all users in one place and allow access with existing credentials.
AutoMQ supports configuring enterprise identity providers using the SAML protocol, allowing you to manage and authenticate AutoMQ environment members through your existing identity provider (hereinafter referred to as Identity Provider, IdP) without needing to use AutoMQ local usernames and passwords.
After enabling SSO in AutoMQ, you can manage all users in one place and allow users to log in to AutoMQ using their existing SSO credentials.
## Prerequisites
The AutoMQ console by default provides an initial admin member and local member login method. To enable SSO login, the following conditions must be met:
* The enterprise's IdP must support the **SAML 2.0 protocol**. AutoMQ does not support the OIDC protocol.
* Enterprise IdP needs to clearly identify each unique user.
* The username provided by the enterprise IdP must not conflict with member names of the AutoMQ local type. Refer to [Member Accounts▸](/automq-cloud/manage-identities-and-access/member-accounts).
## Usage Limitations
When using Enterprise IdP for SSO login in the AutoMQ Console, the following limitations apply:
* Each AutoMQ Console only supports the configuration of a single Enterprise IdP and does not support multiple identity sources.
* After configuring the IdP, SSO is enabled by default, but the local user login method is still supported. Environment administrators can manage SSO through local login.
* If the IdP is deleted, SSO is disabled by default, and existing SSO members will not be deleted and need to be manually removed.
* AutoMQ does not support converting between SSO and local member types.
* AutoMQ does not support the SAML Session logout protocol.
## Configuring Enterprise Identity Providers and SSO.
### Step 1: Configure AutoMQ Console Domain Name
Before configuring IdP and enabling SSO login, the environment admin needs to set up the domain name for the AutoMQ console. This ensures that enterprise users can access the AutoMQ console via their browsers using the specified domain name. The configuration steps are as follows:
1. The enterprise admin clicks the **Settings** menu.
2. On the settings page, click **Add Console Domain Name**.
3. Enter the domain name, port, and protocol that the console will use to provide services to users.
 Enterprise users who require the use of the HTTPS protocol are recommended to mount the console domain onto a front load balancing service such as ALB to complete the TLS protocol offloading.
4. Once setup is complete, conduct a connectivity test.
Enterprise users who require the use of the HTTPS protocol are recommended to mount the console domain onto a front load balancing service such as ALB to complete the TLS protocol offloading.
4. Once setup is complete, conduct a connectivity test.
 ### Step 2: Obtain SP Information from the AutoMQ Console
An AutoMQ environment administrator (a member authorized with the environment administrator role) should view the AutoMQ SP information and provide it to the enterprise IdP administrator. Follow these steps:
1. Click on the **Access and Control** section in the navigation bar. Then click **Add IdP**.
2. **Select Console External Domain**.
3. View the identity information of the AutoMQ console as a Service Provider (SP). Submit the SP information to the enterprise IdP administrator for entry. The administrator can manually copy the information or download the metadata file directly.
1. **SP EntityID:** A unique identifier for the AutoMQ console.
2. **Assertion Consumer Service URL:** The ACS URL is the unique address where AutoMQ, as an SP, receives SAML Responses, and it needs to be configured on the IdP.
3. **AutoMQ SP Certificate:** The certificate used to declare AutoMQ's signed requests.
### Step 2: Obtain SP Information from the AutoMQ Console
An AutoMQ environment administrator (a member authorized with the environment administrator role) should view the AutoMQ SP information and provide it to the enterprise IdP administrator. Follow these steps:
1. Click on the **Access and Control** section in the navigation bar. Then click **Add IdP**.
2. **Select Console External Domain**.
3. View the identity information of the AutoMQ console as a Service Provider (SP). Submit the SP information to the enterprise IdP administrator for entry. The administrator can manually copy the information or download the metadata file directly.
1. **SP EntityID:** A unique identifier for the AutoMQ console.
2. **Assertion Consumer Service URL:** The ACS URL is the unique address where AutoMQ, as an SP, receives SAML Responses, and it needs to be configured on the IdP.
3. **AutoMQ SP Certificate:** The certificate used to declare AutoMQ's signed requests.
 ### Step 3: Configure AutoMQ Service in Enterprise IdP
After obtaining the SP information in Step 2, the enterprise IdP administrator needs to configure the SP information of the AutoMQ console into the IdP service. The operations for this step vary depending on the IdP service. Below are common configuration methods for IdP.
1. Log in to the [Auth0 account](https://manage.auth0.com/).
2. Select **Applications**.
3. Click **Create Application**.
4. Enter the application name.
5. Select **Regular Web Applications** and click **Create.**
6. Once the application is created, navigate to the Addons settings page to enable SAML2.0 configuration.
7. Click on the **SAML 2 WEB APP** option to open the settings page, and configure the following parameters:
1. In the **Application Callback URL** parameter box, set the **ACS URL** obtained from the AutoMQ console.
8. Click **Enable** and save.
9. On the **Usage Tab** page, record the **Identity Provider Login URL**, **Issuer URN**, and **Identity Provider Certificate** information for use in Step 4 for IdP information entry.
1. In the Okta admin console, navigate to **Applications**.
2. Click **Add Application** to start creating a custom application.
3. Select the **SAML 2.0** application type.
4. Enter **App Name**, and click Next.
5. Configure the SP-related parameters according to the instructions below, and click Next.
1. Single sign-on URL: Enter the ACS URL provided by the SP from the second step.
2. Audience URI (SP Entity ID): Enter the SP Entity ID provided by the SP from the second step.
3. Name ID format: Fill in the unique identifier field according to your organization's standards, with the email address being the recommended option.
4. Application username: According to the enterprise standard, fill in the unique identifier field. It is recommended to use the OKTA username.
### Step 3: Configure AutoMQ Service in Enterprise IdP
After obtaining the SP information in Step 2, the enterprise IdP administrator needs to configure the SP information of the AutoMQ console into the IdP service. The operations for this step vary depending on the IdP service. Below are common configuration methods for IdP.
1. Log in to the [Auth0 account](https://manage.auth0.com/).
2. Select **Applications**.
3. Click **Create Application**.
4. Enter the application name.
5. Select **Regular Web Applications** and click **Create.**
6. Once the application is created, navigate to the Addons settings page to enable SAML2.0 configuration.
7. Click on the **SAML 2 WEB APP** option to open the settings page, and configure the following parameters:
1. In the **Application Callback URL** parameter box, set the **ACS URL** obtained from the AutoMQ console.
8. Click **Enable** and save.
9. On the **Usage Tab** page, record the **Identity Provider Login URL**, **Issuer URN**, and **Identity Provider Certificate** information for use in Step 4 for IdP information entry.
1. In the Okta admin console, navigate to **Applications**.
2. Click **Add Application** to start creating a custom application.
3. Select the **SAML 2.0** application type.
4. Enter **App Name**, and click Next.
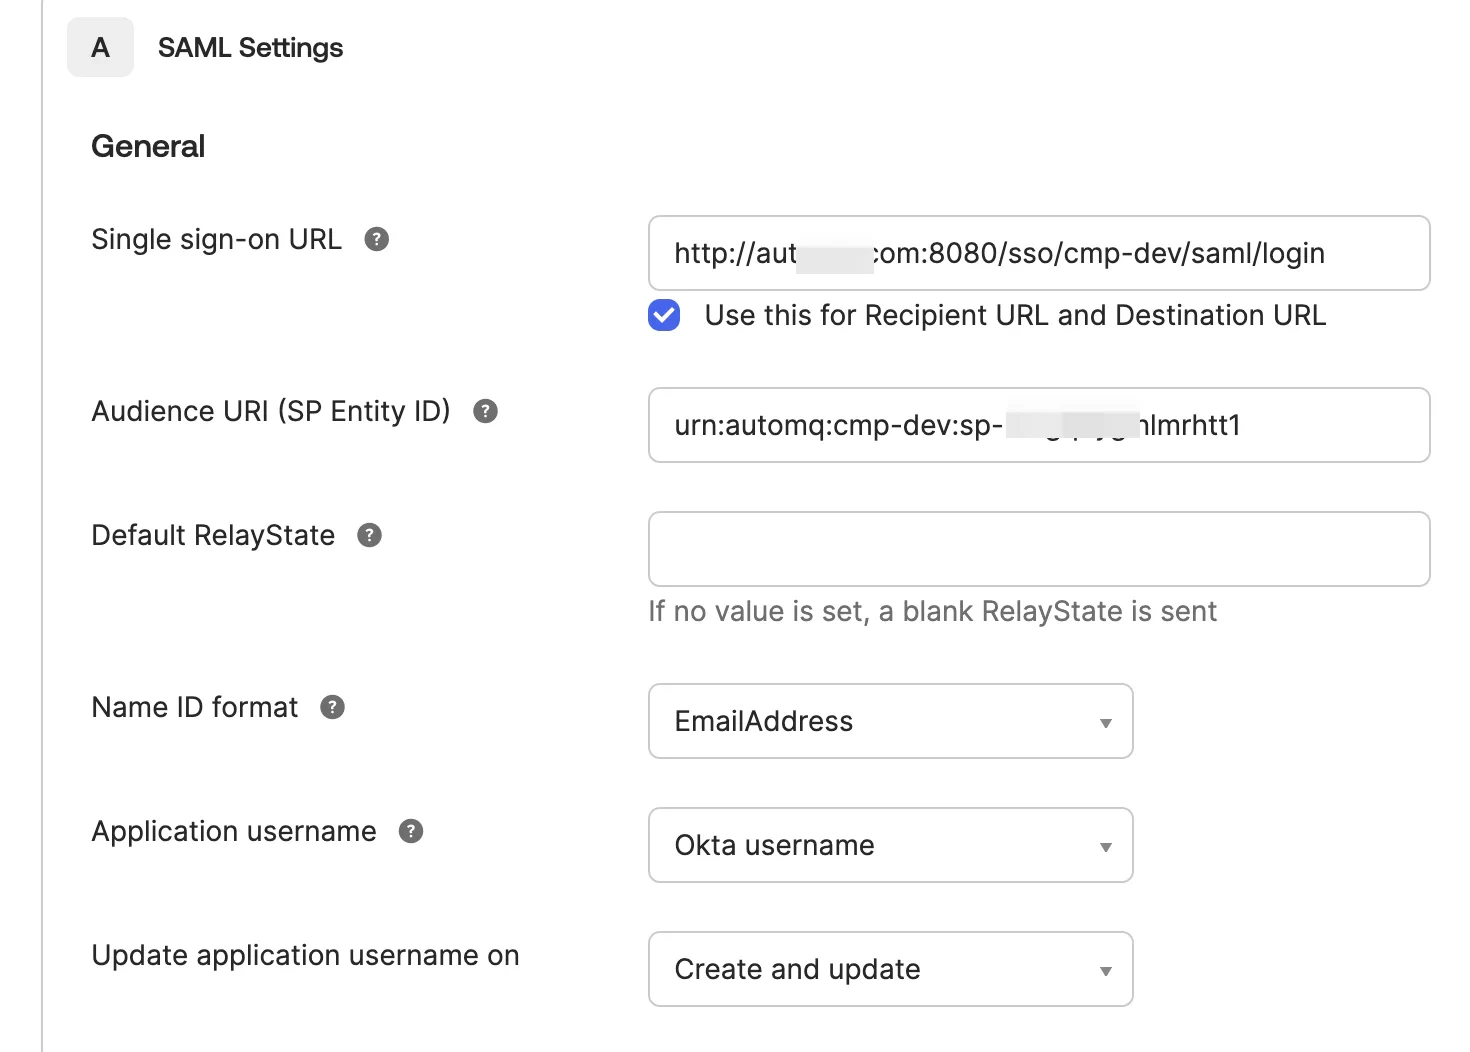
5. Configure the SP-related parameters according to the instructions below, and click Next.
1. Single sign-on URL: Enter the ACS URL provided by the SP from the second step.
2. Audience URI (SP Entity ID): Enter the SP Entity ID provided by the SP from the second step.
3. Name ID format: Fill in the unique identifier field according to your organization's standards, with the email address being the recommended option.
4. Application username: According to the enterprise standard, fill in the unique identifier field. It is recommended to use the OKTA username.
 6. Click "Finish" to complete the SP entry. Click to download the metadata configuration file, which will be used to complete the IdP information in Step 4.
**Note:**
After creating a new application in OKTA, users who have not been assigned to this OKTA application by default cannot use the AutoMQ application. Therefore, it is recommended to allocate the application to relevant users based on requirements.
### Step 4: Complete IdP Entry in the AutoMQ Console
After configuring the enterprise IdP, the IdP information needs to be recorded in the AutoMQ console to complete the connection. The AutoMQ console supports manual entry and direct upload of metadata files. The required information is as follows:
* **IdP Alias:** This is used to distinguish the information of the IdP. It supports English and Chinese letters, numbers, hyphens, and underscores, with a length limit of 3-64 characters.
* **IdP Entity ID:** This is the unique identifier used to recognize the IdP.
* **IdP SSO URL:** This is the unique login address assigned by the IdP to the AutoMQ console.
* **IdP Certificate:** This is the certificate information used by the IdP to sign and encrypt SAML responses.
* **UserID Mapping (Optional):** AutoMQ extracts the unique user ID attribute from the SAML response. If not set, the default value will be used.
* **UserName Mapping (Optional):** AutoMQ extracts the displayed environment member name attribute from the SAML response. If not set, it will be the same as UserID.
* **Session Expiration Time Mapping (Optional):** AutoMQ extracts the session expiration time attribute from the SAML response. If not set, it will default to 6 hours.
6. Click "Finish" to complete the SP entry. Click to download the metadata configuration file, which will be used to complete the IdP information in Step 4.
**Note:**
After creating a new application in OKTA, users who have not been assigned to this OKTA application by default cannot use the AutoMQ application. Therefore, it is recommended to allocate the application to relevant users based on requirements.
### Step 4: Complete IdP Entry in the AutoMQ Console
After configuring the enterprise IdP, the IdP information needs to be recorded in the AutoMQ console to complete the connection. The AutoMQ console supports manual entry and direct upload of metadata files. The required information is as follows:
* **IdP Alias:** This is used to distinguish the information of the IdP. It supports English and Chinese letters, numbers, hyphens, and underscores, with a length limit of 3-64 characters.
* **IdP Entity ID:** This is the unique identifier used to recognize the IdP.
* **IdP SSO URL:** This is the unique login address assigned by the IdP to the AutoMQ console.
* **IdP Certificate:** This is the certificate information used by the IdP to sign and encrypt SAML responses.
* **UserID Mapping (Optional):** AutoMQ extracts the unique user ID attribute from the SAML response. If not set, the default value will be used.
* **UserName Mapping (Optional):** AutoMQ extracts the displayed environment member name attribute from the SAML response. If not set, it will be the same as UserID.
* **Session Expiration Time Mapping (Optional):** AutoMQ extracts the session expiration time attribute from the SAML response. If not set, it will default to 6 hours.
 Advanced attribute field settings are as follows:
 ### Step Five: SSO User Login
Once IdP input and SSO configuration are complete, the AutoMQ console can be accessed using SSO login.
### Step Five: SSO User Login
Once IdP input and SSO configuration are complete, the AutoMQ console can be accessed using SSO login.
 **Note:**
When a new user logs in directly using SSO, they will, by default, have no permissions to operate within the environment and will require authorization from an environment administrator to access specific resources.
Environment administrators can also pre-create SSO members and assign predefined roles to them, allowing these SSO members to operate the console normally upon subsequent logins.
**Note:**
When a new user logs in directly using SSO, they will, by default, have no permissions to operate within the environment and will require authorization from an environment administrator to access specific resources.
Environment administrators can also pre-create SSO members and assign predefined roles to them, allowing these SSO members to operate the console normally upon subsequent logins.