> ## Documentation Index
> Fetch the complete documentation index at: https://docs.automq.com/llms.txt
> Use this file to discover all available pages before exploring further.
# SASL Authentication
> AutoMQ enhances security with SASL authentication, providing Kafka API compatibility, cloud scalability, and cost-efficiency while supporting SASL_PLAINTEXT and SASL_SSL.
Refer to [Overview▸](/automq-cloud/manage-security/overview), the AutoMQ data plane service is based on the Kafka API, providing SASL authentication functionality. This document introduces how to configure SASL authentication for an instance and provides client access examples.
## Enable SASL\_PLAINTEXT
The SASL\_PLAINTEXT protocol allows users to upload access credentials through non-encrypted transmission. The server then performs authentication and verification, followed by ACL access control checks on the authenticated identities.
The SASL\_PLAINTEXT protocol provided by AutoMQ supports the following authentication mechanisms: `PLAIN`, `SCRAM-SHA-256`, `SCRAM-SHA-512`.
### Step 1: Server Configuration
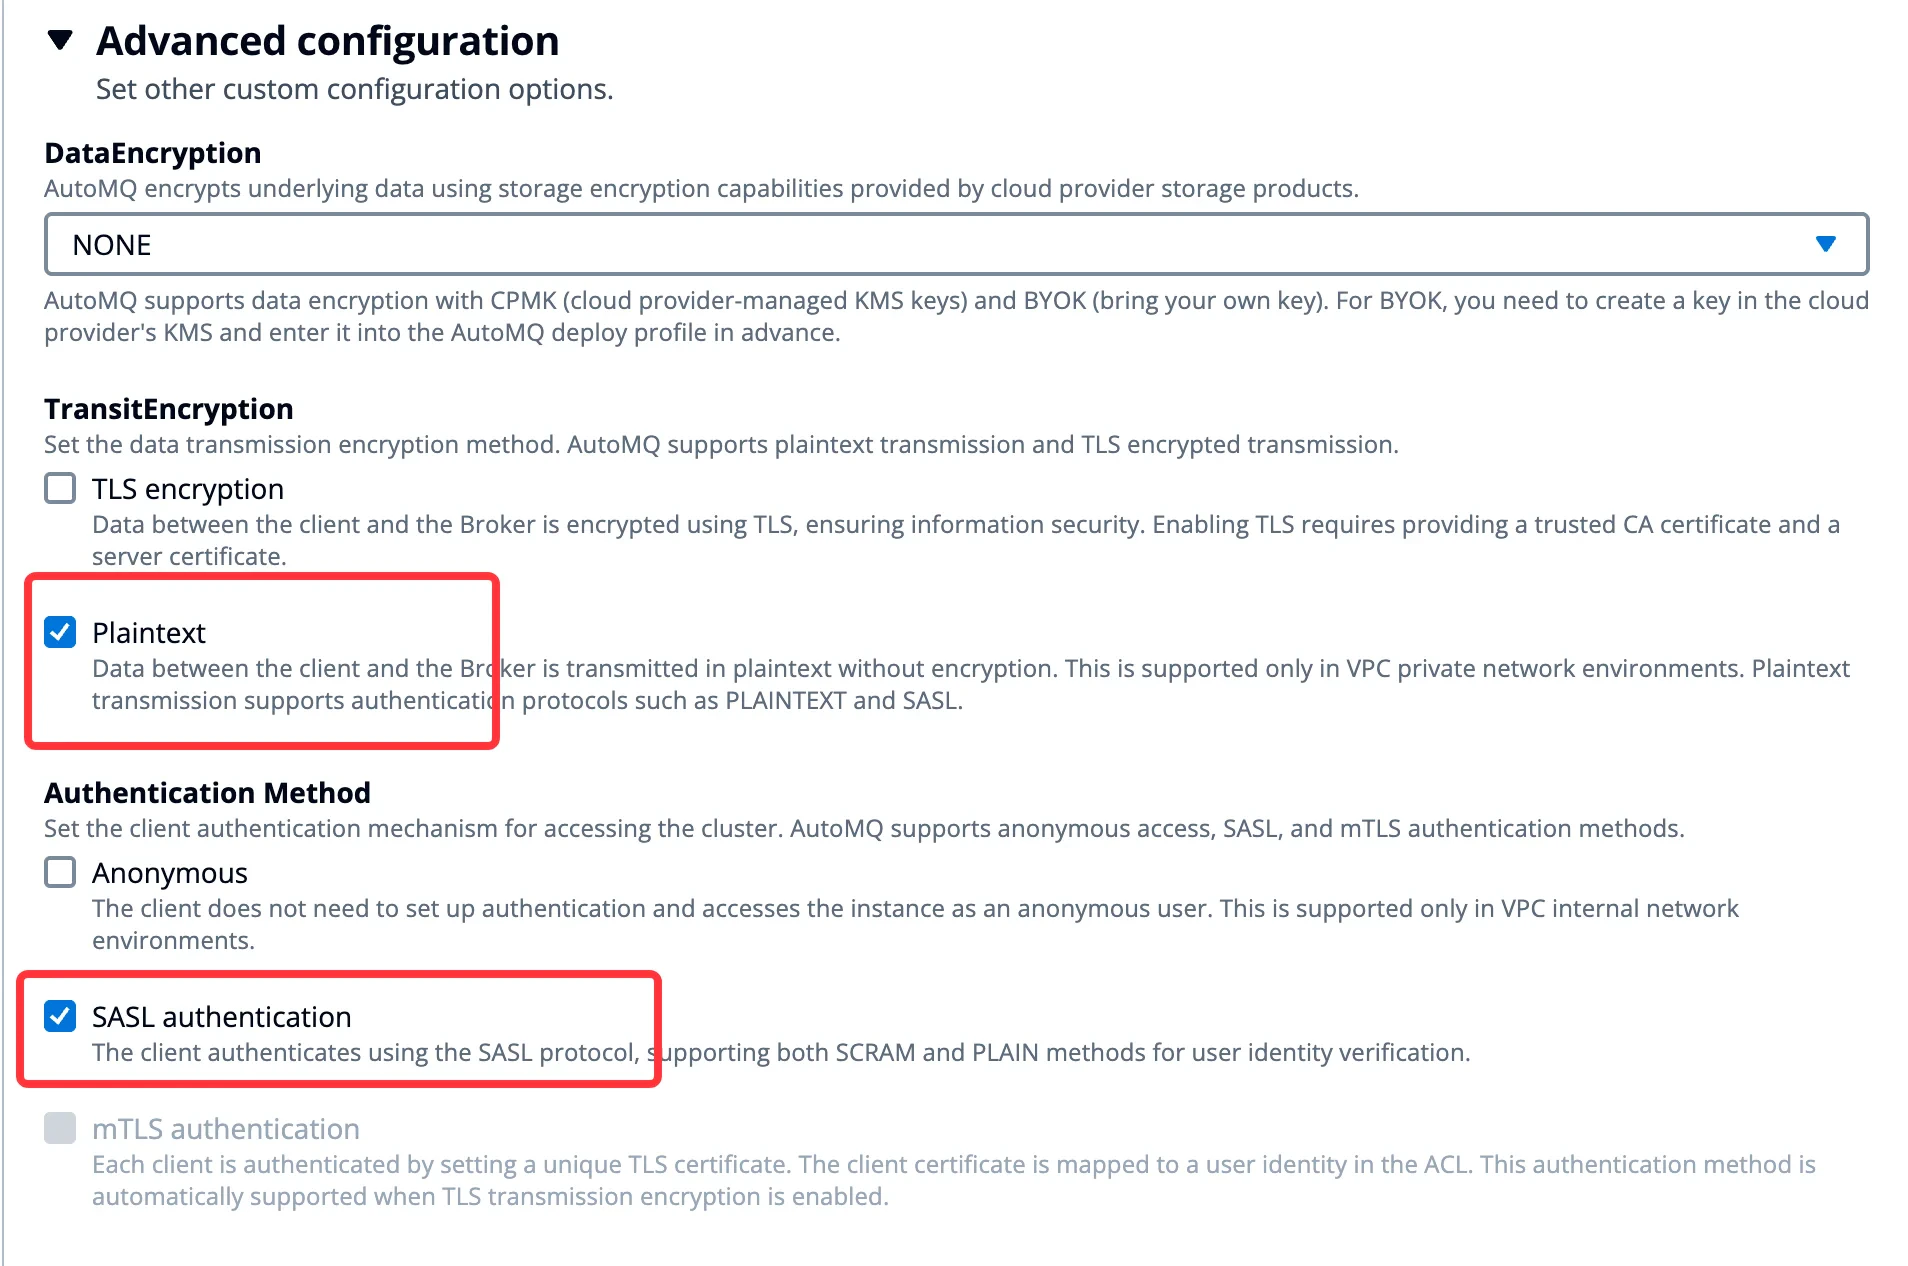
1. To use SASL\_PLAINTEXT, click **Advanced Options >> Enable the following parameters** when creating an instance. Refer to the interface in the figure below:
* TransitEncryption option: **Enable Plaintext.**
* Authentication Method: **Enable SASL authentication.**
 2. After enabling SASL\_PLAINTEXT, access the instance details page to view the corresponding access point information.
 3. After obtaining the access point, you need to create an ACL user and corresponding ACL permissions for the Kafka client. Subsequent clients will access the server using the ACL user credentials. For operation documentation, refer to [Manage Kafka ACLs▸](/automq-cloud/manage-security/manage-kafka-acls).
### Step 2: Client Configuration
Kafka clients utilize the SASL\_PLAINTEXT protocol to connect to the server. Consult the Apache Kafka documentation for detailed examples and be sure to configure the following parameters. The username and password should correspond to the ACL user information you created earlier.
Before connecting using SASL\_PLAINTEXT, ensure that the ACL user has been granted the necessary resource operation permissions.
```properties theme={null}
# Configure SASL_PLAINTEXT
security.protocol=SASL_PLAINTEXT
# Configure Mechanism, Support PLAIN, SCRAM-SHA-256, SCRAM-SHA-512
sasl.mechanism=SCRAM-SHA-512
# Configure the Jaas Config,set LoginModule,UserName,Password
sasl.jaas.config=org.apache.kafka.common.security.scram.ScramLoginModule required \ username="XXXX" \ password="XXXX";
```
## Enable SASL\_SSL
The SASL\_SSL protocol facilitates the transmission of access credentials over a TLS-encrypted communication channel. This enables the server to perform identity authentication and verification. Once identities are successfully authenticated, they undergo ACL access control verification.
To enable TLS transport encryption in an AutoMQ BYOC environment, users must provide a CA and server certificate, ensuring that the certificate matches the domain name. Additionally, users are required to periodically review the certificates to prevent service disruption due to expired certificates.
### Step 1: Create CA and Certificate
If your organization cannot obtain certificates issued by a trusted CA, you can refer to the documentation below to self-sign and maintain a private CA and certificate. Furthermore, for production environments, it is recommended to manage CA and certificates using [AWS Private CA Product](https://docs.aws.amazon.com/privateca/latest/userguide/PcaWelcome.html).
1. **Configure the CA signing policy file** `ca.cnf`.
```properties highlight={19-20} theme={null}
[ ca ]
default_ca = CA_AutoMQ_Default
[ CA_AutoMQ_Default ]
default_days = 3650
database = index.txt
serial = serial.txt
default_md = sha256
copy_extensions = copy
unique_subject = no
policy = signing_policy
[ req ]
prompt = no
distinguished_name = distinguished_name
x509_extensions = extensions
[ distinguished_name ]
organizationName =
commonName =
[ extensions ]
keyUsage = critical,digitalSignature,nonRepudiation,keyEncipherment,keyCertSign
basicConstraints = critical,CA:true,pathlen:1
[ signing_policy ]
organizationName = supplied
commonName = optional
```
2. **Generate the CA private key** `ca.key` and set file access permissions.
```bash theme={null}
openssl genrsa -out ca.key 2048
chmod 400 ca.key
```
3. **Generate the CA public certificate** `ca.crt`.
```bash theme={null}
openssl req -new -x509 -config ca.cnf -key ca.key -days 3650 -batch -out ca.crt
```
The command above will generate the `ca.crt` file as the CA public certificate, which needs to be deployed to both AutoMQ instances and Kafka clients afterwards.
4. **Create the broker certificate configuration file** `broker.cnf`.
The Broker in the AutoMQ BYOC environment provides record resolution services through a Private DNS Zone. Therefore, the SAN information needs to be consistent with the Zone domain name selected when creating the AutoMQ instance to ensure that domain name resolution and certificate matching pass.
In general, it is recommended to directly fill in the Zone domain name for the certificate's DNS, for example, \*.your-private-zone-name.
```ini highlight={7,8,13} theme={null}
[ req ]
prompt = no
distinguished_name = distinguished_name
req_extensions = extensions
[ distinguished_name ]
organizationName =
commonName =
[ extensions ]
subjectAltName = @alt_names
[ alt_names ]
DNS.1 =
```
5. **Generate the broker's private key** `broker.key`.
```bash theme={null}
openssl genrsa -out broker.key 2048
```
6. **Generate the Broker Certificate Signing Request (CSR)** `broker.csr`.
```bash theme={null}
openssl req -new -key broker.key -out broker.csr -nodes -config broker.cnf
```
7. **Use the previously mentioned CA private key to sign the CSR and generate the Broker certificate** `broker.crt`.
```bash theme={null}
openssl x509 -req -CA ca.crt -CAkey ca.key -in broker.csr -out broker.crt -days 3650 -CAcreateserial -extensions extensions -extfile broker.cnf
```
The output file `broker.crt` is the signed Broker public certificate. It is recommended to set it as read-only. For subsequent deployment, the files `broker.crt`, `broker.key`, and `ca.crt` are needed.
### Step 2: Server Configuration
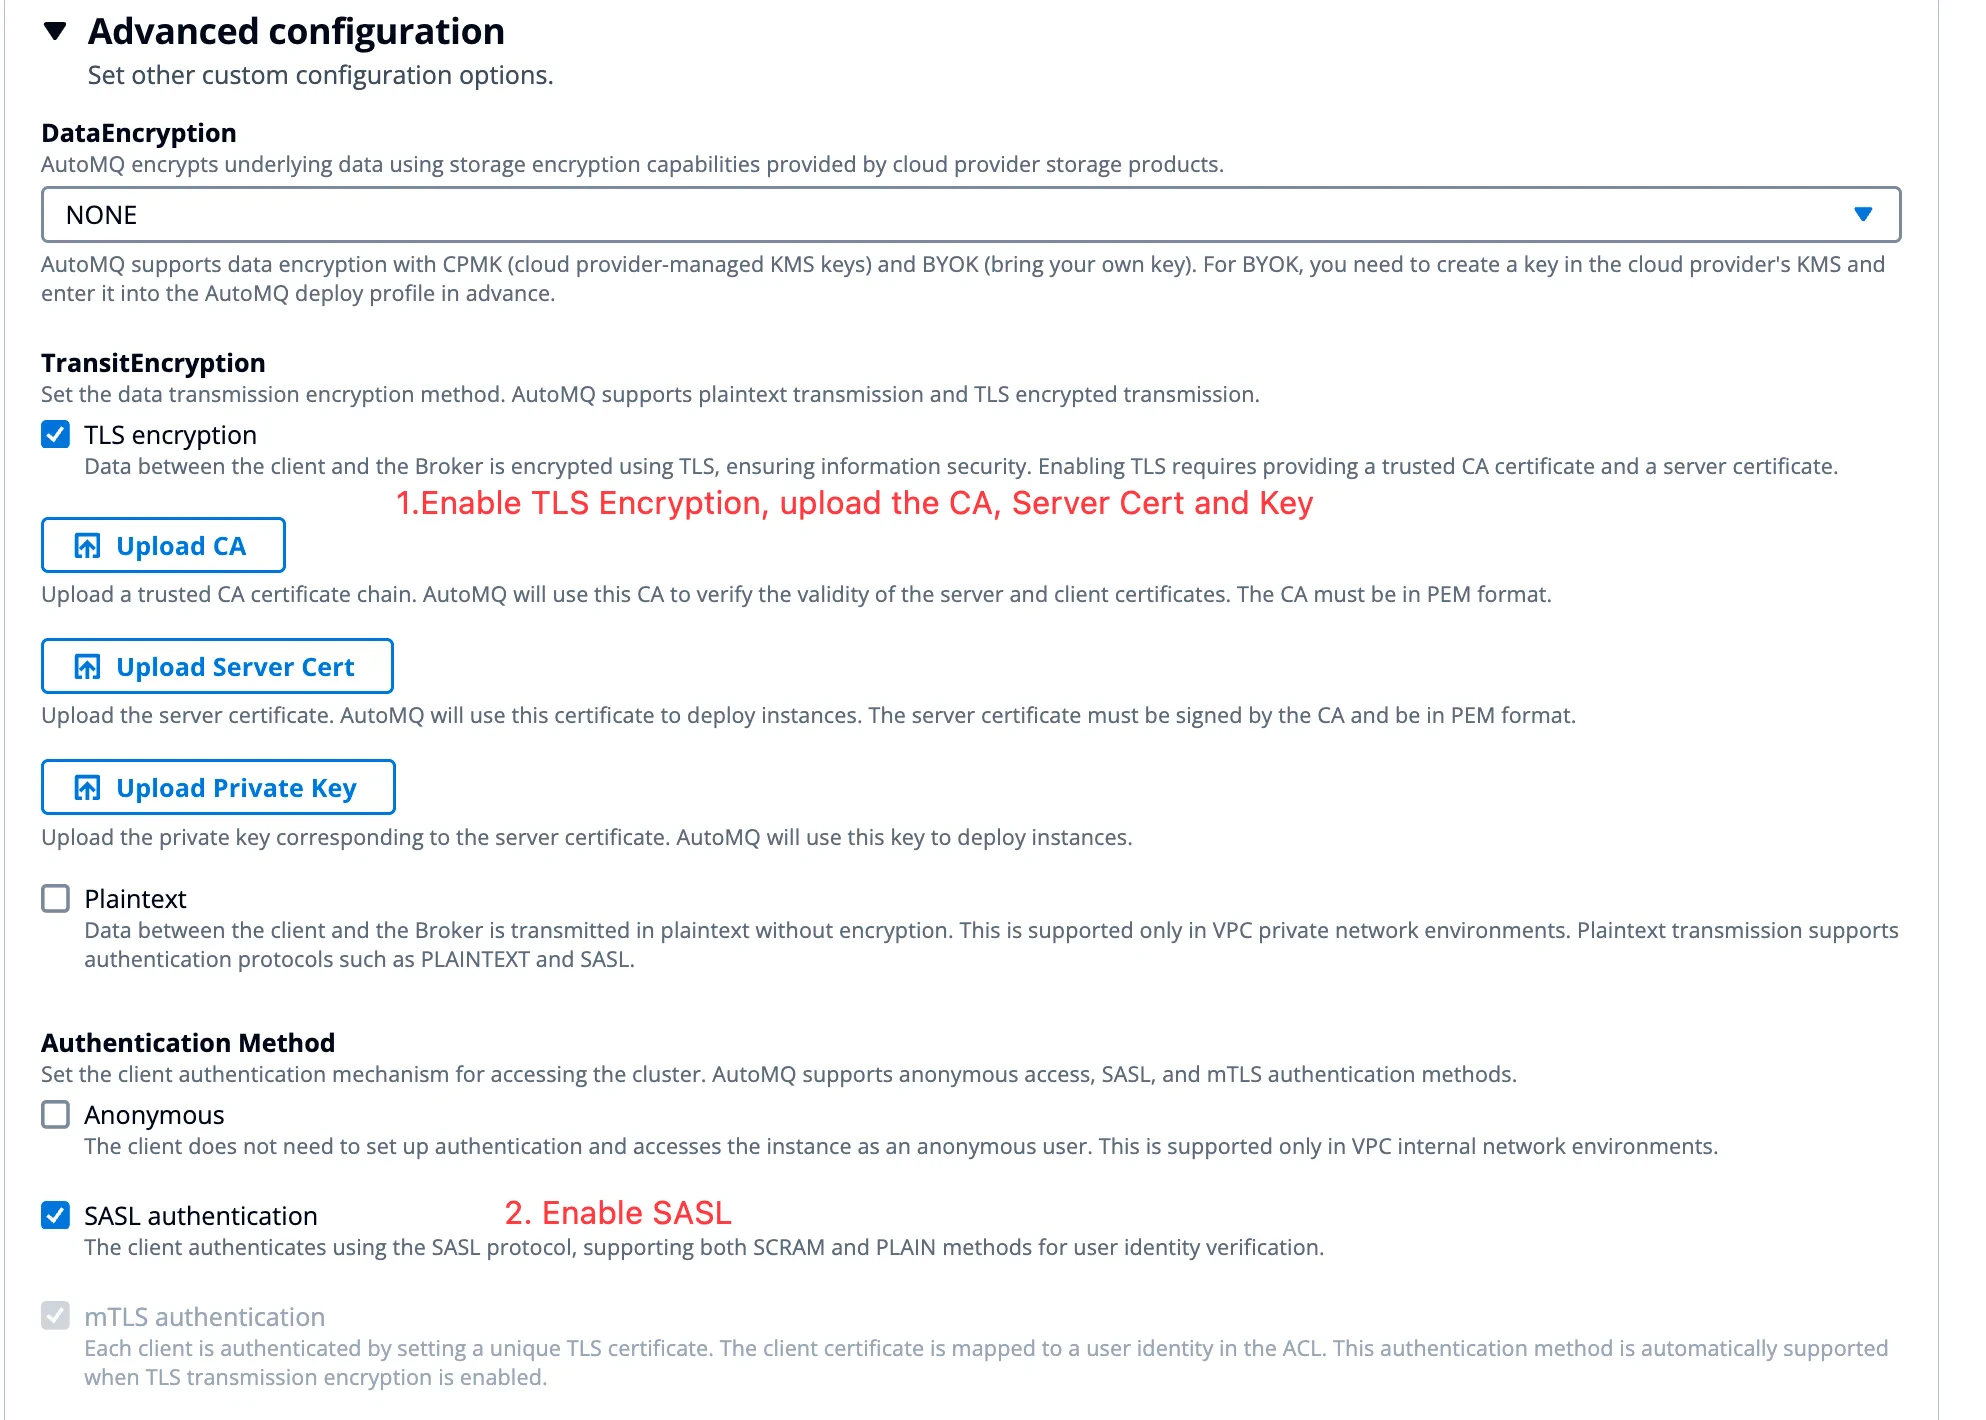
1. Using SASL\_SSL requires clicking on **Advanced Options >> Enable the following parameters** when creating the instance. Refer to the interface depicted in the diagram below:
* TransitEncryption: **Enable TLS Encryption.**
* Authentication Method: **Enable SASL authentication.**
* Upload CA: Upload the CA certificate file obtained in the previous step, `ca.crt`.
* Upload Server Cert: Upload the Broker certificate file obtained in the previous step, `broker.crt`.
* Upload Private Key: Upload the private key file for the Broker certificate obtained in the previous step, `broker.key`.
3. After obtaining the access point, you need to create an ACL user and corresponding ACL permissions for the Kafka client. Subsequent clients will access the server using the ACL user credentials. For operation documentation, refer to [Manage Kafka ACLs▸](/automq-cloud/manage-security/manage-kafka-acls).
### Step 2: Client Configuration
Kafka clients utilize the SASL\_PLAINTEXT protocol to connect to the server. Consult the Apache Kafka documentation for detailed examples and be sure to configure the following parameters. The username and password should correspond to the ACL user information you created earlier.
Before connecting using SASL\_PLAINTEXT, ensure that the ACL user has been granted the necessary resource operation permissions.
```properties theme={null}
# Configure SASL_PLAINTEXT
security.protocol=SASL_PLAINTEXT
# Configure Mechanism, Support PLAIN, SCRAM-SHA-256, SCRAM-SHA-512
sasl.mechanism=SCRAM-SHA-512
# Configure the Jaas Config,set LoginModule,UserName,Password
sasl.jaas.config=org.apache.kafka.common.security.scram.ScramLoginModule required \ username="XXXX" \ password="XXXX";
```
## Enable SASL\_SSL
The SASL\_SSL protocol facilitates the transmission of access credentials over a TLS-encrypted communication channel. This enables the server to perform identity authentication and verification. Once identities are successfully authenticated, they undergo ACL access control verification.
To enable TLS transport encryption in an AutoMQ BYOC environment, users must provide a CA and server certificate, ensuring that the certificate matches the domain name. Additionally, users are required to periodically review the certificates to prevent service disruption due to expired certificates.
### Step 1: Create CA and Certificate
If your organization cannot obtain certificates issued by a trusted CA, you can refer to the documentation below to self-sign and maintain a private CA and certificate. Furthermore, for production environments, it is recommended to manage CA and certificates using [AWS Private CA Product](https://docs.aws.amazon.com/privateca/latest/userguide/PcaWelcome.html).
1. **Configure the CA signing policy file** `ca.cnf`.
```properties highlight={19-20} theme={null}
[ ca ]
default_ca = CA_AutoMQ_Default
[ CA_AutoMQ_Default ]
default_days = 3650
database = index.txt
serial = serial.txt
default_md = sha256
copy_extensions = copy
unique_subject = no
policy = signing_policy
[ req ]
prompt = no
distinguished_name = distinguished_name
x509_extensions = extensions
[ distinguished_name ]
organizationName =
commonName =
[ extensions ]
keyUsage = critical,digitalSignature,nonRepudiation,keyEncipherment,keyCertSign
basicConstraints = critical,CA:true,pathlen:1
[ signing_policy ]
organizationName = supplied
commonName = optional
```
2. **Generate the CA private key** `ca.key` and set file access permissions.
```bash theme={null}
openssl genrsa -out ca.key 2048
chmod 400 ca.key
```
3. **Generate the CA public certificate** `ca.crt`.
```bash theme={null}
openssl req -new -x509 -config ca.cnf -key ca.key -days 3650 -batch -out ca.crt
```
The command above will generate the `ca.crt` file as the CA public certificate, which needs to be deployed to both AutoMQ instances and Kafka clients afterwards.
4. **Create the broker certificate configuration file** `broker.cnf`.
The Broker in the AutoMQ BYOC environment provides record resolution services through a Private DNS Zone. Therefore, the SAN information needs to be consistent with the Zone domain name selected when creating the AutoMQ instance to ensure that domain name resolution and certificate matching pass.
In general, it is recommended to directly fill in the Zone domain name for the certificate's DNS, for example, \*.your-private-zone-name.
```ini highlight={7,8,13} theme={null}
[ req ]
prompt = no
distinguished_name = distinguished_name
req_extensions = extensions
[ distinguished_name ]
organizationName =
commonName =
[ extensions ]
subjectAltName = @alt_names
[ alt_names ]
DNS.1 =
```
5. **Generate the broker's private key** `broker.key`.
```bash theme={null}
openssl genrsa -out broker.key 2048
```
6. **Generate the Broker Certificate Signing Request (CSR)** `broker.csr`.
```bash theme={null}
openssl req -new -key broker.key -out broker.csr -nodes -config broker.cnf
```
7. **Use the previously mentioned CA private key to sign the CSR and generate the Broker certificate** `broker.crt`.
```bash theme={null}
openssl x509 -req -CA ca.crt -CAkey ca.key -in broker.csr -out broker.crt -days 3650 -CAcreateserial -extensions extensions -extfile broker.cnf
```
The output file `broker.crt` is the signed Broker public certificate. It is recommended to set it as read-only. For subsequent deployment, the files `broker.crt`, `broker.key`, and `ca.crt` are needed.
### Step 2: Server Configuration
1. Using SASL\_SSL requires clicking on **Advanced Options >> Enable the following parameters** when creating the instance. Refer to the interface depicted in the diagram below:
* TransitEncryption: **Enable TLS Encryption.**
* Authentication Method: **Enable SASL authentication.**
* Upload CA: Upload the CA certificate file obtained in the previous step, `ca.crt`.
* Upload Server Cert: Upload the Broker certificate file obtained in the previous step, `broker.crt`.
* Upload Private Key: Upload the private key file for the Broker certificate obtained in the previous step, `broker.key`.
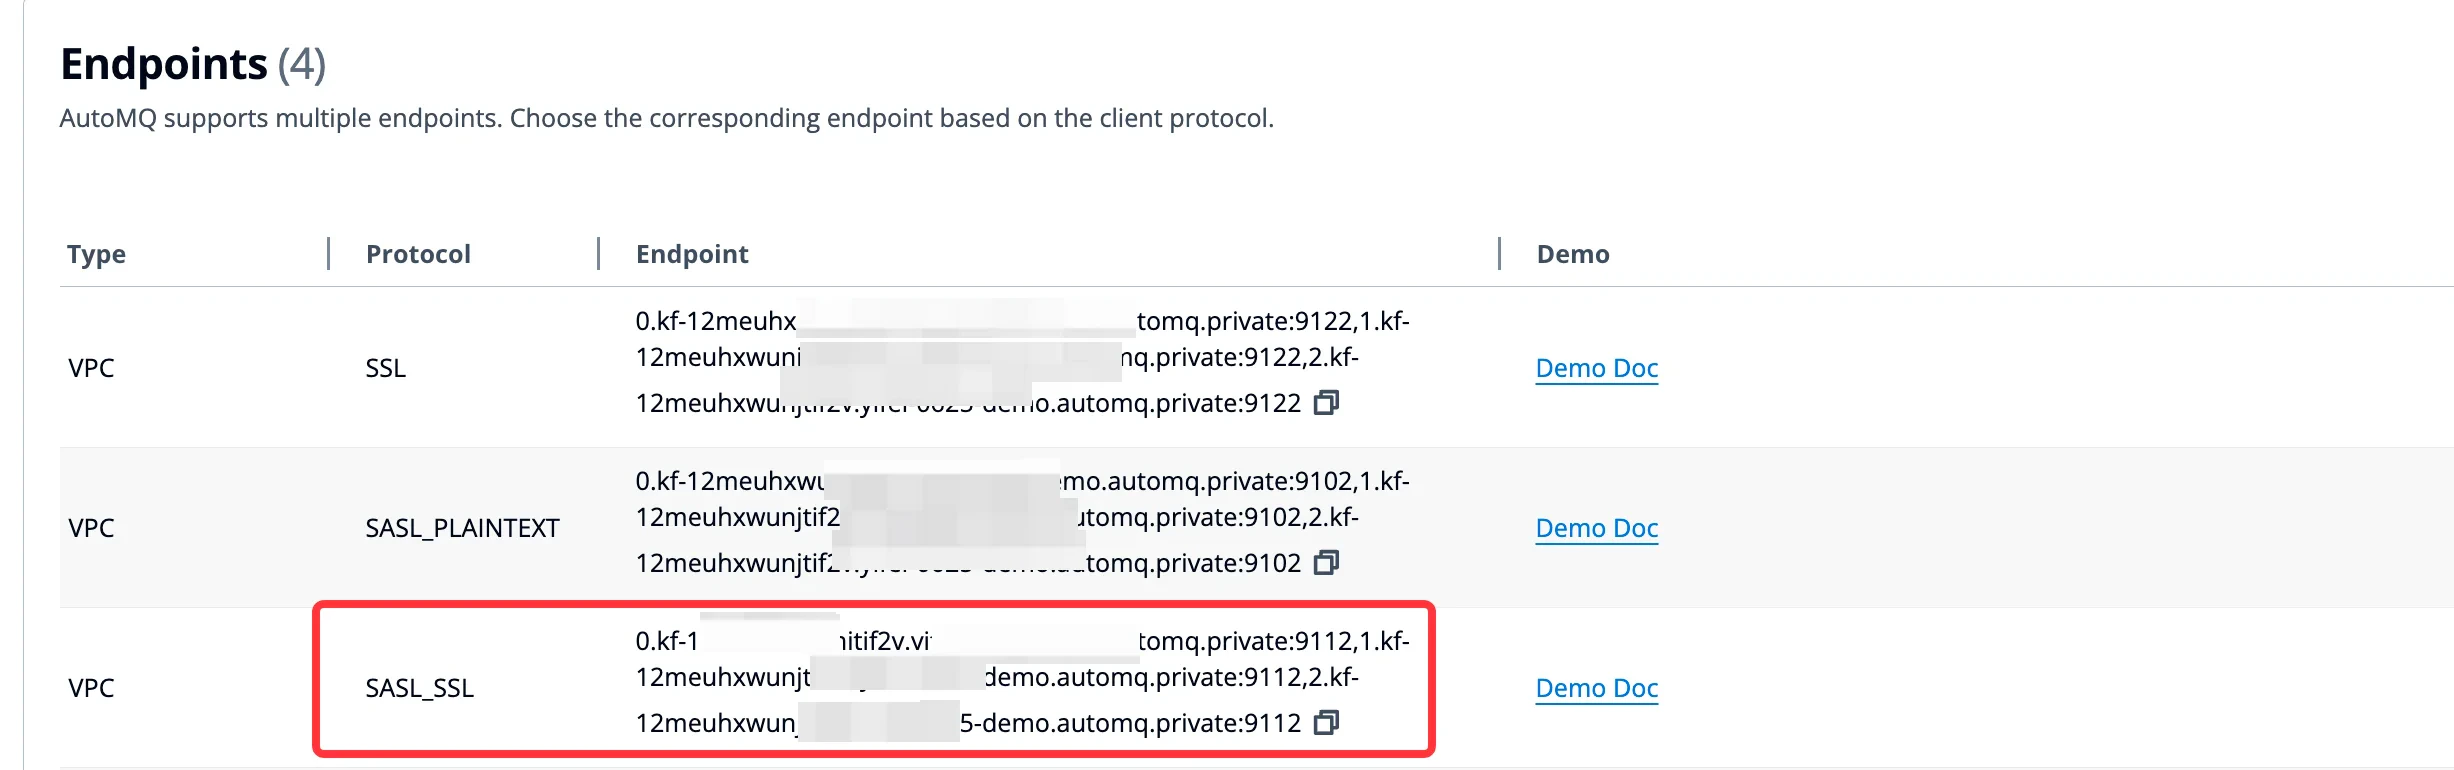
 2. After enabling SASL\_SSL, access the instance details page to view the endpoint information.
 3. After obtaining the access point, you need to create an ACL user and corresponding ACL permissions for the Kafka client. Subsequent clients will access the server using the ACL user credentials. For operation documentation, refer to [Manage Kafka ACLs▸](/automq-cloud/manage-security/manage-kafka-acls).
Note: The SASL\_SSL and mTLS protocols can only be enabled during instance creation and do not support enabling transport encryption for existing instances.
### Step 3: Client Access Configuration
The Kafka client accesses the server using the SASL\_SSL protocol. Refer to the Apache Kafka documentation examples to configure the necessary parameters.
1. Convert the previously generated CA certificate into a JKS trustStore. Ensure you replace the command parameters below based on your specific situation.
1. alias: Specify the alias for the CA certificate.
2. file: Indicate the CA certificate file obtained in the previous step.
3. keystore: Specify the name of the JKS, necessary for Kafka client configurations later on.
4. storepass: Provide the access password for the JKS, required for Kafka client configurations later on.
```bash theme={null}
keytool -importcert -alias automq-ca -file ca.crt -keystore truststore.jks -storepass changeit
```
2. Add the following configuration parameters to the Kafka client configuration properties. Before using the SASL\_SSL protocol to access the server, ensure that ACL users have been granted the appropriate resource operation permissions.
```properties theme={null}
# Configure SASL_SSL
security.protocol=SASL_SSL
# Configure Mechanism, Support PLAIN, SCRAM-SHA-256, SCRAM-SHA-512
sasl.mechanism=SCRAM-SHA-512
# Configure the Jaas Config,set LoginModule,UserName,Password
sasl.jaas.config=org.apache.kafka.common.security.scram.ScramLoginModule required \ username="Replace with your ACL UserName" \ password="Replace with your ACL Password";
# Set Trust Store Type to JKS
ssl.truststore.type=JKS
# Set the Location of Jks
ssl.truststore.location=/path/to/truststore.jks
# Set the Password of Jks
ssl.truststore.password=changeit
```
## Certificate Expiry Monitoring
In the BYOC environment, TLS certificates are provided by the user, so users need to monitor the certificate's validity period and ensure renewal and rotation before expiration. The AutoMQ server provides the following metrics for monitoring the expiry time of server certificates:
* `kafka_stream_cert_expiry_timestamp_milliseconds`: Displays the current certificate expiration timestamp in milliseconds.
* `kafka_stream_cert_days_remaining`: Counts the remaining days from the current time until the certificate expires.
It is recommended that customers refer to the configuration methods in [Monitoring & Alert via Prometheus▸](/automq-cloud/monitoring-alert/monitoring-alert-via-prometheus), using tools such as Prometheus and CloudWatch to monitor certificate expiration times to avoid risks.
3. After obtaining the access point, you need to create an ACL user and corresponding ACL permissions for the Kafka client. Subsequent clients will access the server using the ACL user credentials. For operation documentation, refer to [Manage Kafka ACLs▸](/automq-cloud/manage-security/manage-kafka-acls).
Note: The SASL\_SSL and mTLS protocols can only be enabled during instance creation and do not support enabling transport encryption for existing instances.
### Step 3: Client Access Configuration
The Kafka client accesses the server using the SASL\_SSL protocol. Refer to the Apache Kafka documentation examples to configure the necessary parameters.
1. Convert the previously generated CA certificate into a JKS trustStore. Ensure you replace the command parameters below based on your specific situation.
1. alias: Specify the alias for the CA certificate.
2. file: Indicate the CA certificate file obtained in the previous step.
3. keystore: Specify the name of the JKS, necessary for Kafka client configurations later on.
4. storepass: Provide the access password for the JKS, required for Kafka client configurations later on.
```bash theme={null}
keytool -importcert -alias automq-ca -file ca.crt -keystore truststore.jks -storepass changeit
```
2. Add the following configuration parameters to the Kafka client configuration properties. Before using the SASL\_SSL protocol to access the server, ensure that ACL users have been granted the appropriate resource operation permissions.
```properties theme={null}
# Configure SASL_SSL
security.protocol=SASL_SSL
# Configure Mechanism, Support PLAIN, SCRAM-SHA-256, SCRAM-SHA-512
sasl.mechanism=SCRAM-SHA-512
# Configure the Jaas Config,set LoginModule,UserName,Password
sasl.jaas.config=org.apache.kafka.common.security.scram.ScramLoginModule required \ username="Replace with your ACL UserName" \ password="Replace with your ACL Password";
# Set Trust Store Type to JKS
ssl.truststore.type=JKS
# Set the Location of Jks
ssl.truststore.location=/path/to/truststore.jks
# Set the Password of Jks
ssl.truststore.password=changeit
```
## Certificate Expiry Monitoring
In the BYOC environment, TLS certificates are provided by the user, so users need to monitor the certificate's validity period and ensure renewal and rotation before expiration. The AutoMQ server provides the following metrics for monitoring the expiry time of server certificates:
* `kafka_stream_cert_expiry_timestamp_milliseconds`: Displays the current certificate expiration timestamp in milliseconds.
* `kafka_stream_cert_days_remaining`: Counts the remaining days from the current time until the certificate expires.
It is recommended that customers refer to the configuration methods in [Monitoring & Alert via Prometheus▸](/automq-cloud/monitoring-alert/monitoring-alert-via-prometheus), using tools such as Prometheus and CloudWatch to monitor certificate expiration times to avoid risks.