> ## Documentation Index
> Fetch the complete documentation index at: https://docs.automq.com/llms.txt
> Use this file to discover all available pages before exploring further.
# Deploy Multi-Nodes Cluster on Kubernetes
> Deploy a scalable, cost-efficient AutoMQ cluster on Kubernetes. Explore Kafka-compatible features and a 30-day free cloud trial. Contact us for guidance.
This topic introduces how to deploy a multi-node AutoMQ cluster using Kubernetes, allowing users to validate cluster-related features such as partition reassignment and data auto-balancing in this development environment.
In addition to the Kubernetes deployment solution, users can refer to the following documentation to explore other deployment options:
* [Deploy Multi-Nodes Cluster on Linux▸](/automq/deployment/deploy-multi-nodes-cluster-on-linux)
Deploying AutoMQ and tuning parameters for production load is relatively complex. You can contact the AutoMQ team through [this form](https://www.automq.com/contact) to receive necessary assistance and best practices.
Moreover, if you wish to completely avoid the burden of installation and deployment, you can experience the fully managed cloud service provided by the AutoMQ team through the following link. Currently, all cloud markets offer a free 30-day trial.
* [Experience AutoMQ Cloud for free from AWS Marketplace](/automq-cloud/getting-started/install-byoc-environment/aws/install-automq-on-aws).
## Prerequisites
This document provides examples for deploying a 5-node AutoMQ cluster. In this setup, 3 nodes will run both the Controller and Broker, while the other 2 nodes will run only the Broker.
Ensure the following conditions are met:
* Prepare a Kubernetes cluster with at least 5 nodes, recommending network-optimized virtual machines with 4 cores and 16GB of RAM for subsequent Pod creation and other operations.
* Helm chart requires version v3.8.0 or later. Refer to the [Helm Chart Quickstart](https://helm.sh/docs/intro/quickstart/).
* Utilize the Bitnami Helm repository. AutoMQ is fully compatible with Bitnami's Helm Charts, enabling you to customize the AutoMQ Kubernetes cluster using Bitnami's values.yaml.
* Prepare 2 object storage buckets: one for storing message data and another for storing system logs and metric data.
## Deploy AutoMQ Cluster
### Step 1: Edit the Configuration File
Create an empty `automq-values.yaml` file, edit it, and add specific parameters. For guidance, refer to [demo-values.yaml](https://github.com/AutoMQ/automq-labs/blob/main/opensource-examples/setup/kubernetes/bitnami/demo-values.yaml) and check recommended configuration examples for different scenarios in its subdirectories. For more details, consult the [README.md](https://github.com/AutoMQ/automq-labs/blob/main/opensource-examples/setup/kubernetes/bitnami/README.md).
* Substitute `${ops-bucket}`, `${data-bucket}`, `${region}`, and `${endpoint}` with specific values for object storage. For more details, refer to [Object Storage Configuration▸](/automq/configuration/object-storage-configuration).
* Replace `${access-key}` and `${secret-key}` with the actual values. You can also choose alternative authorization methods such as IAM Role.
* For production-grade deployments, it is recommended to use dedicated nodes for AutoMQ (to avoid network bandwidth and other resource competition with other Pods). It is advisable to match using node affinity (nodeAffinity) and tolerations tags.
* For multi-availability zone deployments, you can use the `topologySpreadConstraints` parameter to ensure Pods are evenly distributed across the specified availability zones.
```yaml theme={null}
controller:
topologySpreadConstraints:
- maxSkew: 1
topologyKey: "topology.kubernetes.io/zone"
whenUnsatisfiable: DoNotSchedule
labelSelector:
matchLabels:
app: automq
```
* To avoid cross Availability Zone traffic, `brokerRackAssignment` will ultimately set the AutoMQ Broker's `broker.rack`. Clients need to be configured accordingly to eliminate cross-Availability Zone traffic costs. For example, the following configuration can be used in AWS EKS:
```yaml theme={null}
brokerRackAssignment: aws-az
```
* Several other server-side parameters can be set as needed in `controller.extraConfig` and `broker.extraConfig`. For more details, refer to: [Broker And Controller Configuration▸](/automq/configuration/broker-and-controller-configuration).
### Step 2: Install AutoMQ
Install or upgrade the AutoMQ Helm Chart using a custom YAML file: It is recommended to use the `--version` flag to specify the Bitnami Helm Chart version [31.x.x (31.1.0 \~ 31.5.0)](https://artifacthub.io/packages/helm/bitnami/kafka) when installing AutoMQ.
```bash theme={null}
helm install automq-release oci://registry-1.docker.io/bitnamicharts/kafka -f demo-values.yaml --version 31.5.0 --namespace automq --create-namespace
```
Wait for the AutoMQ cluster to be ready:
```bash theme={null}
kubectl --namespace automq rollout status statefulset --watch
```
When the AutoMQ cluster is ready, the output should look like the following:
```text theme={null}
statefulset rolling update complete 2 pods at revision automq-kafka-broker-6c756696dd...
statefulset rolling update complete 3 pods at revision automq-kafka-controller-c574d5fd5...
```
Check the Pod list:
```bash theme={null}
~/.kube kubectl get pods
NAME READY STATUS RESTARTS AGE
data-automq-kafka-controller-0 1/1 Running 0 16m
data-automq-kafka-controller-1 1/1 Running 0 16m
data-automq-kafka-controller-2 1/1 Running 0 16m
data-automq-kafka-broker-0 1/1 Running 0 13m
data-automq-kafka-broker-0 1/1 Running 0 13m
```
## Test Message Sending and Receiving
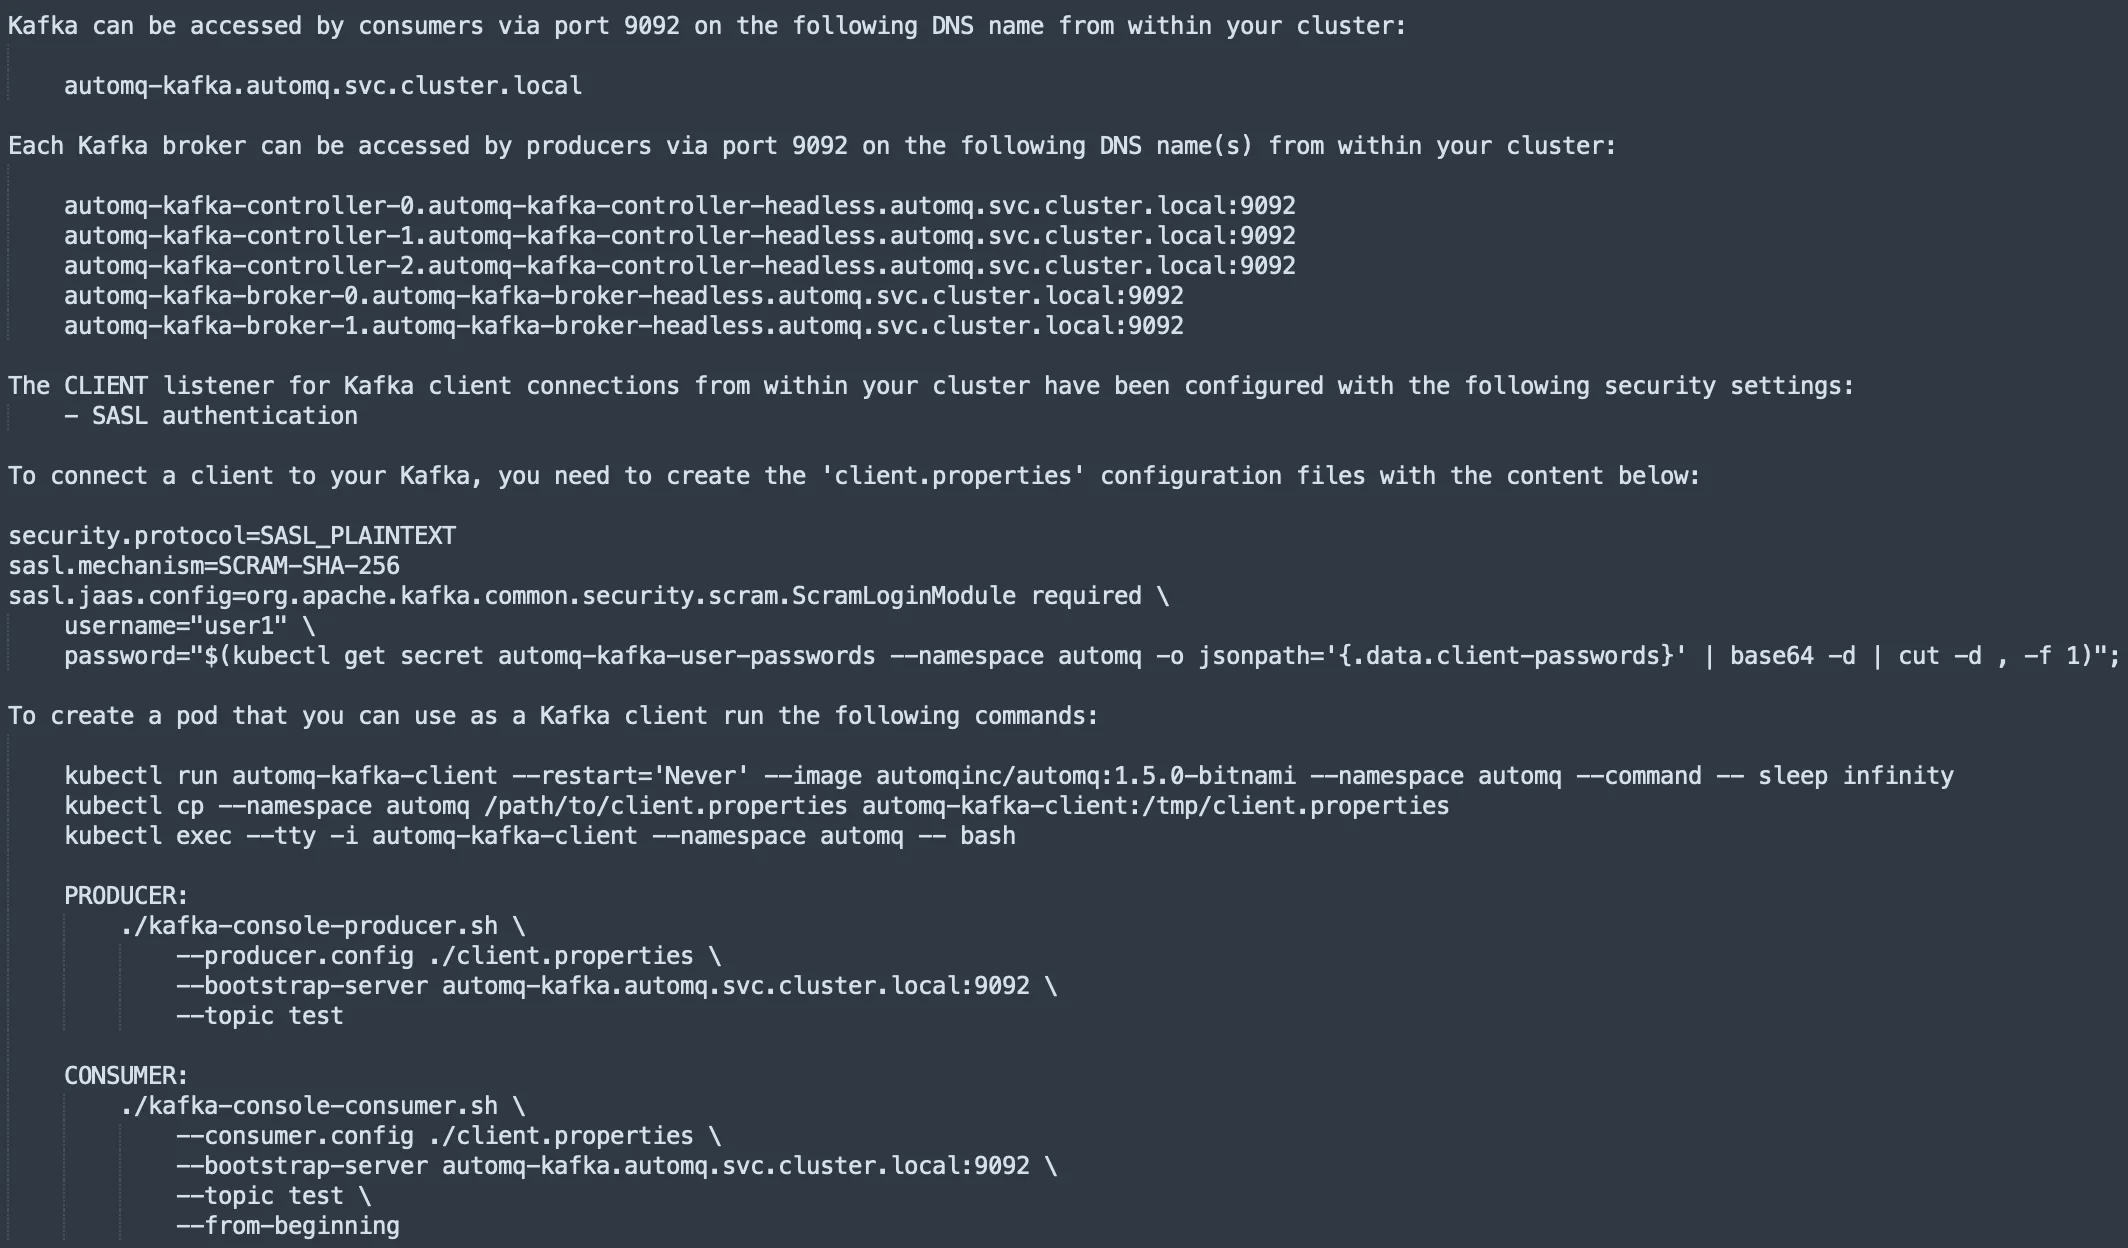
After the Helm execution is complete, the access address for the cluster and the commands for testing message sending and receiving will be displayed. This allows you to perform Topic message sending and consumption tests using `kafka-console-producer.sh` and `kafka-console-consumer.sh`.
 ## Stop and Uninstall the AutoMQ Cluster
* After completing the tests, AutoMQ clusters can be stopped and uninstalled using `helm uninstall`.
```bash theme={null}
helm uninstall automq-release -n automq
```
* If historical data is no longer needed, it's necessary to delete the cluster's PVC and Bucket data altogether to prevent leftover data from affecting the next deployment.
## Precautions for Production Environment
### Lock Chart Version
To avoid unexpected changes during deployment, it is recommended to lock the Helm Chart version. Locking the version means specifying an exact version at deployment instead of using the latest or unspecified version. Locking the Helm Chart version aids in:
* **Ensure Compatibility**: Make sure the application's performance in the deployed environment aligns with its behavior during testing, even if new Chart versions are released.
* **Prevent Unintended Updates**: Prevent automatic updates that may introduce changes incompatible with your current deployment or operational practices.
### Name Override
When deploying multiple instances of the same Helm Chart within a Kubernetes cluster, name conflicts may occur. Use `nameOverride` and `fullnameOverride` to distinguish between different instances. For example, using distinct names for your production and staging environments can help avoid confusion.
* Using `nameOverride`, the StatefulSet name will be `-`.
* Using `fullnameOverride`, the StatefulSet name will be ``.
```yaml theme={null}
nameOverride: 'automq-prod'
fullnameOverride: 'automq-instance-prod'
```
### Docker Image
Bitnami provides the Docker image for AutoMQ deployment, with the default image being `bitnami/kafka:latest`. You should replace it with a custom AutoMQ image specifying a particular version:
```yaml theme={null}
global:
security:
allowInsecureImages: true
image:
registry: automqinc
repository: automq
tag: 1.5.5-bitnami
pullPolicy: Always
```
### Scheduling Strategy
For AutoMQ, a refined scheduling strategy in Kubernetes can be implemented using node affinities and tolerations. We suggest that a production-level AutoMQ operates exclusively without co-locating with other applications. It is advisable to tailor label matching rules based on node types:
#### Tolerance
It is recommended to add a taint to the Kubernetes node group: `key: "dedicated", operator: "Equal", value: "automq", effect: "NoSchedule"`.
```yaml theme={null}
controller:
tolerations:
- key: "dedicated"
operator: "Equal"
value: "automq"
effect: "NoSchedule"
broker:
tolerations:
- key: "dedicated"
operator: "Equal"
value: "automq"
effect: "NoSchedule"
```
#### Node Affinity
Override the default values in the controller/broker configuration to match the node labels (e.g., `node-type: m7g.xlarge`):
```yaml theme={null}
controller:
affinity:
nodeAffinity:
requiredDuringSchedulingIgnoredDuringExecution:
nodeSelectorTerms:
- matchExpressions:
- key: "node-type"
operator: In
values: ["m7g.xlarge"]
```
#### Pod Anti-affinity
Ensure that the controller component and the broker component are not scheduled on the same node by using the `podAntiAffinity` parameter:
```yaml theme={null}
controller:
affinity:
podAntiAffinity:
requiredDuringSchedulingIgnoredDuringExecution:
- labelSelector:
matchExpressions:
- key: app.kubernetes.io/instance
operator: In
values:
- automq
- key: app.kubernetes.io/component
operator: In
values:
- controller-eligible
- broker
topologyKey: kubernetes.io/hostname
```
### Scaling
#### Controller
The number of instances is configured through `controller.replicas`, which supports horizontal scaling. By default, the cluster deploys 3 Controller Pods, but users can customize the number of Controller replicas.
Note: Once the cluster deployment is complete, adjusting the replicas for the Controller is not recommended to avoid unexpected risks.
#### Broker
The number of instances is configured through `broker.replicas`, which supports horizontal scaling.
#### AutoScaling (HPA)
HPA is disabled by default. To enable it, you can configure parameters in `broker.autoscaling.hpa`:
```yaml theme={null}
broker:
autoscaling:
hpa:
enabled: true # Enable HPA
minReplicas: "1" # Minimum Replicas
maxReplicas: "3" # Maximum Replicas
targetCPU: "60" # Target CPU Utilization Rate (%)
targetMemory: "" # Target Memory Utilization (% Optional)
```
Note: We do not recommend configuring Controller HPA because the Controller in Kafka KRaft mode relies on the Raft protocol to maintain metadata consistency, which does not support automated Raft membership changes. Therefore, configuring Controller HPA could lead to quorum failure or make the cluster unavailable.
### Resource Configuration
It is recommended that each Pod for AutoMQ runs on resources of 4Core16GB. Adjust resource parameters through the following configurations:
```yaml theme={null}
controller:
replicaCount: 3
resources:
requests:
cpu: "3000m"
memory: "12Gi"
limits:
cpu: "4000m"
memory: "16Gi"
heapOpts: -Xmx6g -Xms6g -XX:MaxDirectMemorySize=6g -XX:MetaspaceSize=96m
```
```yaml theme={null}
broker:
replicaCount: 2
resources:
requests:
cpu: "3000m"
memory: "12Gi"
limits:
cpu: "4000m"
memory: "16Gi"
heapOpts: -Xmx6g -Xms6g -XX:MaxDirectMemorySize=6g -XX:MetaspaceSize=96m
```
### Security and Authentication
Each listener configured in Kafka can have a different authentication protocol. For instance, you can use `sasl_tls` authentication for client communications and `tls` for inter-Controller and Broker communications. The table below lists available protocols and their security features (see more details in [Kafka Security Authentication](https://github.com/bitnami/charts/blob/main/bitnami/kafka/README.md#enable-security-for-kafka)):
| Method | Authentication Method | Encrypted via TLS |
| --------------- | --------------------------- | ----------------- |
| plaintext | None | No |
| tls | None | Yes |
| mtls | Yes (Mutual Authentication) | Yes |
| sasl | Yes (via SASL) | No |
| sasl\_tls
## Stop and Uninstall the AutoMQ Cluster
* After completing the tests, AutoMQ clusters can be stopped and uninstalled using `helm uninstall`.
```bash theme={null}
helm uninstall automq-release -n automq
```
* If historical data is no longer needed, it's necessary to delete the cluster's PVC and Bucket data altogether to prevent leftover data from affecting the next deployment.
## Precautions for Production Environment
### Lock Chart Version
To avoid unexpected changes during deployment, it is recommended to lock the Helm Chart version. Locking the version means specifying an exact version at deployment instead of using the latest or unspecified version. Locking the Helm Chart version aids in:
* **Ensure Compatibility**: Make sure the application's performance in the deployed environment aligns with its behavior during testing, even if new Chart versions are released.
* **Prevent Unintended Updates**: Prevent automatic updates that may introduce changes incompatible with your current deployment or operational practices.
### Name Override
When deploying multiple instances of the same Helm Chart within a Kubernetes cluster, name conflicts may occur. Use `nameOverride` and `fullnameOverride` to distinguish between different instances. For example, using distinct names for your production and staging environments can help avoid confusion.
* Using `nameOverride`, the StatefulSet name will be `-`.
* Using `fullnameOverride`, the StatefulSet name will be ``.
```yaml theme={null}
nameOverride: 'automq-prod'
fullnameOverride: 'automq-instance-prod'
```
### Docker Image
Bitnami provides the Docker image for AutoMQ deployment, with the default image being `bitnami/kafka:latest`. You should replace it with a custom AutoMQ image specifying a particular version:
```yaml theme={null}
global:
security:
allowInsecureImages: true
image:
registry: automqinc
repository: automq
tag: 1.5.5-bitnami
pullPolicy: Always
```
### Scheduling Strategy
For AutoMQ, a refined scheduling strategy in Kubernetes can be implemented using node affinities and tolerations. We suggest that a production-level AutoMQ operates exclusively without co-locating with other applications. It is advisable to tailor label matching rules based on node types:
#### Tolerance
It is recommended to add a taint to the Kubernetes node group: `key: "dedicated", operator: "Equal", value: "automq", effect: "NoSchedule"`.
```yaml theme={null}
controller:
tolerations:
- key: "dedicated"
operator: "Equal"
value: "automq"
effect: "NoSchedule"
broker:
tolerations:
- key: "dedicated"
operator: "Equal"
value: "automq"
effect: "NoSchedule"
```
#### Node Affinity
Override the default values in the controller/broker configuration to match the node labels (e.g., `node-type: m7g.xlarge`):
```yaml theme={null}
controller:
affinity:
nodeAffinity:
requiredDuringSchedulingIgnoredDuringExecution:
nodeSelectorTerms:
- matchExpressions:
- key: "node-type"
operator: In
values: ["m7g.xlarge"]
```
#### Pod Anti-affinity
Ensure that the controller component and the broker component are not scheduled on the same node by using the `podAntiAffinity` parameter:
```yaml theme={null}
controller:
affinity:
podAntiAffinity:
requiredDuringSchedulingIgnoredDuringExecution:
- labelSelector:
matchExpressions:
- key: app.kubernetes.io/instance
operator: In
values:
- automq
- key: app.kubernetes.io/component
operator: In
values:
- controller-eligible
- broker
topologyKey: kubernetes.io/hostname
```
### Scaling
#### Controller
The number of instances is configured through `controller.replicas`, which supports horizontal scaling. By default, the cluster deploys 3 Controller Pods, but users can customize the number of Controller replicas.
Note: Once the cluster deployment is complete, adjusting the replicas for the Controller is not recommended to avoid unexpected risks.
#### Broker
The number of instances is configured through `broker.replicas`, which supports horizontal scaling.
#### AutoScaling (HPA)
HPA is disabled by default. To enable it, you can configure parameters in `broker.autoscaling.hpa`:
```yaml theme={null}
broker:
autoscaling:
hpa:
enabled: true # Enable HPA
minReplicas: "1" # Minimum Replicas
maxReplicas: "3" # Maximum Replicas
targetCPU: "60" # Target CPU Utilization Rate (%)
targetMemory: "" # Target Memory Utilization (% Optional)
```
Note: We do not recommend configuring Controller HPA because the Controller in Kafka KRaft mode relies on the Raft protocol to maintain metadata consistency, which does not support automated Raft membership changes. Therefore, configuring Controller HPA could lead to quorum failure or make the cluster unavailable.
### Resource Configuration
It is recommended that each Pod for AutoMQ runs on resources of 4Core16GB. Adjust resource parameters through the following configurations:
```yaml theme={null}
controller:
replicaCount: 3
resources:
requests:
cpu: "3000m"
memory: "12Gi"
limits:
cpu: "4000m"
memory: "16Gi"
heapOpts: -Xmx6g -Xms6g -XX:MaxDirectMemorySize=6g -XX:MetaspaceSize=96m
```
```yaml theme={null}
broker:
replicaCount: 2
resources:
requests:
cpu: "3000m"
memory: "12Gi"
limits:
cpu: "4000m"
memory: "16Gi"
heapOpts: -Xmx6g -Xms6g -XX:MaxDirectMemorySize=6g -XX:MetaspaceSize=96m
```
### Security and Authentication
Each listener configured in Kafka can have a different authentication protocol. For instance, you can use `sasl_tls` authentication for client communications and `tls` for inter-Controller and Broker communications. The table below lists available protocols and their security features (see more details in [Kafka Security Authentication](https://github.com/bitnami/charts/blob/main/bitnami/kafka/README.md#enable-security-for-kafka)):
| Method | Authentication Method | Encrypted via TLS |
| --------------- | --------------------------- | ----------------- |
| plaintext | None | No |
| tls | None | Yes |
| mtls | Yes (Mutual Authentication) | Yes |
| sasl | Yes (via SASL) | No |
| sasl\_tls
| Yes (via SASL)
| Yes
|
### External Access
Additional listeners and advertised listeners must be configured, and a specific service must be created for each Kafka Pod.
There are three ways to configure external access: by using LoadBalancer services, NodePort services, or ClusterIP services. For more information, refer to the [Kafka External Access](https://github.com/bitnami/charts/blob/main/bitnami/kafka/README.md#accessing-kafka-brokers-from-outside-the-cluster) section.
### **Monitoring**
The primary focus is on the integration of this Chart with Prometheus. For more details, refer to the section [Enable Prometheus Metrics](https://github.com/bitnami/charts/tree/main/bitnami/kafka#prometheus-metrics).
### Table Topic Feature
The Table Topic feature supports integration between topic streaming data and a static data lake. To enable the Table Topic feature in an AutoMQ cluster, refer to [Overview▸](/automq/table-topic/overview).