> ## Documentation Index
> Fetch the complete documentation index at: https://docs.automq.com/llms.txt
> Use this file to discover all available pages before exploring further.
# Airbyte
> AutoMQ, a cloud-native Kafka-compatible service, delivers cost-efficient, scalable data flow with Airbyte integration for optimal analytics.
## Preface
This guide shows how to integrate AutoMQ \[1] with Airbyte \[2] and a data warehouse to build a real-time data flow and analytics pipeline.
### AutoMQ Overview
AutoMQ is a Kafka-compatible streaming platform. For an overview, see [AutoMQ Overview](/automq/what-is-automq).
### Airbyte Overview
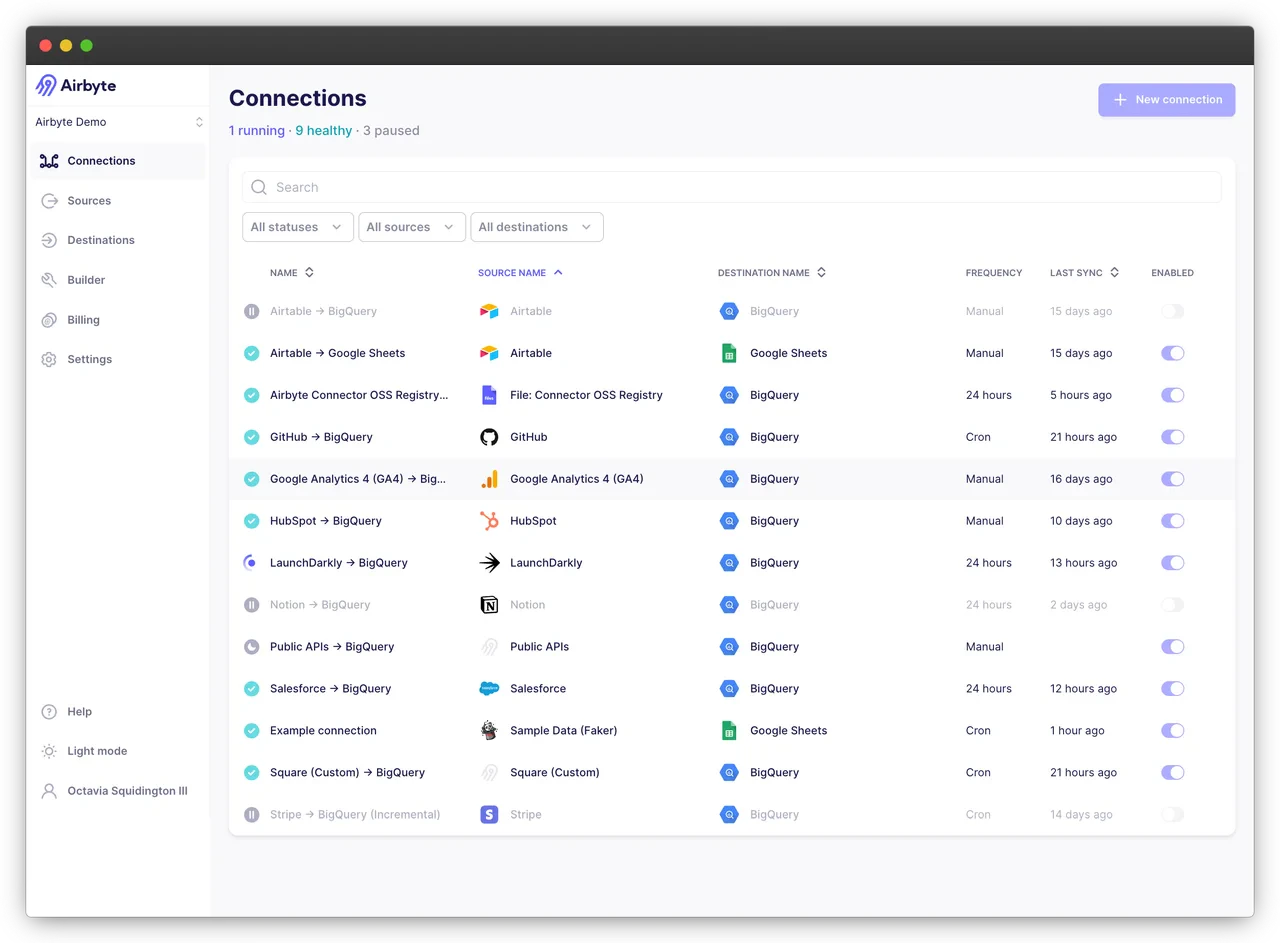
Airbyte is a data integration platform designed to simplify and automate the creation and management of data pipelines. It supports a wide variety of source and target systems, enabling users to easily configure data pipelines through a user-friendly web interface or API. Airbyte offers efficient Extract, Transform, Load (ETL) capabilities with built-in scheduling and monitoring mechanisms to ensure the reliability and performance of data pipelines. Its modular design supports custom connectors to meet diverse data integration demands.
Airbyte's major advantages include high scalability and flexibility, allowing users to swiftly adapt to various data sources and target systems. Built-in data normalization and automated scheduling functionalities enhance the efficiency and consistency of data processing. With containerized deployment, Airbyte streamlines installation and scaling, making it apt for enterprise-level data integration and data warehousing. Additionally, its comprehensive connector library and community support make it an excellent tool for data engineers and analysts to efficiently address complex data integration challenges.
 ## Prerequisites
* Data Source: An available AutoMQ node.
* Data Connector: Available Airbyte Environment.
* Data Endpoint (Data Warehouse): In this example, I've selected a cloud-deployed Databricks \[3] cluster.
## Quick Deployment
### Deploy AutoMQ
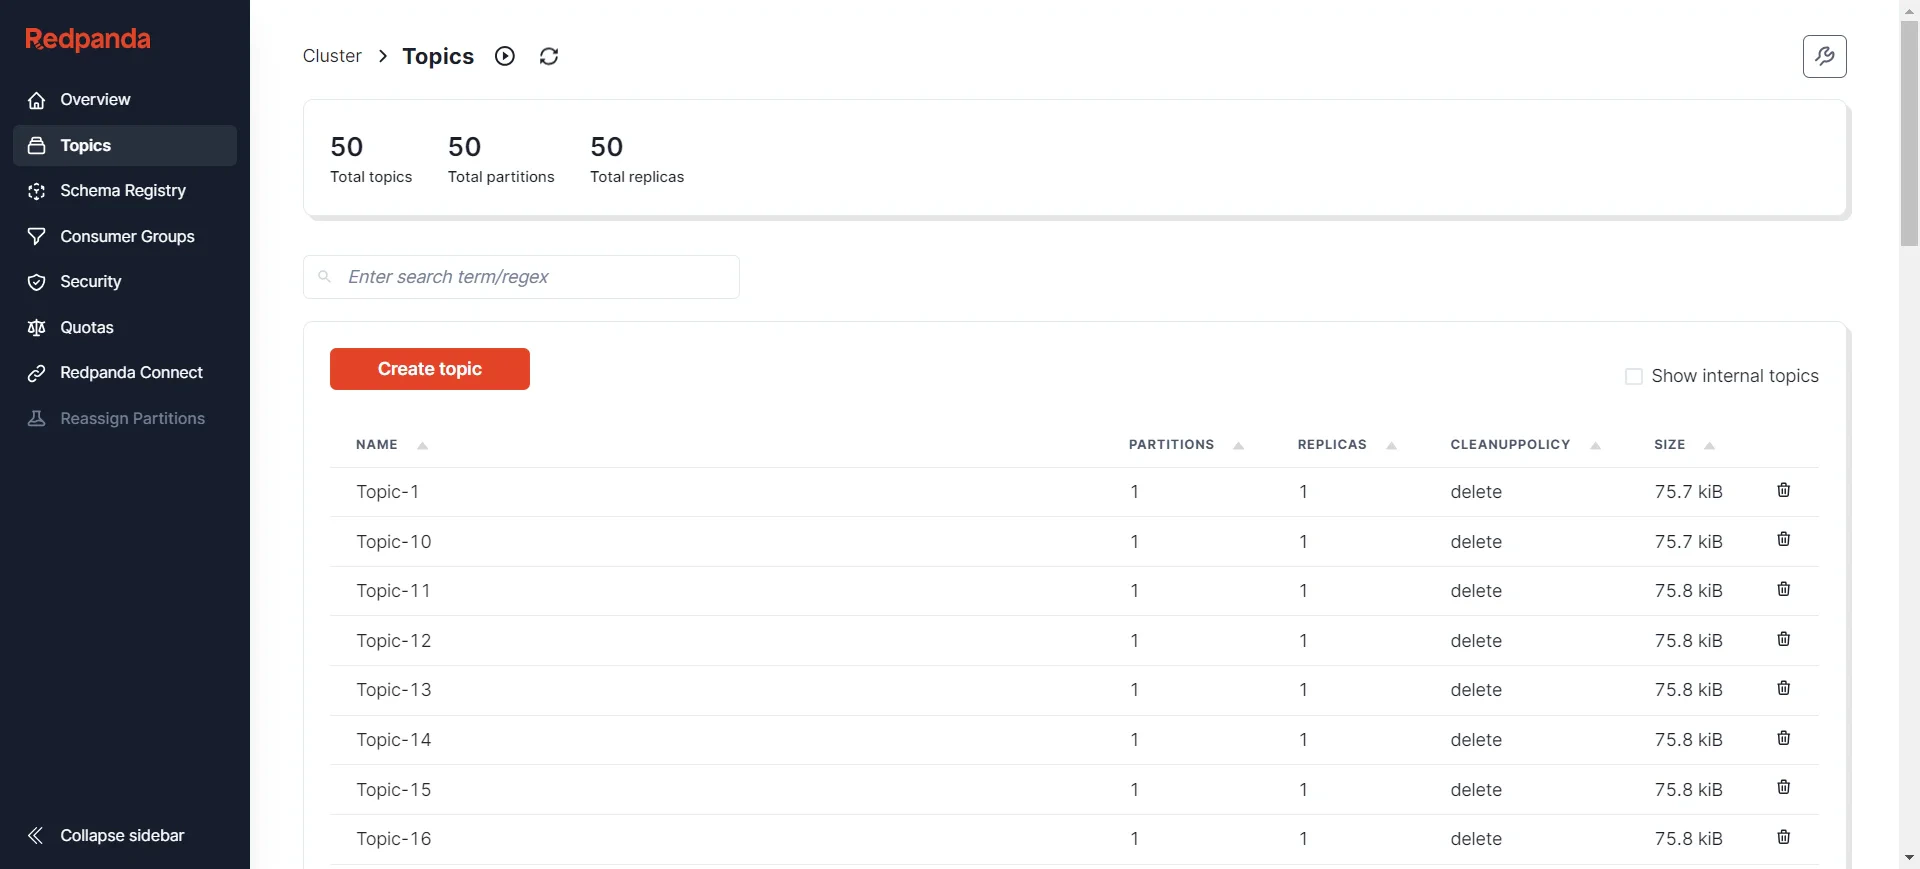
Deployment can be achieved by consulting the official AutoMQ documentation: [Deploy Multi-Nodes Cluster on Linux▸](/automq/deployment/deploy-multi-nodes-cluster-on-linux). Once the setup is complete, data preparation can be done using either the Kafka SDK or manually, followed by the data synchronization process. I've prepared some data in advance, which can be observed using various visualization tools to monitor AutoMQ node status, such as [Redpanda Console](https://www.redpanda.com/redpanda-console-kafka-ui) \[5], [Kafdrop](https://github.com/obsidiandynamics/kafdrop) \[6], and others. Here, I've chosen Redpanda Console, where you can see that there are currently 50 topics, each containing 1000 initial messages.
## Prerequisites
* Data Source: An available AutoMQ node.
* Data Connector: Available Airbyte Environment.
* Data Endpoint (Data Warehouse): In this example, I've selected a cloud-deployed Databricks \[3] cluster.
## Quick Deployment
### Deploy AutoMQ
Deployment can be achieved by consulting the official AutoMQ documentation: [Deploy Multi-Nodes Cluster on Linux▸](/automq/deployment/deploy-multi-nodes-cluster-on-linux). Once the setup is complete, data preparation can be done using either the Kafka SDK or manually, followed by the data synchronization process. I've prepared some data in advance, which can be observed using various visualization tools to monitor AutoMQ node status, such as [Redpanda Console](https://www.redpanda.com/redpanda-console-kafka-ui) \[5], [Kafdrop](https://github.com/obsidiandynamics/kafdrop) \[6], and others. Here, I've chosen Redpanda Console, where you can see that there are currently 50 topics, each containing 1000 initial messages.
 Message Format:
```json theme={null}
[
{
"partitionID": 0,
"offset": 950,
"timestamp": 1721988652404,
"compression": "uncompressed",
"isTransactional": false,
"headers": [],
"key": {
"payload": "key-451",
"encoding": "text"
},
"value": {
"payload": {
"userId": 451,
"action": "visit",
"timestamp": 1721988652404
},
"encoding": "json"
}
}
]
```
### Deploying Airbyte
> Refer to the official Airbyte documentation: [Quickstart | Airbyte](https://docs.airbyte.com/using-airbyte/getting-started/oss-quickstart) \[7]
Here, I will use the example of deploying Airbyte on a Linux system.
#### Environment Preparation
First, you need to install `abctl`, an official setup tool provided by Airbyte that facilitates quick setup of the required Airbyte environment. Note that this tool requires a Docker environment. If you don't have Docker installed, see Docker's installation instructions: [Docker Install](https://docs.docker.com/desktop/install/linux-install/) \[8]. You can check your Docker version by running the command `docker version`:
```bash theme={null}
Client:
Version: 20.10.5+dfsg1
API version: 1.41
Go version: go1.15.15
Git commit: 55c4c88
Built: Mon May 30 18:34:49 2022
OS/Arch: linux/amd64
Context: default
Experimental: true
Server:
Engine:
Version: 20.10.5+dfsg1
.........
```
#### Preparing the Abctl Tool
To get started with abctl, execute the following commands sequentially. Here, I'm downloading version `version: v0.9.2`:
```bash theme={null}
# Download:
wget https://github.com/airbytehq/abctl/releases/download/v0.9.2/abctl-v0.9.2-linux-amd64.tar.gz
# Unzip:
tar -xvzf abctl-v0.9.2-linux-amd64.tar.gz
# Enter:
cd abctl-v0.9.2-linux-amd64
# Add Execution Permission:
chmod +x abctl
# Global Environment:
sudo mv abctl /usr/local/bin
# Verify Version:
abctl version
# Output
version: v0.9.2
```
#### Deploying the Airbyte Environment
By executing the command `abctl local install`, this will pull Airbyte's images in Docker and deploy the environment using Helm. Some of the logs are as follows:
```bash theme={null}
INFO Namespace 'airbyte-abctl' already exists
INFO Persistent volume 'airbyte-minio-pv' already exists
INFO Persistent volume 'airbyte-volume-db' already exists
INFO Persistent volume claim 'airbyte-minio-pv-claim-airbyte-minio-0' already exists
INFO Persistent volume claim 'airbyte-volume-db-airbyte-db-0' already exists
INFO Starting Helm Chart installation of 'airbyte/airbyte' (version: 0.350.0)
SUCCESS Installed Helm Chart airbyte/airbyte:
Name: airbyte-abctl
Namespace: airbyte-abctl
Version: 0.350.0
Release: 2
INFO Starting Helm Chart installation of 'nginx/ingress-nginx' (version: 4.11.1)
SUCCESS Installed Helm Chart nginx/ingress-nginx:
Name: ingress-nginx
Namespace: ingress-nginx
Version: 4.11.1
Release: 2
SUCCESS Basic-Auth secret created
SUCCESS Found existing Ingress
SUCCESS Updated existing Ingress
SUCCESS Launched web-browser successfully for http://localhost:8000
SUCCESS Airbyte installation complete
```
Once the launch is successful, you can log in via your browser at `http://localhost:8000` with the default credentials:
* Username: `airbyte`yaml
* Password: `password`
If you want to set your own username and password, use command line flags or variables. For example, to set the username and password to `zhaoxi` and `ktpro123` respectively, you can run the following command:
```bash theme={null}
abctl local install --username zhaoxi --password ktpro123
```
Or you can set these values using environment variables:
```bash theme={null}
export ABCTL_LOCAL_INSTALL_PASSWORD=airbyte
export ABCTL_LOCAL_INSTALL_USERNAME=password
```
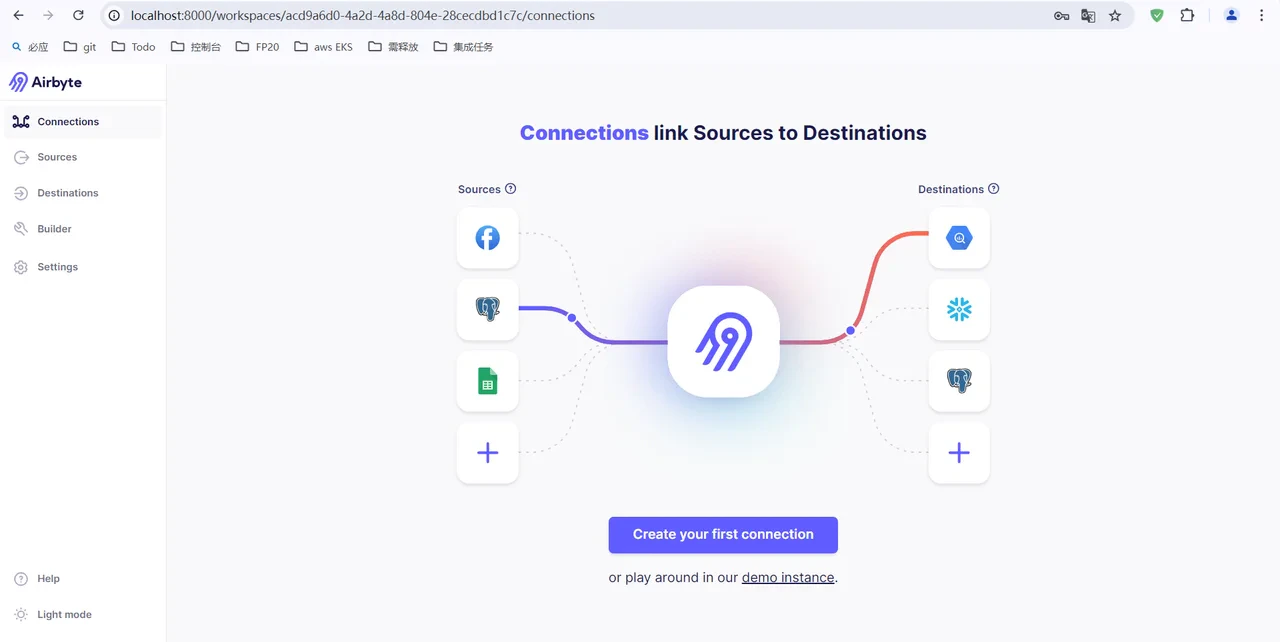
After entering your username and password, you will access the Airbyte workspace. This interface allows you to easily set up and manage all connections and move data!
Message Format:
```json theme={null}
[
{
"partitionID": 0,
"offset": 950,
"timestamp": 1721988652404,
"compression": "uncompressed",
"isTransactional": false,
"headers": [],
"key": {
"payload": "key-451",
"encoding": "text"
},
"value": {
"payload": {
"userId": 451,
"action": "visit",
"timestamp": 1721988652404
},
"encoding": "json"
}
}
]
```
### Deploying Airbyte
> Refer to the official Airbyte documentation: [Quickstart | Airbyte](https://docs.airbyte.com/using-airbyte/getting-started/oss-quickstart) \[7]
Here, I will use the example of deploying Airbyte on a Linux system.
#### Environment Preparation
First, you need to install `abctl`, an official setup tool provided by Airbyte that facilitates quick setup of the required Airbyte environment. Note that this tool requires a Docker environment. If you don't have Docker installed, see Docker's installation instructions: [Docker Install](https://docs.docker.com/desktop/install/linux-install/) \[8]. You can check your Docker version by running the command `docker version`:
```bash theme={null}
Client:
Version: 20.10.5+dfsg1
API version: 1.41
Go version: go1.15.15
Git commit: 55c4c88
Built: Mon May 30 18:34:49 2022
OS/Arch: linux/amd64
Context: default
Experimental: true
Server:
Engine:
Version: 20.10.5+dfsg1
.........
```
#### Preparing the Abctl Tool
To get started with abctl, execute the following commands sequentially. Here, I'm downloading version `version: v0.9.2`:
```bash theme={null}
# Download:
wget https://github.com/airbytehq/abctl/releases/download/v0.9.2/abctl-v0.9.2-linux-amd64.tar.gz
# Unzip:
tar -xvzf abctl-v0.9.2-linux-amd64.tar.gz
# Enter:
cd abctl-v0.9.2-linux-amd64
# Add Execution Permission:
chmod +x abctl
# Global Environment:
sudo mv abctl /usr/local/bin
# Verify Version:
abctl version
# Output
version: v0.9.2
```
#### Deploying the Airbyte Environment
By executing the command `abctl local install`, this will pull Airbyte's images in Docker and deploy the environment using Helm. Some of the logs are as follows:
```bash theme={null}
INFO Namespace 'airbyte-abctl' already exists
INFO Persistent volume 'airbyte-minio-pv' already exists
INFO Persistent volume 'airbyte-volume-db' already exists
INFO Persistent volume claim 'airbyte-minio-pv-claim-airbyte-minio-0' already exists
INFO Persistent volume claim 'airbyte-volume-db-airbyte-db-0' already exists
INFO Starting Helm Chart installation of 'airbyte/airbyte' (version: 0.350.0)
SUCCESS Installed Helm Chart airbyte/airbyte:
Name: airbyte-abctl
Namespace: airbyte-abctl
Version: 0.350.0
Release: 2
INFO Starting Helm Chart installation of 'nginx/ingress-nginx' (version: 4.11.1)
SUCCESS Installed Helm Chart nginx/ingress-nginx:
Name: ingress-nginx
Namespace: ingress-nginx
Version: 4.11.1
Release: 2
SUCCESS Basic-Auth secret created
SUCCESS Found existing Ingress
SUCCESS Updated existing Ingress
SUCCESS Launched web-browser successfully for http://localhost:8000
SUCCESS Airbyte installation complete
```
Once the launch is successful, you can log in via your browser at `http://localhost:8000` with the default credentials:
* Username: `airbyte`yaml
* Password: `password`
If you want to set your own username and password, use command line flags or variables. For example, to set the username and password to `zhaoxi` and `ktpro123` respectively, you can run the following command:
```bash theme={null}
abctl local install --username zhaoxi --password ktpro123
```
Or you can set these values using environment variables:
```bash theme={null}
export ABCTL_LOCAL_INSTALL_PASSWORD=airbyte
export ABCTL_LOCAL_INSTALL_USERNAME=password
```
After entering your username and password, you will access the Airbyte workspace. This interface allows you to easily set up and manage all connections and move data!
 ### Deploying Databricks
If you do not yet have a Databricks service available, refer to the official documentation for setup: [Google Databricks](https://cloud.google.com/databricks?hl=zh_cn)\[9].
## Data Synchronization
### Add New Data Source
Add AutoMQ as a data source. Thanks to AutoMQ's full compatibility with Kafka, you can set up an AutoMQ data source using Kafka's data source template. Navigate via the Airbyte interface's left sidebar -> Sources -> search Kafka, then fill in basic information such as Bootstrap Servers, Protocol, Topic Pattern, etc.
### Deploying Databricks
If you do not yet have a Databricks service available, refer to the official documentation for setup: [Google Databricks](https://cloud.google.com/databricks?hl=zh_cn)\[9].
## Data Synchronization
### Add New Data Source
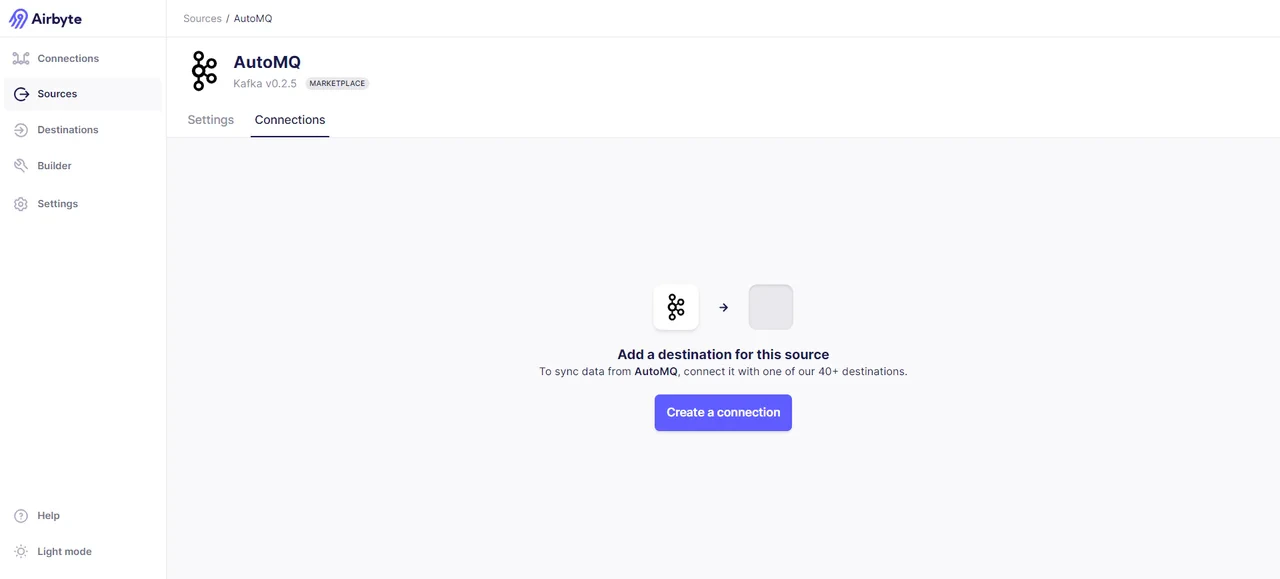
Add AutoMQ as a data source. Thanks to AutoMQ's full compatibility with Kafka, you can set up an AutoMQ data source using Kafka's data source template. Navigate via the Airbyte interface's left sidebar -> Sources -> search Kafka, then fill in basic information such as Bootstrap Servers, Protocol, Topic Pattern, etc.
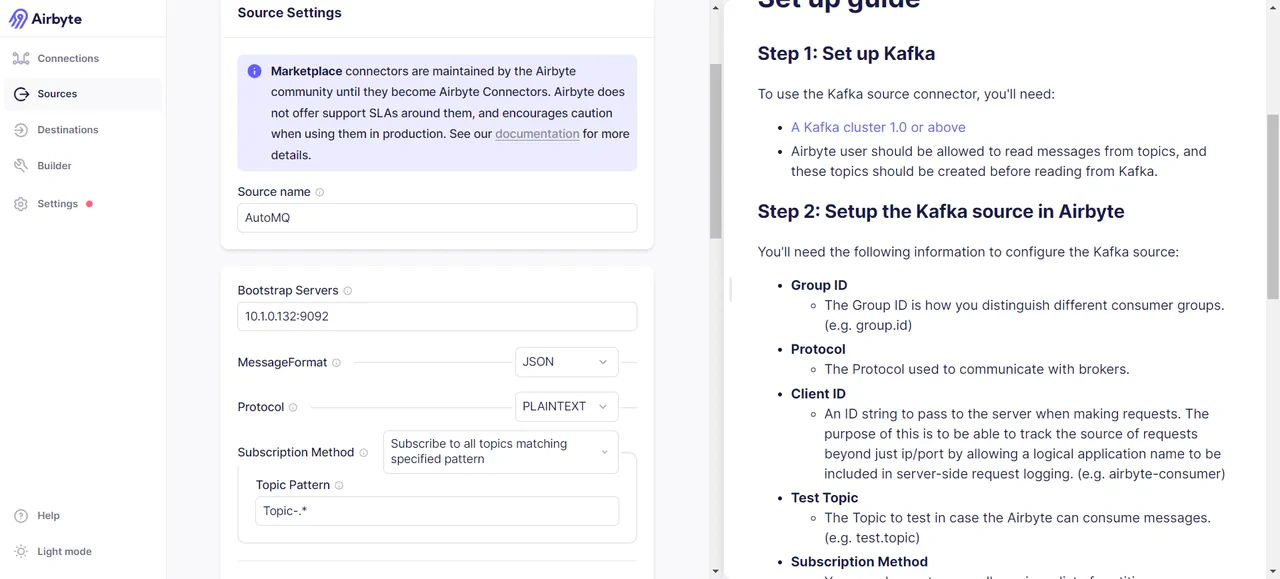 We then need to specify the object of data transfer, which can be topics that meet custom regex criteria, or you can directly specify the topics to be transferred. Here, I choose to use the regex expression `Topic-.*` to match all topics with the prefix `Topic-`. This aligns with the format of my prepared data, so you need to ensure your data can be matched as well. After successful addition, we can see the following results, proving that the data source connection was successful:
 ### Add Data Destination
We have chosen Databricks as our data destination, although you can select other options if you wish. For a complete list of supported destinations, visit: [Destinations | Airbyte](https://docs.airbyte.com/integrations/destinations/) \[10]. In the Airbyte interface, go to the sidebar -> Destinations -> Search for Databricks:
### Add Data Destination
We have chosen Databricks as our data destination, although you can select other options if you wish. For a complete list of supported destinations, visit: [Destinations | Airbyte](https://docs.airbyte.com/integrations/destinations/) \[10]. In the Airbyte interface, go to the sidebar -> Destinations -> Search for Databricks:
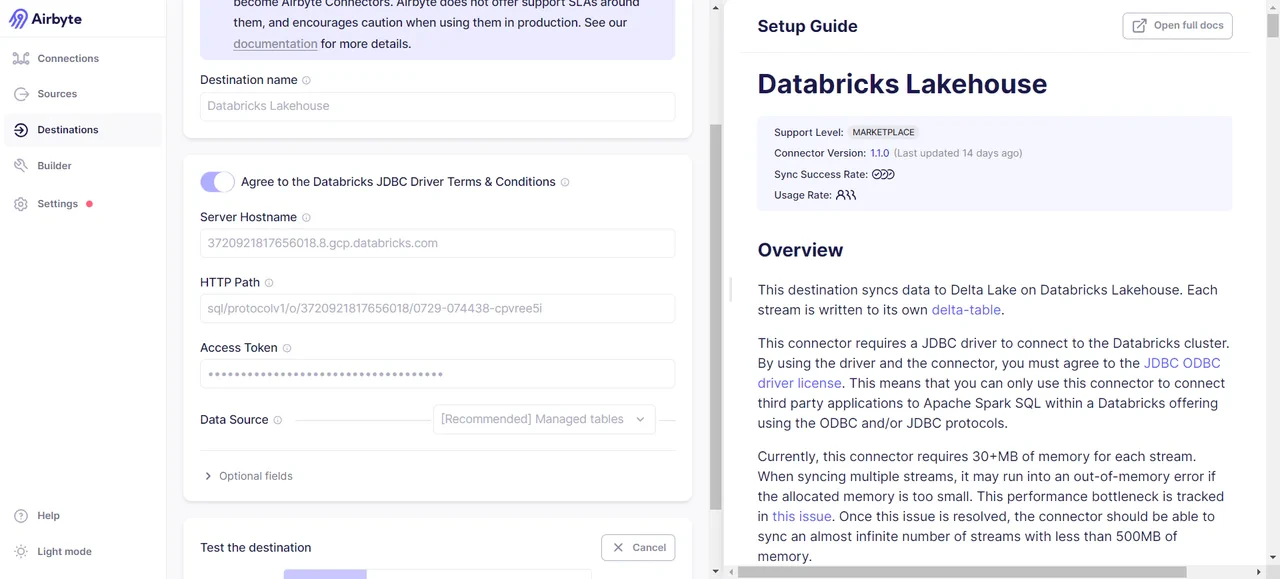 The necessary credential information can be obtained from the Databricks cluster. The specific steps are as follows:
* Go to the created Databricks Cluster -> Select Advanced Options -> JDBC/ODBC, and you will find the values for HTTP PATH and Server Hostname.
The necessary credential information can be obtained from the Databricks cluster. The specific steps are as follows:
* Go to the created Databricks Cluster -> Select Advanced Options -> JDBC/ODBC, and you will find the values for HTTP PATH and Server Hostname.
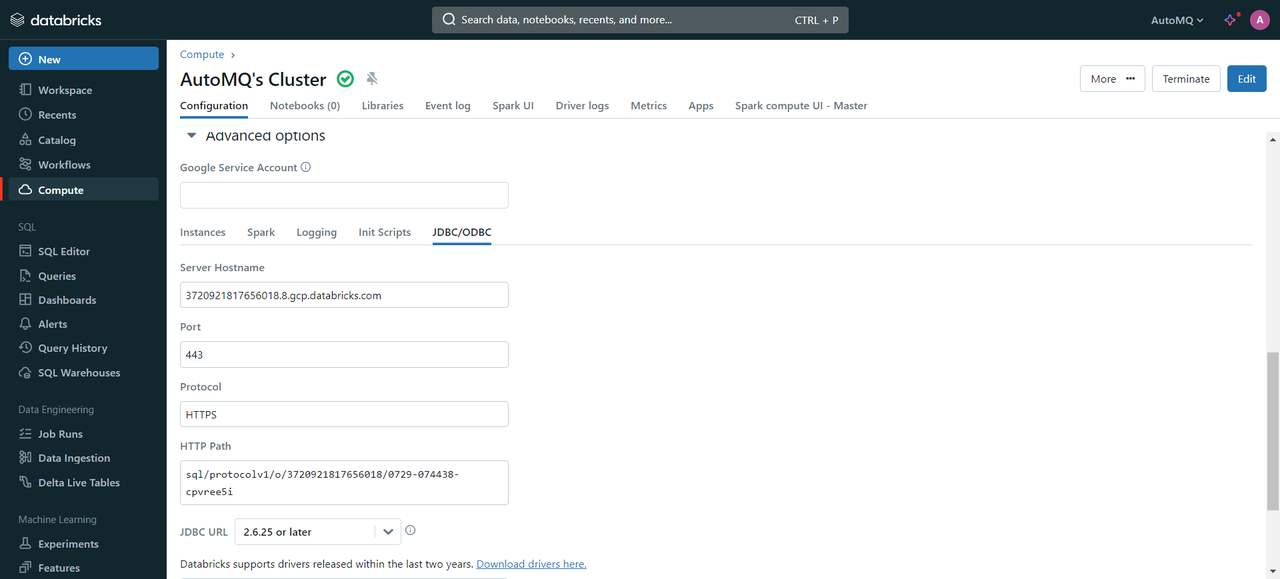 * In the top right corner of the cluster, select the user -> go to Settings -> choose User -> Developer -> AccessToken -> Generate new Token. You will receive a Token similar to `dapi8d336faXXXXXXXXXa6aa18a086c0e`.
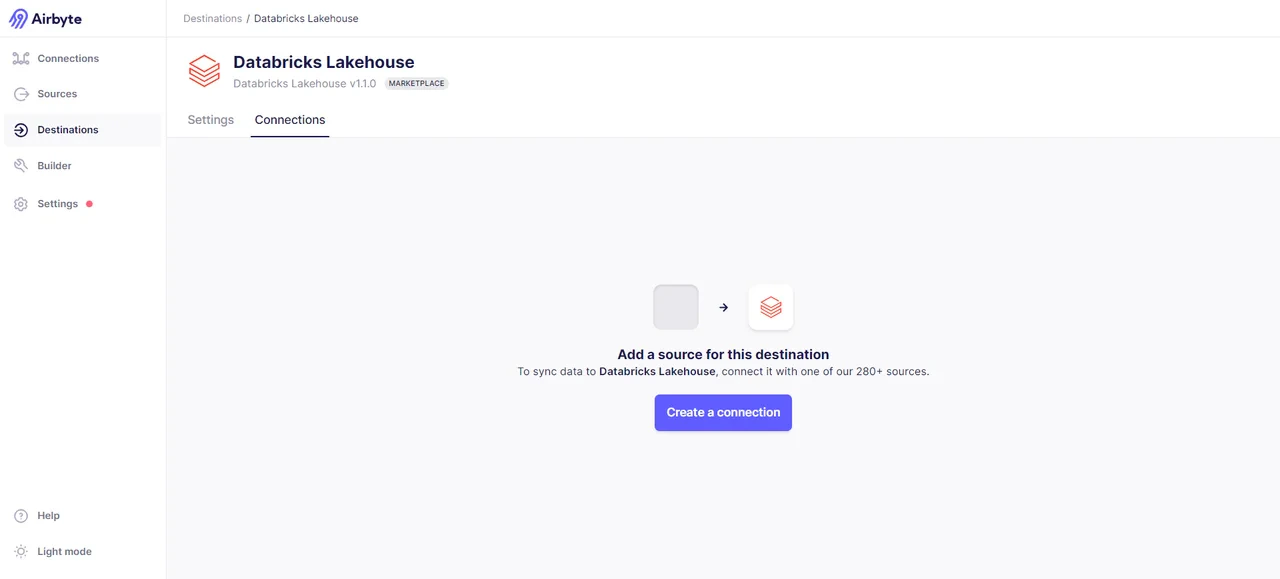
Once you have the credential information, proceed to create a data endpoint. If successful, you will see the following interface:
* In the top right corner of the cluster, select the user -> go to Settings -> choose User -> Developer -> AccessToken -> Generate new Token. You will receive a Token similar to `dapi8d336faXXXXXXXXXa6aa18a086c0e`.
Once you have the credential information, proceed to create a data endpoint. If successful, you will see the following interface:
 ### Initiate Connection and Transfer Data
With both the data source and data endpoint ready, we can now establish a connection. Select Airbyte's left sidebar -> Connections -> choose the data source and data endpoint -> establish connection.
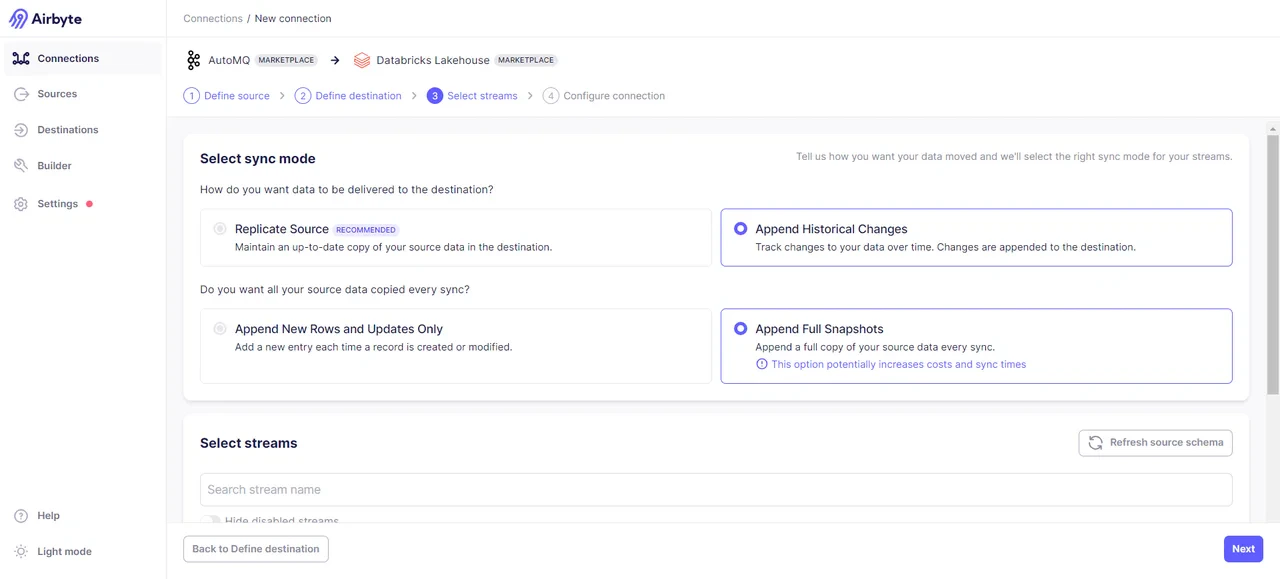
After successfully connecting, you need to select the mode of data transmission. Here, both incremental sync and full sync options are provided. I opted for the full sync mode:
### Initiate Connection and Transfer Data
With both the data source and data endpoint ready, we can now establish a connection. Select Airbyte's left sidebar -> Connections -> choose the data source and data endpoint -> establish connection.
After successfully connecting, you need to select the mode of data transmission. Here, both incremental sync and full sync options are provided. I opted for the full sync mode:
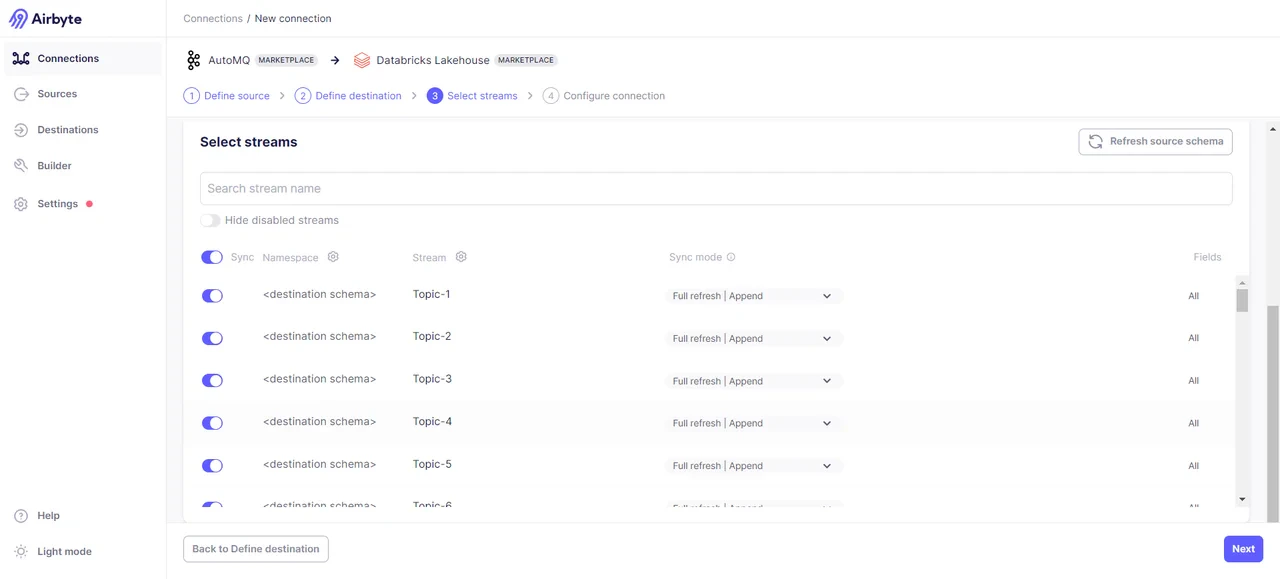
 Select the specific Topics data you need to transmit:
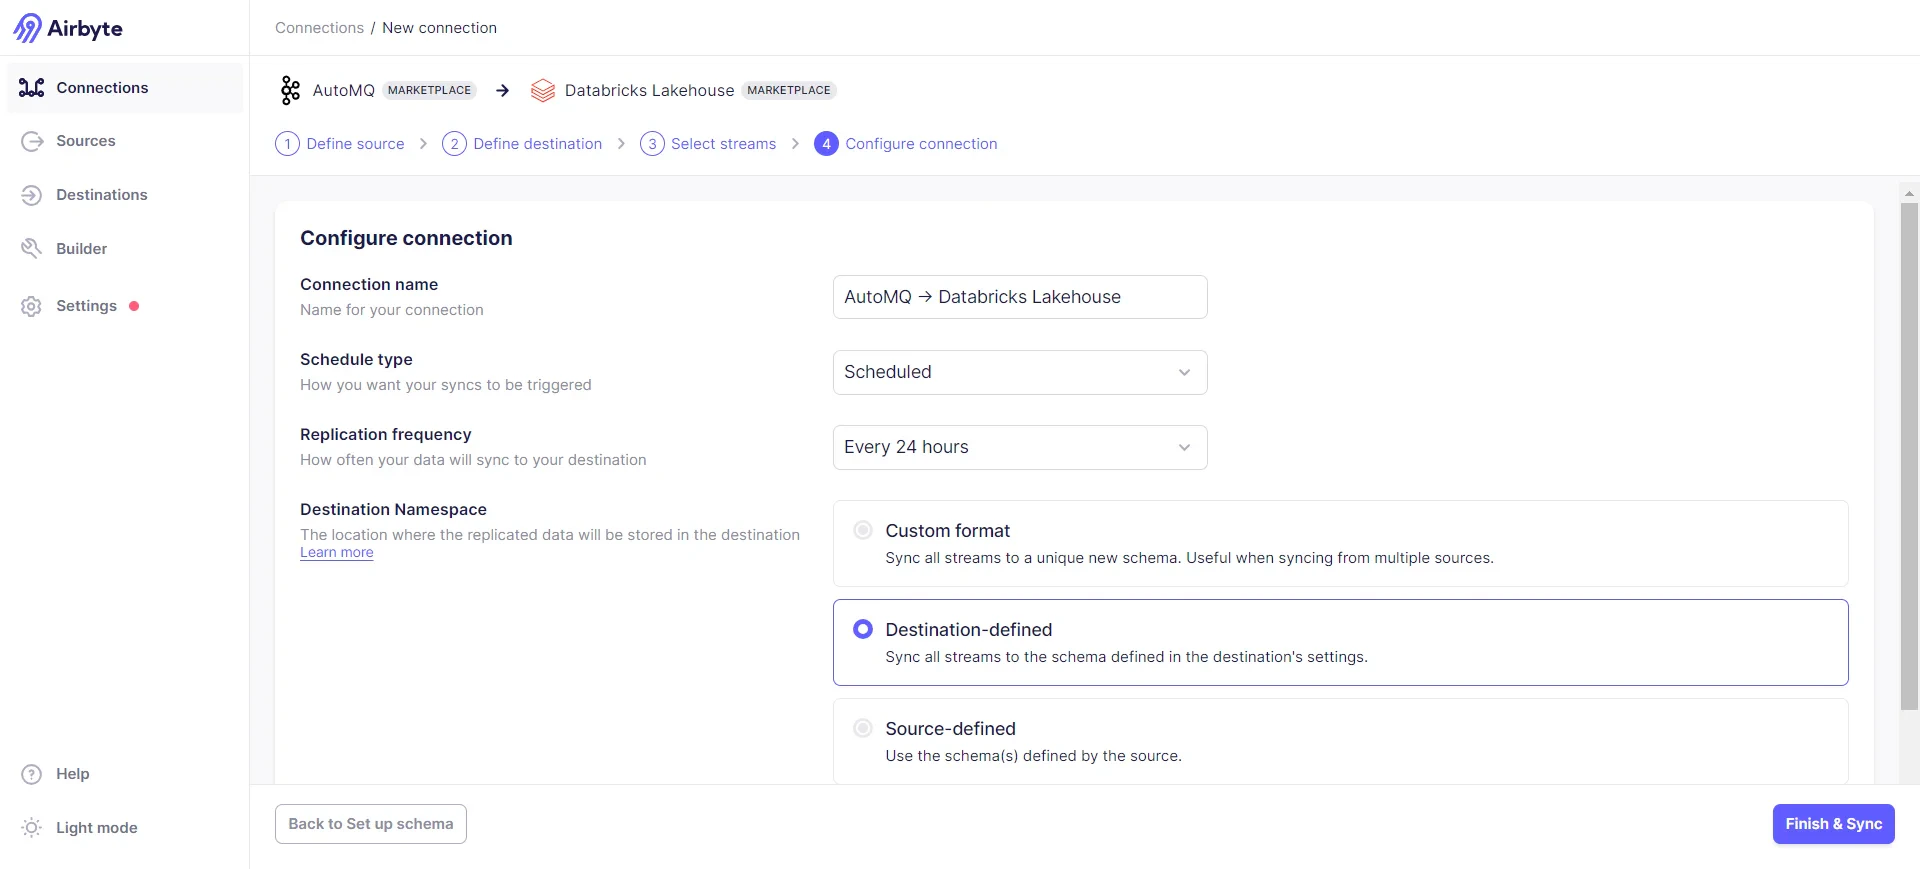
 Configure sync frequency and target data formats:
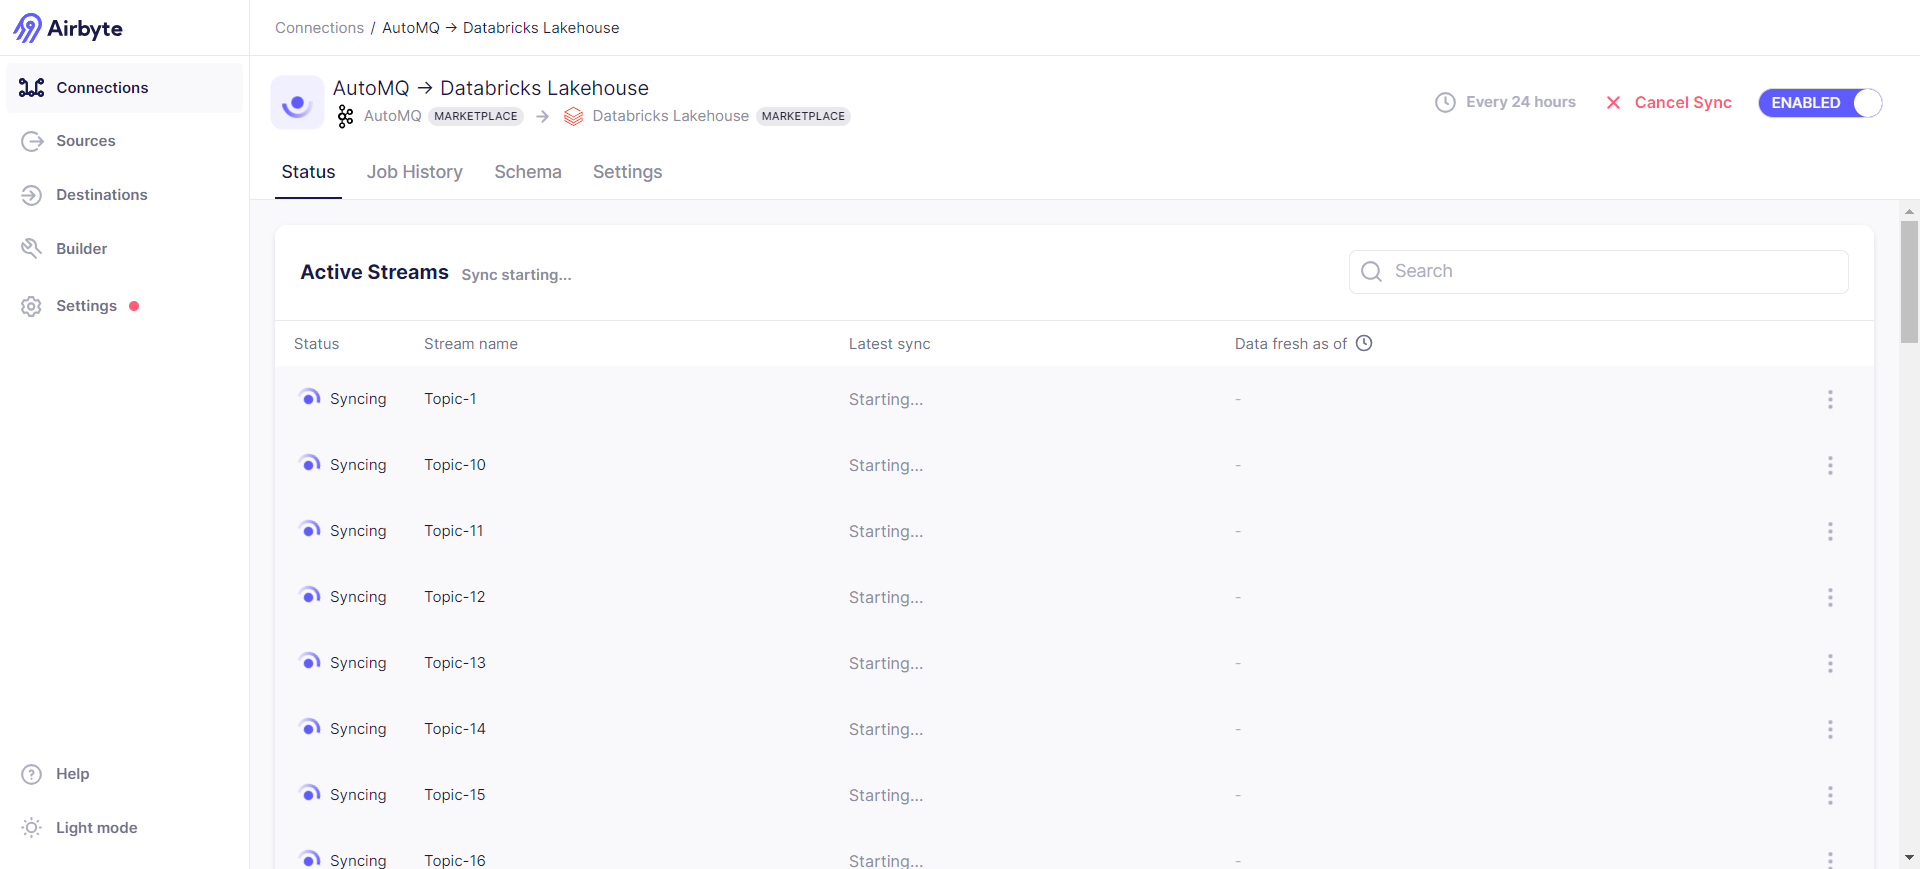
 Start Sync:
 You can check the synchronization status via Job History -> Job -> Logs, where part of the log content is:
```bash theme={null}
2024-07-29 08:53:33 source > INFO o.a.k.c.c.i.AbstractCoordinator(resetStateAndGeneration):998 [Consumer clientId=consumer-airbyte-consumer-group-1, groupId=airbyte-consumer-group] Resetting generation and member id due to: consumer pro-actively leaving the group
2024-07-29 08:53:33 source > INFO o.a.k.c.c.i.AbstractCoordinator(requestRejoin):1045 [Consumer clientId=consumer-airbyte-consumer-group-1, groupId=airbyte-consumer-group] Request joining group due to: consumer pro-actively leaving the group
2024-07-29 08:53:33 source > INFO o.a.k.c.m.Metrics(close):659 Metrics scheduler closed
2024-07-29 08:53:33 source > INFO o.a.k.c.m.Metrics(close):663 Closing reporter org.apache.kafka.common.metrics.JmxReporter
2024-07-29 08:53:33 source > INFO o.a.k.c.m.Metrics(close):669 Metrics reporters closed
2024-07-29 08:53:33 source > INFO o.a.k.c.u.AppInfoParser(unregisterAppInfo):83 App info kafka.consumer for consumer-airbyte-consumer-group-1 unregistered
2024-07-29 08:53:33 source > INFO i.a.c.i.b.IntegrationRunner(runInternal):231 Completed integration: io.airbyte.integrations.source.kafka.KafkaSource
2024-07-29 08:53:33 source > INFO i.a.i.s.k.KafkaSource(main):62 Completed source: class io.airbyte.integrations.source.kafka.KafkaSource
2024-07-29 08:53:33 replication-orchestrator > (pod: airbyte-abctl / source-kafka-read-2-0-pbvbp) - Closed all resources for pod
2024-07-29 08:53:33 replication-orchestrator > Total records read: 0 (0 bytes)
2024-07-29 08:53:33 replication-orchestrator > Schema validation was performed to a max of 10 records with errors per stream.
2024-07-29 08:53:33 replication-orchestrator > readFromSource: done. (source.isFinished:true, fromSource.isClosed:false)
2024-07-29 08:53:33 replication-orchestrator > processMessage: done. (fromSource.isDone:true, forDest.isClosed:false)
2024-07-29 08:53:33 replication-orchestrator > thread status... heartbeat thread: false , replication thread: true
2024-07-29 08:53:33 replication-orchestrator > writeToDestination: done. (forDest.isDone:true, isDestRunning:true)
2024-07-29 08:53:33 replication-orchestrator > thread status... timeout thread: false , replication thread: true
2024-07-29 08:53:35 destination > INFO i.a.i.d.j.JdbcBufferedConsumerFactory(lambda$onStartFunction$1):147 Preparing raw table in destination started for stream Topic-27. schema: default, table name: _airbyte_raw_topic_27
2024-07-29 08:53:40 destination > INFO i.a.i.d.j.JdbcBufferedConsumerFactory(lambda$onStartFunction$1):147 Preparing raw table in destination started for stream Topic-24. schema: default, table name: _airbyte_raw_topic_24
2024-07-29 08:53:45 destination > INFO i.a.i.d.j.JdbcBufferedConsumerFactory(lambda$onStartFunction$1):147 Preparing raw table in destination started for stream Topic-25. schema: default, table name: _airbyte_raw_topic_25
2024-07-29 08:53:50 destination > INFO i.a.i.d.j.JdbcBufferedConsumerFactory(lambda$onStartFunction$1):147 Preparing raw table in destination started for stream Topic-28. schema: default, table name: _airbyte_raw_topic_28
2024-07-29 08:53:55 destination > INFO i.a.i.d.j.JdbcBufferedConsumerFactory(lambda$onStartFunction$1):147 Preparing raw table in destination started for stream Topic-29. schema: default, table name: _airbyte_raw_topic_29
2024-07-29 08:54:01 destination > INFO i.a.i.d.j.JdbcBufferedConsumerFactory(lambda$onStartFunction$1):147 Preparing raw table in destination started for stream Topic-30. schema: default, table name: _airbyte_raw_topic_30
2024-07-29 08:54:06 destination > INFO i.a.i.d.j.JdbcBufferedConsumerFactory(lambda$onStartFunction$1):147 Preparing raw table in destination started for stream Topic-33. schema: default, table name: _airbyte_raw_topic_33
2024-07-29 08:54:10 destination > INFO i.a.i.d.j.JdbcBufferedConsumerFactory(lambda$onStartFunction$1):147 Preparing raw table in destination started for stream Topic-34. schema: default, table name: _airbyte_raw_topic_34
2024-07-29 08:54:15 destination > INFO i.a.i.d.j.JdbcBufferedConsumerFactory(lambda$onStartFunction$1):147 Preparing raw table in destination started for stream Topic-31. schema: default, table name: _airbyte_raw_topic_31
2024-07-29 08:54:19 destination > INFO i.a.i.d.j.JdbcBufferedConsumerFactory(lambda$onStartFunction$1):147 Preparing raw table in destination started for stream Topic-32. schema: default, table name: _airbyte_raw_topic_32
```
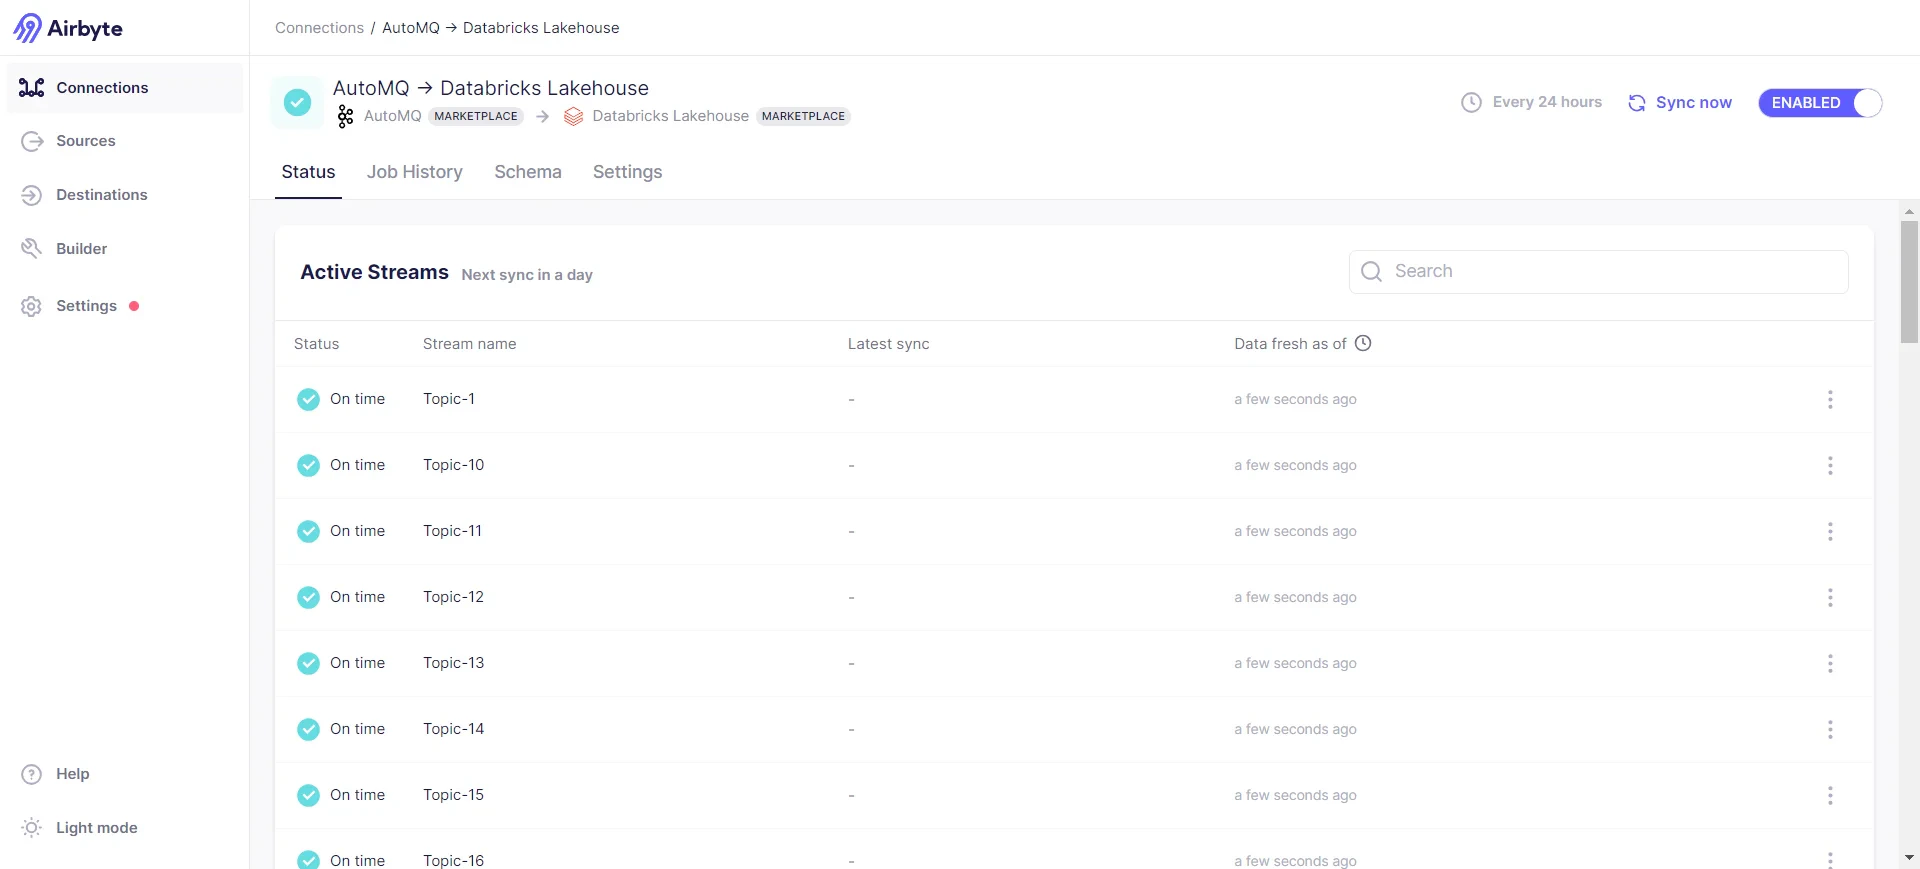
Sync successful:
You can check the synchronization status via Job History -> Job -> Logs, where part of the log content is:
```bash theme={null}
2024-07-29 08:53:33 source > INFO o.a.k.c.c.i.AbstractCoordinator(resetStateAndGeneration):998 [Consumer clientId=consumer-airbyte-consumer-group-1, groupId=airbyte-consumer-group] Resetting generation and member id due to: consumer pro-actively leaving the group
2024-07-29 08:53:33 source > INFO o.a.k.c.c.i.AbstractCoordinator(requestRejoin):1045 [Consumer clientId=consumer-airbyte-consumer-group-1, groupId=airbyte-consumer-group] Request joining group due to: consumer pro-actively leaving the group
2024-07-29 08:53:33 source > INFO o.a.k.c.m.Metrics(close):659 Metrics scheduler closed
2024-07-29 08:53:33 source > INFO o.a.k.c.m.Metrics(close):663 Closing reporter org.apache.kafka.common.metrics.JmxReporter
2024-07-29 08:53:33 source > INFO o.a.k.c.m.Metrics(close):669 Metrics reporters closed
2024-07-29 08:53:33 source > INFO o.a.k.c.u.AppInfoParser(unregisterAppInfo):83 App info kafka.consumer for consumer-airbyte-consumer-group-1 unregistered
2024-07-29 08:53:33 source > INFO i.a.c.i.b.IntegrationRunner(runInternal):231 Completed integration: io.airbyte.integrations.source.kafka.KafkaSource
2024-07-29 08:53:33 source > INFO i.a.i.s.k.KafkaSource(main):62 Completed source: class io.airbyte.integrations.source.kafka.KafkaSource
2024-07-29 08:53:33 replication-orchestrator > (pod: airbyte-abctl / source-kafka-read-2-0-pbvbp) - Closed all resources for pod
2024-07-29 08:53:33 replication-orchestrator > Total records read: 0 (0 bytes)
2024-07-29 08:53:33 replication-orchestrator > Schema validation was performed to a max of 10 records with errors per stream.
2024-07-29 08:53:33 replication-orchestrator > readFromSource: done. (source.isFinished:true, fromSource.isClosed:false)
2024-07-29 08:53:33 replication-orchestrator > processMessage: done. (fromSource.isDone:true, forDest.isClosed:false)
2024-07-29 08:53:33 replication-orchestrator > thread status... heartbeat thread: false , replication thread: true
2024-07-29 08:53:33 replication-orchestrator > writeToDestination: done. (forDest.isDone:true, isDestRunning:true)
2024-07-29 08:53:33 replication-orchestrator > thread status... timeout thread: false , replication thread: true
2024-07-29 08:53:35 destination > INFO i.a.i.d.j.JdbcBufferedConsumerFactory(lambda$onStartFunction$1):147 Preparing raw table in destination started for stream Topic-27. schema: default, table name: _airbyte_raw_topic_27
2024-07-29 08:53:40 destination > INFO i.a.i.d.j.JdbcBufferedConsumerFactory(lambda$onStartFunction$1):147 Preparing raw table in destination started for stream Topic-24. schema: default, table name: _airbyte_raw_topic_24
2024-07-29 08:53:45 destination > INFO i.a.i.d.j.JdbcBufferedConsumerFactory(lambda$onStartFunction$1):147 Preparing raw table in destination started for stream Topic-25. schema: default, table name: _airbyte_raw_topic_25
2024-07-29 08:53:50 destination > INFO i.a.i.d.j.JdbcBufferedConsumerFactory(lambda$onStartFunction$1):147 Preparing raw table in destination started for stream Topic-28. schema: default, table name: _airbyte_raw_topic_28
2024-07-29 08:53:55 destination > INFO i.a.i.d.j.JdbcBufferedConsumerFactory(lambda$onStartFunction$1):147 Preparing raw table in destination started for stream Topic-29. schema: default, table name: _airbyte_raw_topic_29
2024-07-29 08:54:01 destination > INFO i.a.i.d.j.JdbcBufferedConsumerFactory(lambda$onStartFunction$1):147 Preparing raw table in destination started for stream Topic-30. schema: default, table name: _airbyte_raw_topic_30
2024-07-29 08:54:06 destination > INFO i.a.i.d.j.JdbcBufferedConsumerFactory(lambda$onStartFunction$1):147 Preparing raw table in destination started for stream Topic-33. schema: default, table name: _airbyte_raw_topic_33
2024-07-29 08:54:10 destination > INFO i.a.i.d.j.JdbcBufferedConsumerFactory(lambda$onStartFunction$1):147 Preparing raw table in destination started for stream Topic-34. schema: default, table name: _airbyte_raw_topic_34
2024-07-29 08:54:15 destination > INFO i.a.i.d.j.JdbcBufferedConsumerFactory(lambda$onStartFunction$1):147 Preparing raw table in destination started for stream Topic-31. schema: default, table name: _airbyte_raw_topic_31
2024-07-29 08:54:19 destination > INFO i.a.i.d.j.JdbcBufferedConsumerFactory(lambda$onStartFunction$1):147 Preparing raw table in destination started for stream Topic-32. schema: default, table name: _airbyte_raw_topic_32
```
Sync successful:
 ## Verification Results
After successfully transferring the data, we can access the Databricks cluster to review the transfer results:
## Verification Results
After successfully transferring the data, we can access the Databricks cluster to review the transfer results:
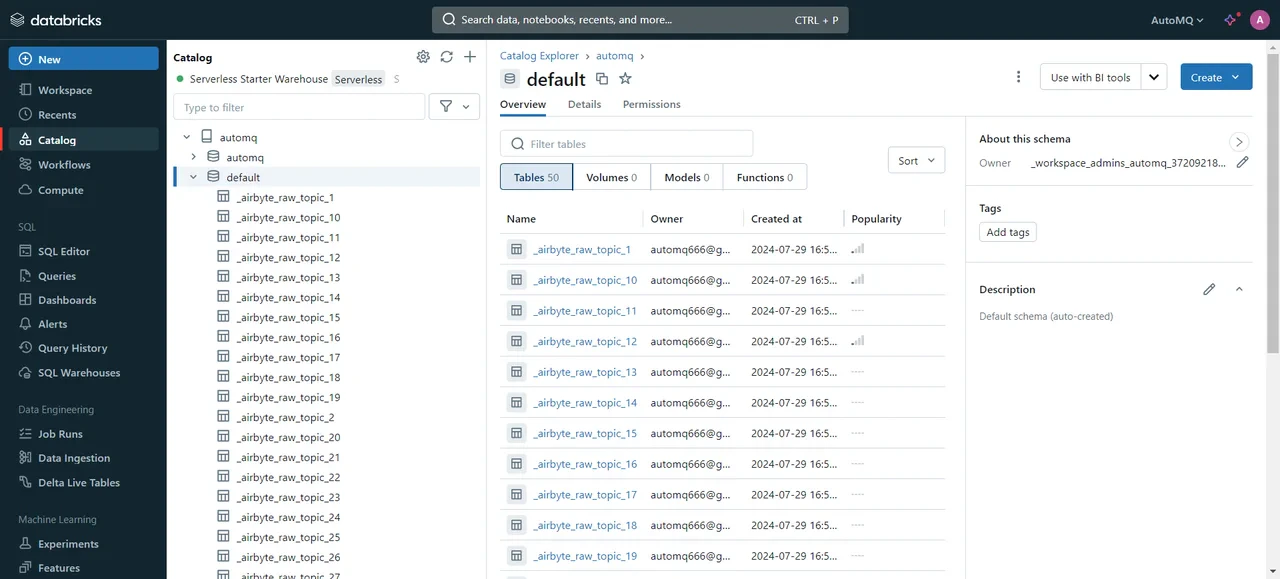 We have successfully synchronized the selected Topics data from the AutoMQ node to Databricks. Next, data retrieval and processing can be performed via SQL. For specific syntax, please refer to the official documentation: [SQL language](https://docs.databricks.com/en/sql/language-manual/index.html)\[11].
## Summary
In this introduction, we show how to integrate AutoMQ, Airbyte, and Databricks to enable efficient real-time data flow and analytics. By leveraging AutoMQ's high-performance stream processing, Airbyte's adaptable data integration, and Databricks' robust data analytics capabilities, enterprises can develop a data processing platform that is both effective and scalable. This integration not only decreases storage and maintenance costs but also boosts data processing efficiency and improves the timeliness of business decisions.
## References
\[1] AutoMQ: [https://www.automq.com/zh](https://www.automq.com/zh)
\[2] Airbyte: httpsyte: [https://airbyte.com/](https://airbyte.com/)
\[3] Databricks: [https://www.databricks.com/](https://www.databricks.com/)
\[4] Quick Start AutoMQ: [https://docs.automq.com/automq/getting-started/deploy-multi-nodes-test-cluster-on-docker](https://docs.automq.com/automq/getting-started/deploy-multi-nodes-test-cluster-on-docker)
\[5] Redpanda Console: [https://www.redpanda.com/redpanda-console-kafka-ui](https://www.redpanda.com/redpanda-console-kafka-ui)
\[6] Kafdrop: [https://github.com/obsidiandynamics/kafdrop](https://github.com/obsidiandynamics/kafdrop)
\[7] Quickstart Airbyte: [https://docs.airbyte.com/using-airbyte/getting-started/oss-quickstart](https://docs.airbyte.com/using-airbyte/getting-started/oss-quickstart)
\[8] Docker Install: [https://docs.docker.com/desktop/install/linux-install/](https://docs.docker.com/desktop/install/linux-install/)
\[9] Google databricks: [https://cloud.google.com/databricks?hl=zh\_cn](https://cloud.google.com/databricks?hl=zh_cn)
\[10] Destinations : [https://docs.airbyte.com/integrations/destinations/](https://docs.airbyte.com/integrations/destinations/)
\[11] SQL language: [https://docs.databricks.com/en/sql/language-manual/index.html](https://docs.databricks.com/en/sql/language-manual/index.html)
We have successfully synchronized the selected Topics data from the AutoMQ node to Databricks. Next, data retrieval and processing can be performed via SQL. For specific syntax, please refer to the official documentation: [SQL language](https://docs.databricks.com/en/sql/language-manual/index.html)\[11].
## Summary
In this introduction, we show how to integrate AutoMQ, Airbyte, and Databricks to enable efficient real-time data flow and analytics. By leveraging AutoMQ's high-performance stream processing, Airbyte's adaptable data integration, and Databricks' robust data analytics capabilities, enterprises can develop a data processing platform that is both effective and scalable. This integration not only decreases storage and maintenance costs but also boosts data processing efficiency and improves the timeliness of business decisions.
## References
\[1] AutoMQ: [https://www.automq.com/zh](https://www.automq.com/zh)
\[2] Airbyte: httpsyte: [https://airbyte.com/](https://airbyte.com/)
\[3] Databricks: [https://www.databricks.com/](https://www.databricks.com/)
\[4] Quick Start AutoMQ: [https://docs.automq.com/automq/getting-started/deploy-multi-nodes-test-cluster-on-docker](https://docs.automq.com/automq/getting-started/deploy-multi-nodes-test-cluster-on-docker)
\[5] Redpanda Console: [https://www.redpanda.com/redpanda-console-kafka-ui](https://www.redpanda.com/redpanda-console-kafka-ui)
\[6] Kafdrop: [https://github.com/obsidiandynamics/kafdrop](https://github.com/obsidiandynamics/kafdrop)
\[7] Quickstart Airbyte: [https://docs.airbyte.com/using-airbyte/getting-started/oss-quickstart](https://docs.airbyte.com/using-airbyte/getting-started/oss-quickstart)
\[8] Docker Install: [https://docs.docker.com/desktop/install/linux-install/](https://docs.docker.com/desktop/install/linux-install/)
\[9] Google databricks: [https://cloud.google.com/databricks?hl=zh\_cn](https://cloud.google.com/databricks?hl=zh_cn)
\[10] Destinations : [https://docs.airbyte.com/integrations/destinations/](https://docs.airbyte.com/integrations/destinations/)
\[11] SQL language: [https://docs.databricks.com/en/sql/language-manual/index.html](https://docs.databricks.com/en/sql/language-manual/index.html)