Prerequisites
Feature List
Currently, AutoMQ only provides the Kafka Server component and does not offer other ecosystem components. Therefore, before migrating to AutoMQ, you need to confirm whether the following features are used and handle them according to the following guidelines:- Kafka Server: AutoMQ provides a more cost-effective and flexible Kafka Server solution, compatible with Apache Kafka versions 0.9.x to 3.9.x. If your current Apache Kafka Server version falls outside the supported range, please contact us for support and updates.
- Kafka Client: AutoMQ is fully compatible with the original Apache Kafka Client SDK; ensure your SDK version is between 0.9.x and 3.9.x for full compatibility.
- Kafka Connector: AutoMQ is compatible with the Apache Kafka Connector. If you are using Kafka Connector, it is recommended to maintain the existing service and replace the Kafka Server endpoint in the Connector configuration with the AutoMQ instance endpoint.
Business Scope
Migrating from Apache Kafka® to AutoMQ in a production environment is generally recommended to be done in batches, gradually migrating Topics and Consumer Groups from the source cluster based on business chains and scopes. Therefore, it is advisable to follow the process below for business scope assessment:- Inventory Source Cluster Resources: It is recommended to use Kafka Admin CLI or other tools to export all Topics and Consumer Groups from the source cluster, categorizing them by business systems. Clean up any invalid or unclaimed Topics and Consumer Groups in advance.
- Batch Division by Business Systems: In a production environment, it is recommended to plan migration batches based on business systems. Start with offline or non-core business systems and gradually expand the scope of migration to avoid unexpected risks.
- Coordinate with Business Personnel for Migration: The process of migrating from Apache Kafka to AutoMQ requires cooperation from business personnel to change access points and restart applications. Therefore, before executing the migration plan, coordination with business personnel is necessary.
Once a connection is established between the Apache Kafka Client and the server, the connection to the source cluster will not be disconnected. Therefore, even if the server is accessed via a domain name, it is still necessary to restart the client application to connect to the new AutoMQ cluster.
Migration Process
From migrating from Apache Kafka® to AutoMQ, the primary considerations include the following tasks:- Message Data Migration: Kafka stores both consumed and unconsumed historical message data. The migration process must ensure that the message data is replicated to the new cluster as needed, with no message loss.
- Consumer Progress Metadata Migration: The metadata of consumer progress that Kafka consumers have already processed in the source cluster needs to be reconstructed in the new cluster to avoid losing progress and re-consuming messages, which can result in a large amount of duplication.
- Producer Switch: Besides data synchronization, the migration work also involves switching producer applications at the appropriate time so that producers connect to the target cluster to produce new messages.
- Consumer Switch: Besides data synchronization, the migration work also involves switching consumer applications at the appropriate time so that consumers connect to the target cluster and continue consuming messages from the previous progress.
Step 1: Create a Migration Task and Synchronize Data
Refer to Overview▸. AutoMQ recommends using a separate MirrorMaker2 Connector for each batch task to optimize data synchronization and enhance isolation. Fill in the following parameters according to your specific requirements:- Source Cluster: Specify the source cluster that needs migration.
- Target Cluster: Specify the target cluster for the migration. Here, select the AutoMQ cluster.
- List of Topics to Sync: Set the list of Topics covered by the migration task. This list supports wildcard inputs, allowing you to configure multiple Topics at once.
- Sync Consumer Progress: It is recommended to enable this. When enabled, the migration task will map the consumption progress of the ConsumerGroup from the source cluster to the target cluster, ensuring that consumers can continue from where they left off after switching, thus avoiding a large amount of duplicate processing.
- List of Topics to Exclude: If wildcards are used in the List of Topics to Sync but some Topics need to be excluded from the migration, you can set the list of Topics to exclude, removing the relevant Topics from the migration.
Step 2: Monitor Sync Progress and Wait for the Migration to Approach Completion
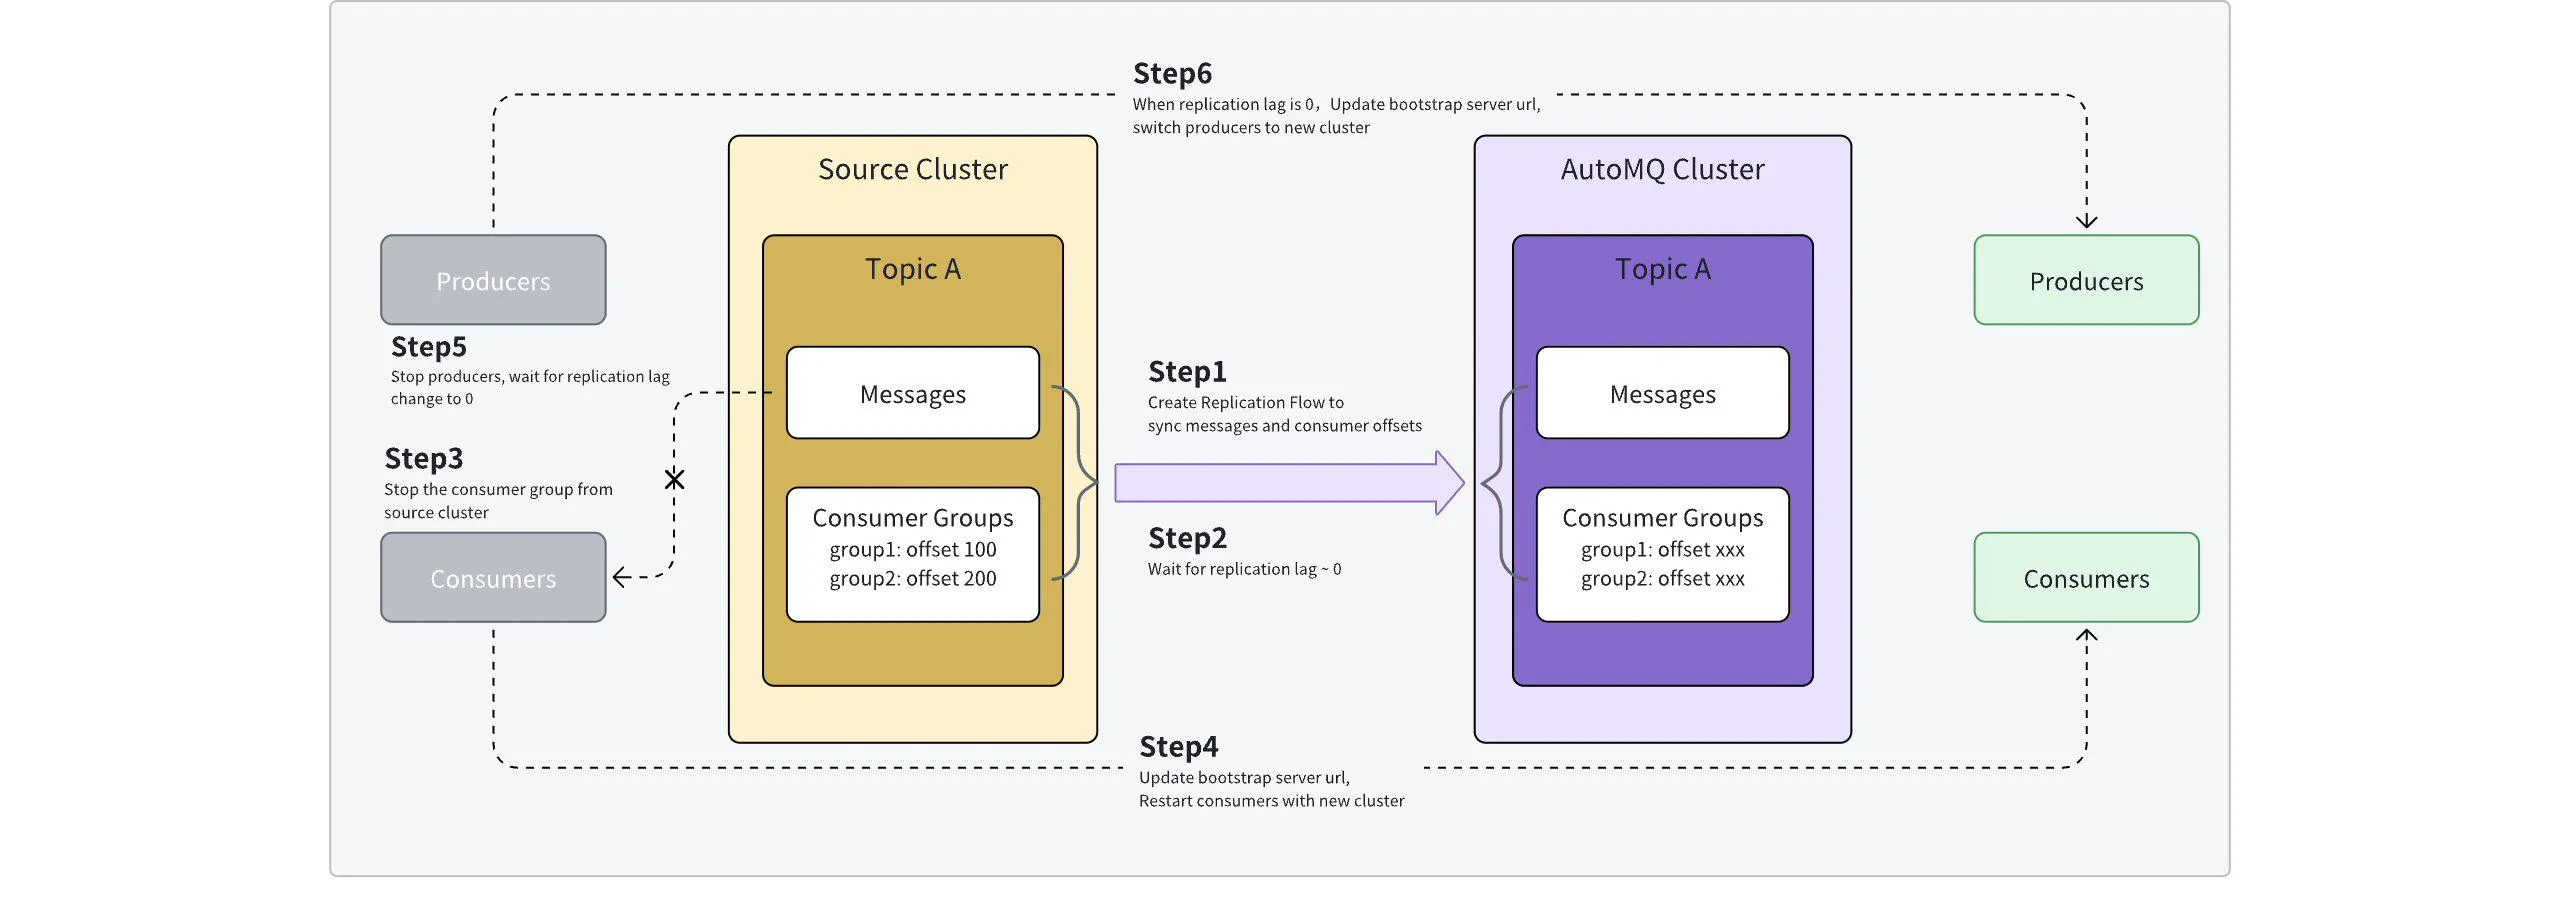
MirrorMaker2 supports viewing synchronization latency via JMX metrics. Users should monitor the synchronization task’s latency metrics and wait until the metrics approach zero. In MirrorMaker2, synchronization latency refers to the time taken for messages from the migrated Topic to be produced in the source cluster and synchronized. When multiple Topics are involved in a single migration task, the maximum latency among all Topics is considered. According to the migration plan description, it is necessary to regularly monitor the synchronization latency and the synchronization backlog metrics of the migration task. It is recommended to prepare for the next step of application switchover when the synchronization latency is less than 1 minute.Step 3: Stop the Source Cluster Consumers
Application switchover requires switching the consumers first. It is advisable to stop the consumer applications initially and wait for the consumption progress data from the source cluster to be synchronized to the target cluster before switching to the target cluster.Step 4: Switch Consumers to the Target Cluster
After completing Step 3, update the consumer configuration to replace the endpoint with the one provided by the AutoMQ instance, then restart the application.According to MirrorMaker2’s technical implementation, there may be some consumer duplication during Steps 3 and 4. If you want to reduce the likelihood of duplication, you can customize the configuration in the advanced parameters of the migration task.
Step 5: Stop Producers on the Source Cluster
For each Topic, ensure that Steps 3 and 4 have been repeated for all consumers of the current Topic. Once all consumers have been switched, you can stop the producers on the source cluster and wait for all message data to synchronize to the target cluster.Step 6: Switch Producers to the Target Cluster
Monitor the synchronization delay of the migration task. Once the synchronization delay is confirmed to be zero, restart the producers with the new endpoint address to connect to the AutoMQ target cluster, completing the entire migration task.Step 7: Repeat Steps 3 Through 6 Until the Migration Is Complete, Then Delete the Migration Task.
- Repeatedly check if all Topic migrations are completed. Steps 3 to 6 are performed at the granularity of the Topic and the associated producer and consumer applications. Therefore, continuous checks are needed until all Topics in the current migration task are completed.
- Delete the migration task. Once all Topic migrations are completed, click confirm to delete the task. AutoMQ will clean up the underlying machine resources and configuration information.
Rollback Process
During various stages of the migration process, if unexpected exceptions occur and cannot be quickly diagnosed, users can attempt to rollback using the following process and be aware of the impacts caused by the rollback.| Migration Stage | Rollback Plan | Rollback Impact |
|---|---|---|
| Step 1: Create Task |
| At this stage, since the application has not yet switched, there is no impact on the application |
| Step 2: Monitor Synchronization Progress | ||
| Step 3: Stop Source Cluster Consumers |
| Data remains unaffected, only causing consumption pauses and delays |
| Step 4: The consumer has been switched to the target cluster |
| Rolling back to the source cluster will reconsume data during the switching period |
| Step 5: The source cluster producer has been stopped |
| |
| Step 6: The producer has been switched to the target cluster |
| During Step 6, messages produced to the target cluster cannot be reverse-synchronized back to the source cluster and require application processing. |
| In Step 7, the migration task has been deleted. |
| Not applicable |