> ## Documentation Index
> Fetch the complete documentation index at: https://docs.automq.com/llms.txt
> Use this file to discover all available pages before exploring further.
# Airbyte
> AutoMQ revolutionizes data integration with cloud-native scalability, 100% Kafka compatibility, and cost efficiency, enabling seamless real-time data analytics integration with Airbyte and Databricks.
## 前言
随着实时数据处理需求的不断增加,企业需要更加高效和灵活的数据集成解决方案。AutoMQ \[1] 作为一种基于云重新设计的 Kafka 消息系统,以其显著的成本优势和弹性能力,成为了企业的理想选择。通过将 AutoMQ 与 Airbyte \[2] 和数据仓库集成,可以进一步简化数据集成流程并提升数据分析能力,从而实现实时数据的高效流动和分析,帮助企业快速做出明智决策。这篇文章将向你介绍如何集成这些组件。
### AutoMQ 概述
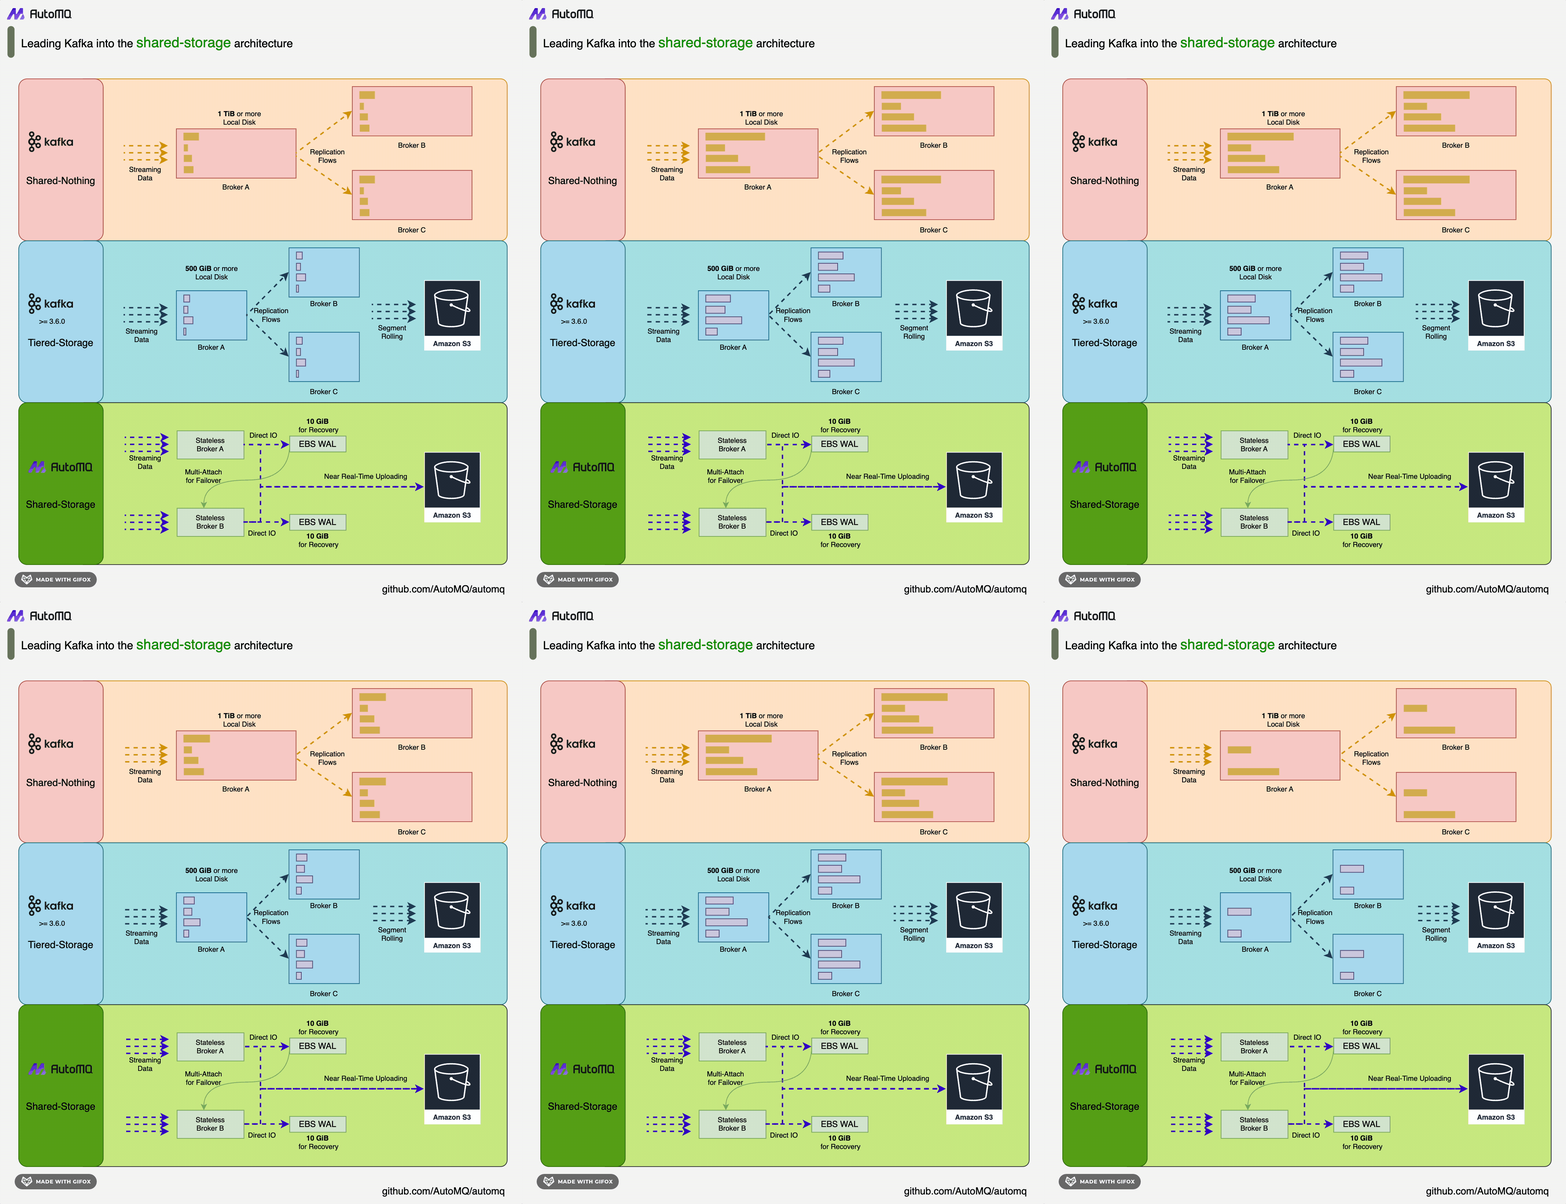
AutoMQ 是一种基于云重新设计的流处理系统,在保持与 Apache Kafka 100% 兼容的前提下,AutoMQ 通过将存储分离至对象存储,显著提升了系统的成本效益和弹性能力。具体来说,AutoMQ 通过构建在 S3 上的流存储库 S3Stream,将存储卸载至共享云存储 EBS 和 S3,提供低成本、低延时、高可用、高可靠和无限容量的流存储能力。与传统的 Shared Nothing 架构相比,AutoMQ 采用了 Shared Storage 架构,显著降低了存储和运维的复杂性,同时提升了系统的弹性和可靠性。
AutoMQ 的设计理念和技术优势使其成为替换企业现有 Kafka 集群的理想选择。采用 AutoMQ,企业可以显著降低存储成本、简化运维,并实现集群的自动扩缩容和平衡,从而更高效地应对业务需求的变化。此外,AutoMQ 的高效支持高吞吐的冷读操作和服务零中断,确保系统在负载波动的情况下稳定运行。AutoMQ 的存储架构如下:
 ### Airbyte 概述
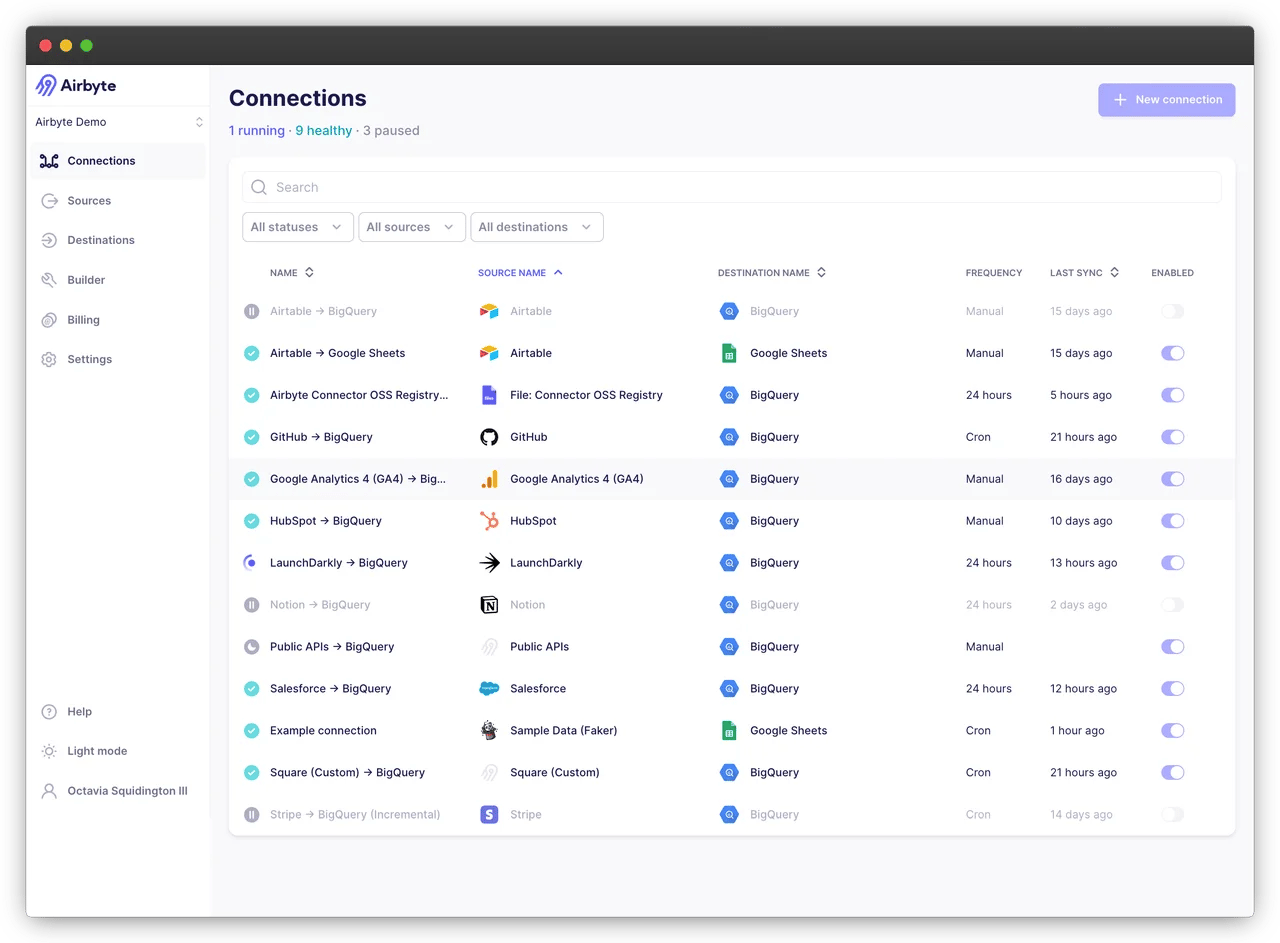
Airbyte 是一个数据集成平台,专注于简化和自动化数据管道的构建和管理。它支持广泛的源和目标系统,用户可以通过直观的 Web 界面或 API 轻松配置数据管道。Airbyte 具备高效的数据提取、转化和加载(ETL)功能,内置调度和监控机制,确保数据管道的可靠性和性能。其模块化设计支持自定义连接器,满足多样化的数据集成需求。
Airbyte 的主要优势包括高可扩展性和灵活性,允许用户快速适应不同的数据源和目标系统。内置的数据标准化处理和自动化调度功能提升了数据处理的效率和一致性。通过容器化部署,Airbyte 简化了安装和扩展过程,适合企业级数据集成和数据仓库建设。此外,丰富的连接器库和社区支持使其成为数据工程师和分析师的理想工具,能够高效地解决复杂的数据集成挑战。
### Airbyte 概述
Airbyte 是一个数据集成平台,专注于简化和自动化数据管道的构建和管理。它支持广泛的源和目标系统,用户可以通过直观的 Web 界面或 API 轻松配置数据管道。Airbyte 具备高效的数据提取、转化和加载(ETL)功能,内置调度和监控机制,确保数据管道的可靠性和性能。其模块化设计支持自定义连接器,满足多样化的数据集成需求。
Airbyte 的主要优势包括高可扩展性和灵活性,允许用户快速适应不同的数据源和目标系统。内置的数据标准化处理和自动化调度功能提升了数据处理的效率和一致性。通过容器化部署,Airbyte 简化了安装和扩展过程,适合企业级数据集成和数据仓库建设。此外,丰富的连接器库和社区支持使其成为数据工程师和分析师的理想工具,能够高效地解决复杂的数据集成挑战。
 ## 前置条件
* 数据源:一个可用的 AutoMQ 节点。
* 数据 Connector:可用的 Airbyte 环境 。
* 数据终点(数仓):这里我选择的是云上部署的 Databricks \[3] 集群。
## 快速部署
### 部署 AutoMQ
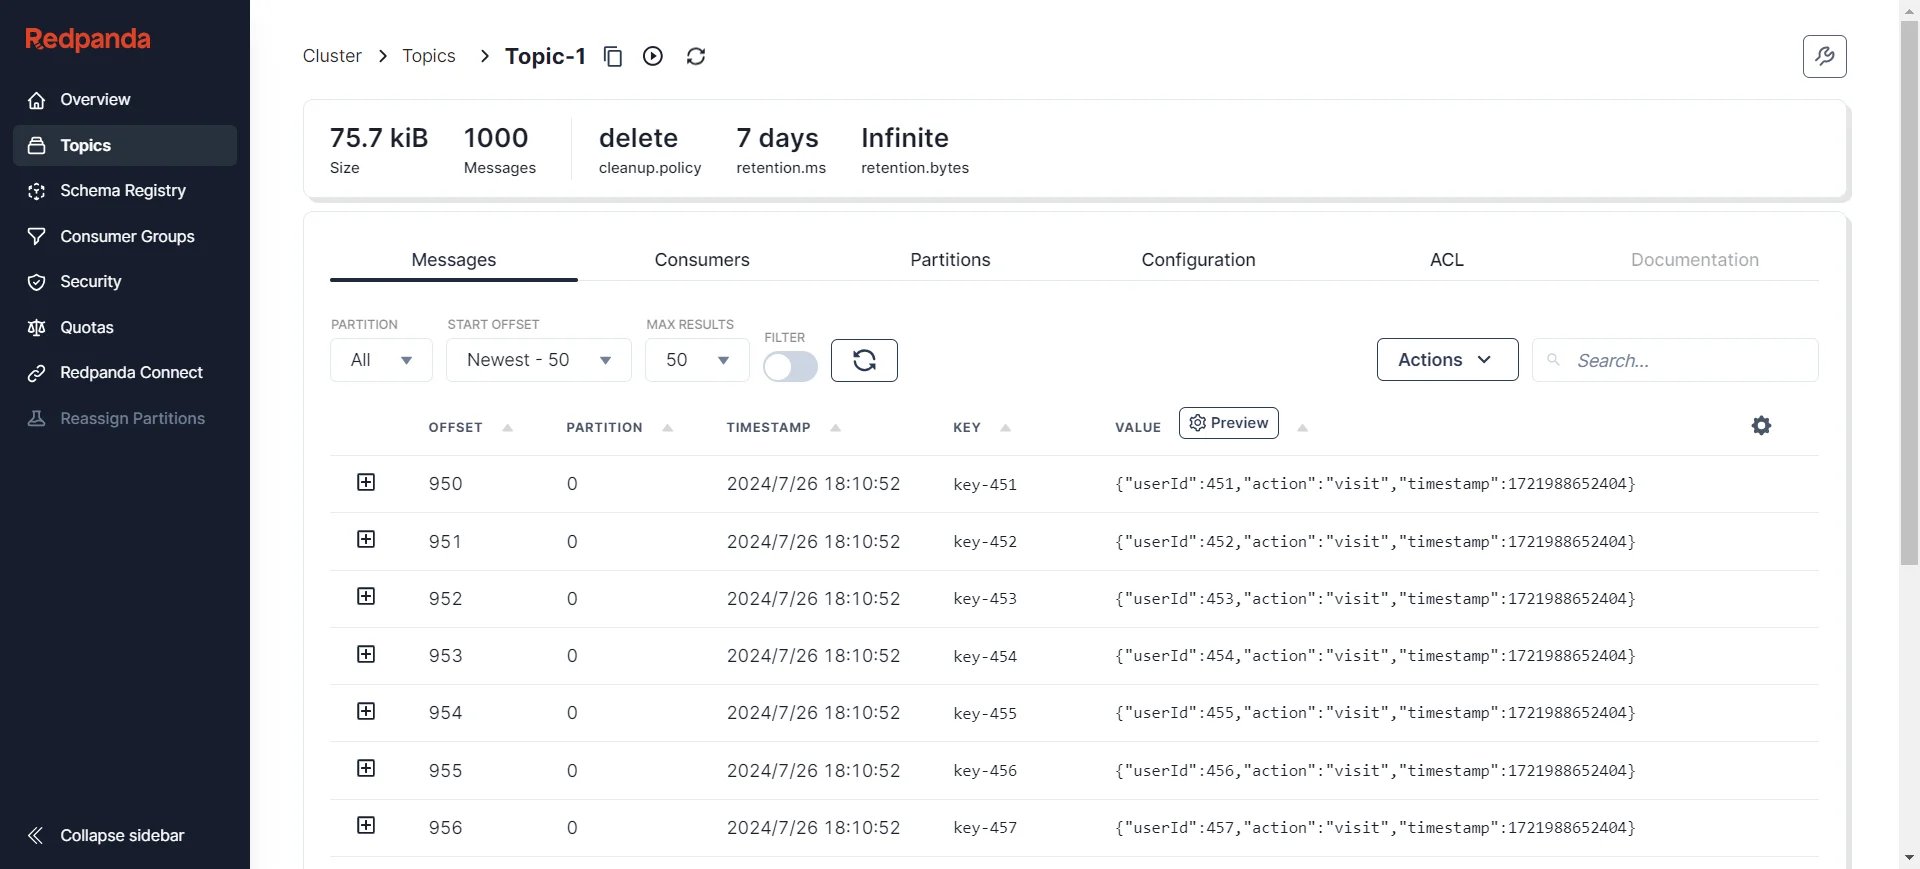
可以参考 AutoMQ 官方文档进行部署:[Linux 主机部署多节点集群▸](/zh/automq/deployment/deploy-multi-nodes-cluster-on-linux)。搭建完成后,可以通过 Kafka SDK 或者手动方式进行数据准备,之后将进行数据同步过程。我提前准备了一些数据,可以通过各种可视化工具查看 AutoMQ 节点状态,比如 [Redpanda Console](https://www.redpanda.com/redpanda-console-kafka-ui) \[5]、[Kafdrop](https://github.com/obsidiandynamics/kafdrop) \[6] 等。这里我选择 Redpanda Console,可以看到当前已经有了 50 个Topic,并且每个 Topic 下有 1000 条初始消息。
## 前置条件
* 数据源:一个可用的 AutoMQ 节点。
* 数据 Connector:可用的 Airbyte 环境 。
* 数据终点(数仓):这里我选择的是云上部署的 Databricks \[3] 集群。
## 快速部署
### 部署 AutoMQ
可以参考 AutoMQ 官方文档进行部署:[Linux 主机部署多节点集群▸](/zh/automq/deployment/deploy-multi-nodes-cluster-on-linux)。搭建完成后,可以通过 Kafka SDK 或者手动方式进行数据准备,之后将进行数据同步过程。我提前准备了一些数据,可以通过各种可视化工具查看 AutoMQ 节点状态,比如 [Redpanda Console](https://www.redpanda.com/redpanda-console-kafka-ui) \[5]、[Kafdrop](https://github.com/obsidiandynamics/kafdrop) \[6] 等。这里我选择 Redpanda Console,可以看到当前已经有了 50 个Topic,并且每个 Topic 下有 1000 条初始消息。
 消息格式:
```json theme={null}
[
{
"partitionID": 0,
"offset": 950,
"timestamp": 1721988652404,
"compression": "uncompressed",
"isTransactional": false,
"headers": [],
"key": {
"payload": "key-451",
"encoding": "text"
},
"value": {
"payload": {
"userId": 451,
"action": "visit",
"timestamp": 1721988652404
},
"encoding": "json"
}
}
]
```
### 部署 Airbyte
> 参考 AirByte 官网文档:[Quickstart | Airbyte](https://docs.airbyte.com/using-airbyte/getting-started/oss-quickstart) \[7]
这里我以 Linux 系统为例进行 Airbyte 的部署。
#### 环境准备
首先,你需要安装 `abctl` ,这个工具是 Airbyte 官方提供的搭建工具,能帮你快速构建所需要的 Airbyte 环境。然而使用该工具搭建环境需要安装 Docker 环境。如果你没有可用的 Docker 环境,请参阅 Docker 的安装说明:[Docker Install](https://docs.docker.com/desktop/install/linux-install/) \[8] 。可以通过命令 `docker version` 输出版本信息:
```text theme={null}
Client:
Version: 20.10.5+dfsg1
API version: 1.41
Go version: go1.15.15
Git commit: 55c4c88
Built: Mon May 30 18:34:49 2022
OS/Arch: linux/amd64
Context: default
Experimental: true
Server:
Engine:
Version: 20.10.5+dfsg1
.........
```
#### 准备 abctl 工具
可依次执行如下命令,这里我下载的版本是 `version: v0.9.2` :
```bash theme={null}
# 下载:
wget https://github.com/airbytehq/abctl/releases/download/v0.9.2/abctl-v0.9.2-linux-amd64.tar.gz
# 解压:
tar -xvzf abctl-v0.9.2-linux-amd64.tar.gz
# 进入:
cd abctl-v0.9.2-linux-amd64
# 加执行权限:
chmod +x abctl
# 全局环境:
sudo mv abctl /usr/local/bin
# 验证版本:
abctl version
# 输出
version: v0.9.2
```
#### 部署 Airbyte 环境
通过执行命令 `abctl local install` ,这将在 Docker 中拉取 Airbyte 的镜像,并通过 helm 进行环境部署。部分日志如下:
```text theme={null}
INFO Namespace 'airbyte-abctl' already exists
INFO Persistent volume 'airbyte-minio-pv' already exists
INFO Persistent volume 'airbyte-volume-db' already exists
INFO Persistent volume claim 'airbyte-minio-pv-claim-airbyte-minio-0' already exists
INFO Persistent volume claim 'airbyte-volume-db-airbyte-db-0' already exists
INFO Starting Helm Chart installation of 'airbyte/airbyte' (version: 0.350.0)
SUCCESS Installed Helm Chart airbyte/airbyte:
Name: airbyte-abctl
Namespace: airbyte-abctl
Version: 0.350.0
Release: 2
INFO Starting Helm Chart installation of 'nginx/ingress-nginx' (version: 4.11.1)
SUCCESS Installed Helm Chart nginx/ingress-nginx:
Name: ingress-nginx
Namespace: ingress-nginx
Version: 4.11.1
Release: 2
SUCCESS Basic-Auth secret created
SUCCESS Found existing Ingress
SUCCESS Updated existing Ingress
SUCCESS Launched web-browser successfully for http://localhost:8000
SUCCESS Airbyte installation complete
```
启动成功后,即可通过浏览器访问 `http://localhost:8000` 进行登录,默认的账号和密码为:
* 用户名: `airbyte`
* 密码: `password`
如果设置您自己的用户名和密码,请使用命令行标志或变量。例如,要将用户名和密码分别设置为 `zhaoxi` 和 `ktpro123` ,您可以运行以下命令:
```bash theme={null}
abctl local install --username zhaoxi --password ktpro123
```
或者从环境变量设置这些值:
```bash theme={null}
export ABCTL_LOCAL_INSTALL_PASSWORD=airbyte
export ABCTL_LOCAL_INSTALL_USERNAME=password
```
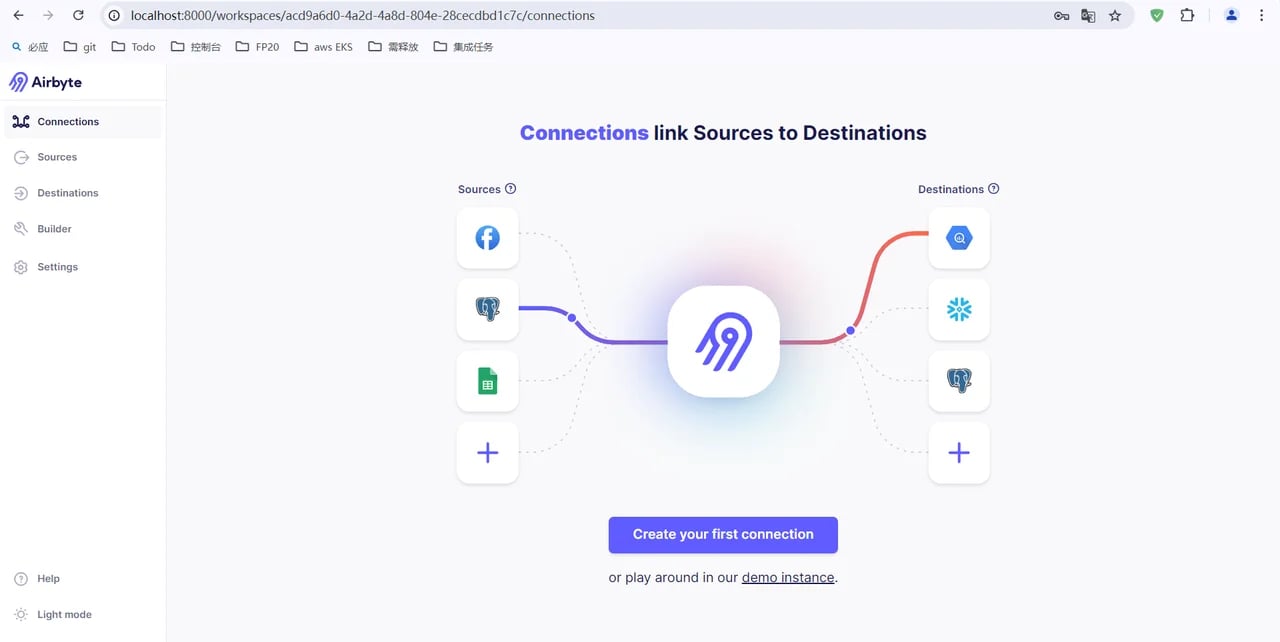
输入用户名和密码后,您将看到 Airbyte 工作区。使用此界面,您可以轻松设置和管理所有连接并移动数据!
消息格式:
```json theme={null}
[
{
"partitionID": 0,
"offset": 950,
"timestamp": 1721988652404,
"compression": "uncompressed",
"isTransactional": false,
"headers": [],
"key": {
"payload": "key-451",
"encoding": "text"
},
"value": {
"payload": {
"userId": 451,
"action": "visit",
"timestamp": 1721988652404
},
"encoding": "json"
}
}
]
```
### 部署 Airbyte
> 参考 AirByte 官网文档:[Quickstart | Airbyte](https://docs.airbyte.com/using-airbyte/getting-started/oss-quickstart) \[7]
这里我以 Linux 系统为例进行 Airbyte 的部署。
#### 环境准备
首先,你需要安装 `abctl` ,这个工具是 Airbyte 官方提供的搭建工具,能帮你快速构建所需要的 Airbyte 环境。然而使用该工具搭建环境需要安装 Docker 环境。如果你没有可用的 Docker 环境,请参阅 Docker 的安装说明:[Docker Install](https://docs.docker.com/desktop/install/linux-install/) \[8] 。可以通过命令 `docker version` 输出版本信息:
```text theme={null}
Client:
Version: 20.10.5+dfsg1
API version: 1.41
Go version: go1.15.15
Git commit: 55c4c88
Built: Mon May 30 18:34:49 2022
OS/Arch: linux/amd64
Context: default
Experimental: true
Server:
Engine:
Version: 20.10.5+dfsg1
.........
```
#### 准备 abctl 工具
可依次执行如下命令,这里我下载的版本是 `version: v0.9.2` :
```bash theme={null}
# 下载:
wget https://github.com/airbytehq/abctl/releases/download/v0.9.2/abctl-v0.9.2-linux-amd64.tar.gz
# 解压:
tar -xvzf abctl-v0.9.2-linux-amd64.tar.gz
# 进入:
cd abctl-v0.9.2-linux-amd64
# 加执行权限:
chmod +x abctl
# 全局环境:
sudo mv abctl /usr/local/bin
# 验证版本:
abctl version
# 输出
version: v0.9.2
```
#### 部署 Airbyte 环境
通过执行命令 `abctl local install` ,这将在 Docker 中拉取 Airbyte 的镜像,并通过 helm 进行环境部署。部分日志如下:
```text theme={null}
INFO Namespace 'airbyte-abctl' already exists
INFO Persistent volume 'airbyte-minio-pv' already exists
INFO Persistent volume 'airbyte-volume-db' already exists
INFO Persistent volume claim 'airbyte-minio-pv-claim-airbyte-minio-0' already exists
INFO Persistent volume claim 'airbyte-volume-db-airbyte-db-0' already exists
INFO Starting Helm Chart installation of 'airbyte/airbyte' (version: 0.350.0)
SUCCESS Installed Helm Chart airbyte/airbyte:
Name: airbyte-abctl
Namespace: airbyte-abctl
Version: 0.350.0
Release: 2
INFO Starting Helm Chart installation of 'nginx/ingress-nginx' (version: 4.11.1)
SUCCESS Installed Helm Chart nginx/ingress-nginx:
Name: ingress-nginx
Namespace: ingress-nginx
Version: 4.11.1
Release: 2
SUCCESS Basic-Auth secret created
SUCCESS Found existing Ingress
SUCCESS Updated existing Ingress
SUCCESS Launched web-browser successfully for http://localhost:8000
SUCCESS Airbyte installation complete
```
启动成功后,即可通过浏览器访问 `http://localhost:8000` 进行登录,默认的账号和密码为:
* 用户名: `airbyte`
* 密码: `password`
如果设置您自己的用户名和密码,请使用命令行标志或变量。例如,要将用户名和密码分别设置为 `zhaoxi` 和 `ktpro123` ,您可以运行以下命令:
```bash theme={null}
abctl local install --username zhaoxi --password ktpro123
```
或者从环境变量设置这些值:
```bash theme={null}
export ABCTL_LOCAL_INSTALL_PASSWORD=airbyte
export ABCTL_LOCAL_INSTALL_USERNAME=password
```
输入用户名和密码后,您将看到 Airbyte 工作区。使用此界面,您可以轻松设置和管理所有连接并移动数据!
 ### 部署 Databricks
如果你还没有一个可用的 Databricks 服务,可参考官方文档进行搭建:[Google Databricks ](https://cloud.google.com/databricks?hl=zh_cn)\[9]。
## 数据同步
### 新增数据源
新增 AutoMQ 作为数据源,得益于 AutoMQ 完全兼容 Kafka,因此可以使用 Kafka 的数据源模板进行 AutoMQ 数据源的搭建。通过 Airbyte 界面的左侧边栏 -> Sources -> 搜索 Kafka,填写基本信息,如 Bootstrap Servers、Protocol 、Topic Pattern 等。
### 部署 Databricks
如果你还没有一个可用的 Databricks 服务,可参考官方文档进行搭建:[Google Databricks ](https://cloud.google.com/databricks?hl=zh_cn)\[9]。
## 数据同步
### 新增数据源
新增 AutoMQ 作为数据源,得益于 AutoMQ 完全兼容 Kafka,因此可以使用 Kafka 的数据源模板进行 AutoMQ 数据源的搭建。通过 Airbyte 界面的左侧边栏 -> Sources -> 搜索 Kafka,填写基本信息,如 Bootstrap Servers、Protocol 、Topic Pattern 等。
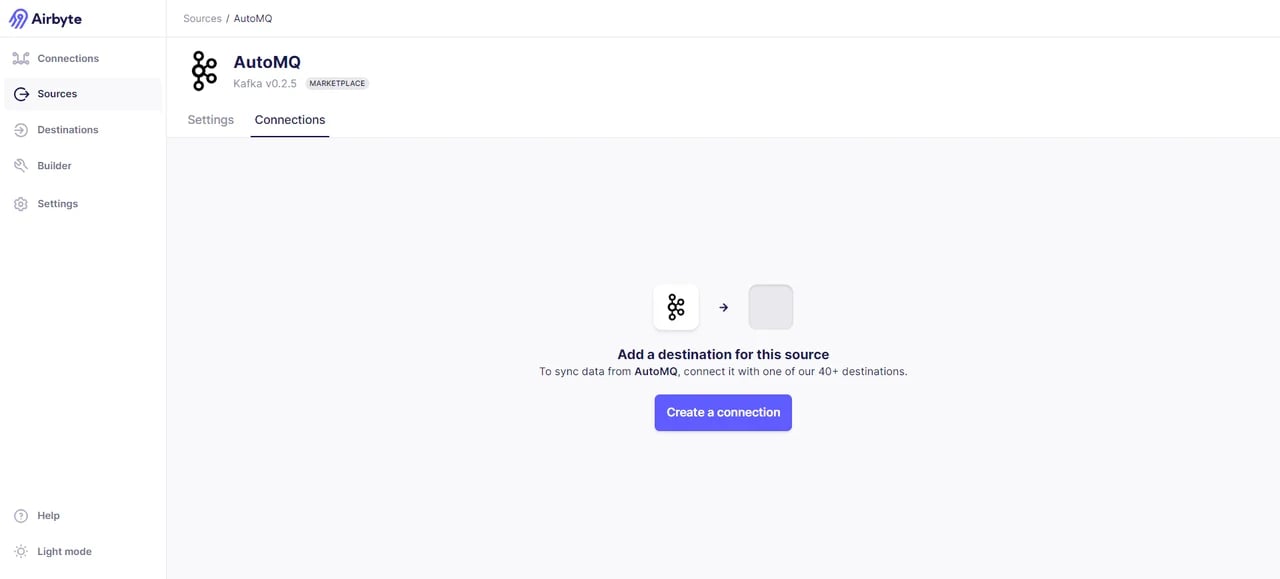
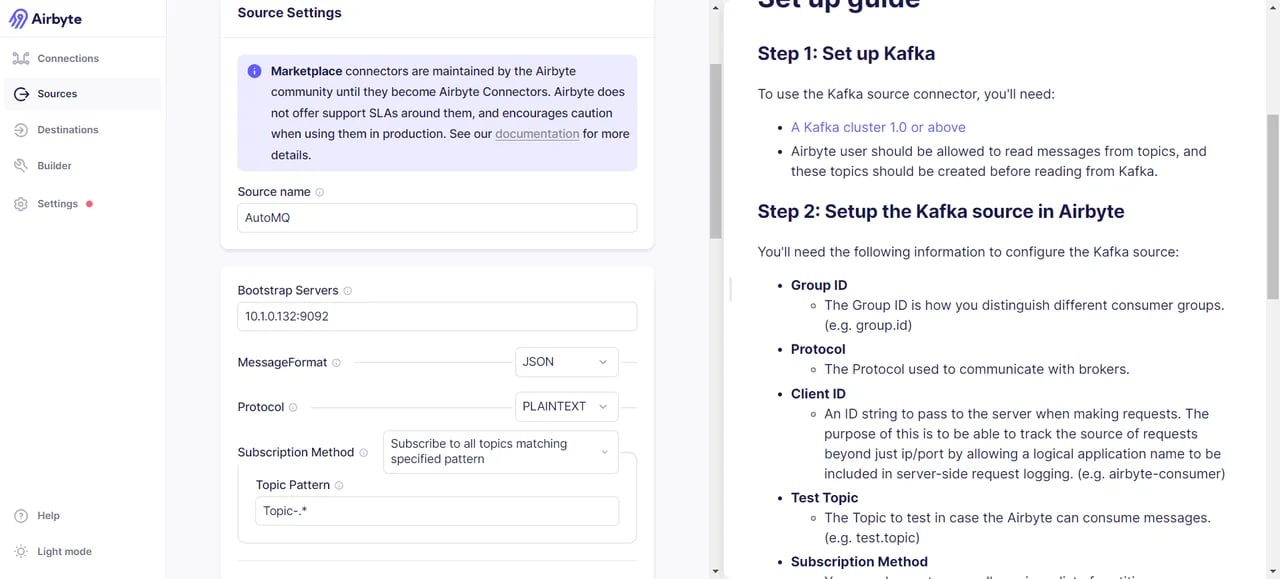 随后,我们需要指定数据传输的对象,可以指定符合自定义正则的 Topics,也可以直接指定具体需要进行传输的 Topics。这里我选择通过正则表达式 `Topic-.\*` 匹配所有以 `Topic-` 为前缀的所有 Topic,这与我准备的数据格式是一致的,因此你需要保证你准备的数据也能够被匹配到。新增成功后,我们可以看到如下结果,证明数据源连接成功:
 ### 新增数据终点
数据终点我们选择的是 Databricks,当然你也可以选择其他数据终点,具体列表可参考:[Destinations | Airbyte](https://docs.airbyte.com/integrations/destinations/) \[10]。通过 Airbyte 界面的左侧边栏 -> Destinations -> 搜索 Databricks:
### 新增数据终点
数据终点我们选择的是 Databricks,当然你也可以选择其他数据终点,具体列表可参考:[Destinations | Airbyte](https://docs.airbyte.com/integrations/destinations/) \[10]。通过 Airbyte 界面的左侧边栏 -> Destinations -> 搜索 Databricks:
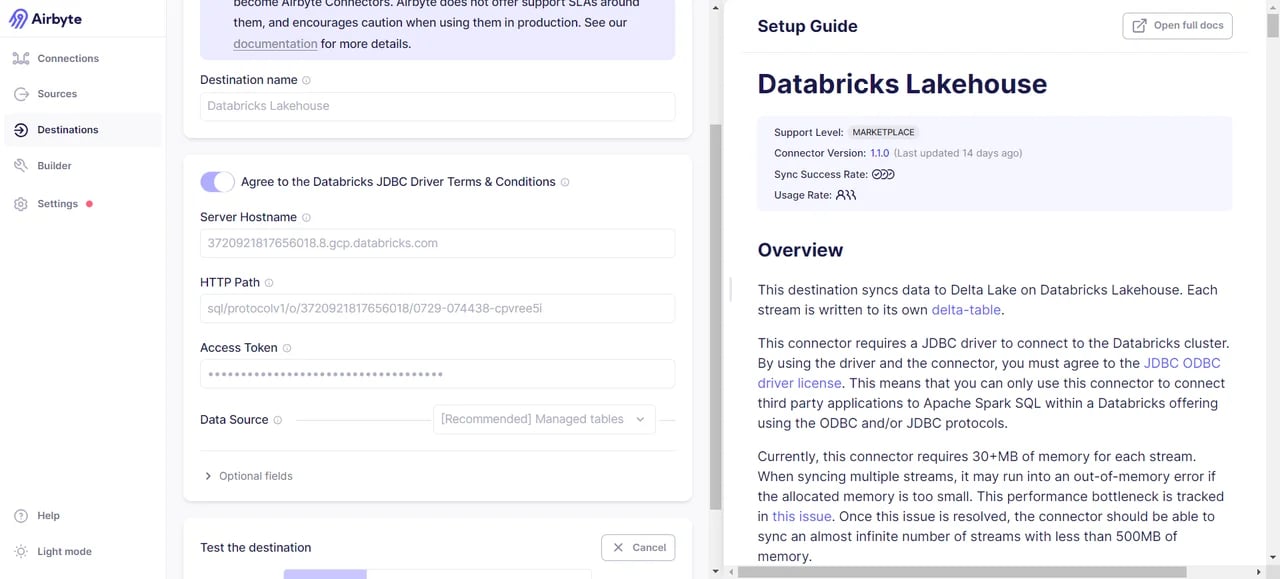 其中需要填写的凭证信息,需要通过 Databricks 集群中的信息得到,具体操作是:
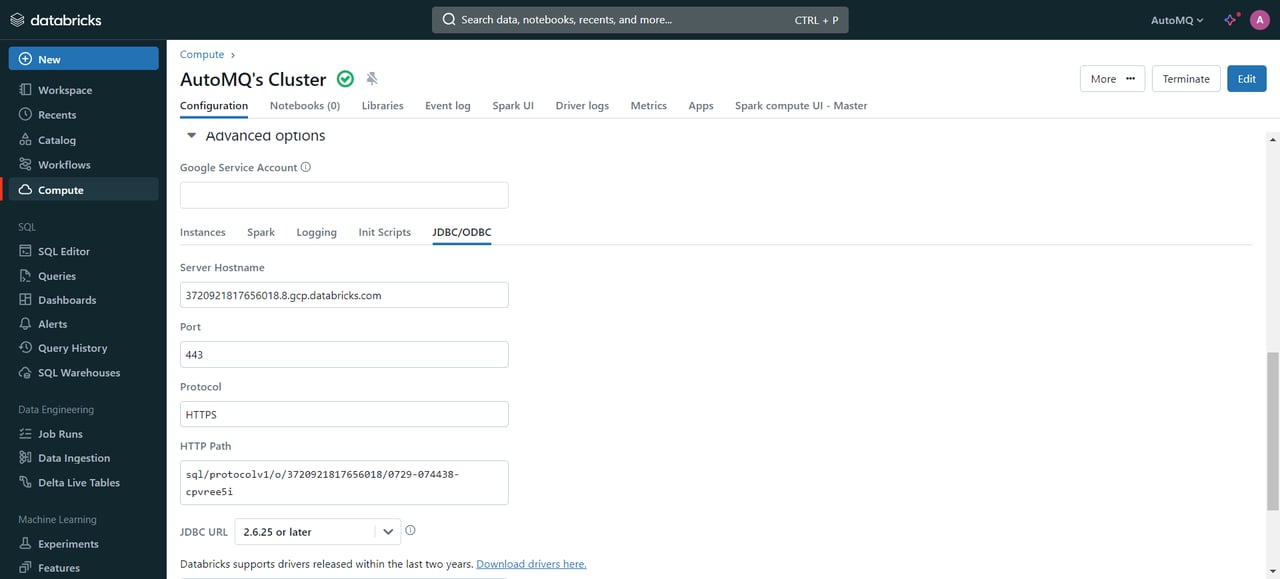
* 进入创建的 Databricks Cluster 集群内 -> 选择 Advanced Options -> JDBC/ODBC ,即可看到 HTTP PATH 以及 Server Hostname 的值。
其中需要填写的凭证信息,需要通过 Databricks 集群中的信息得到,具体操作是:
* 进入创建的 Databricks Cluster 集群内 -> 选择 Advanced Options -> JDBC/ODBC ,即可看到 HTTP PATH 以及 Server Hostname 的值。
 * 选择集群右上角用户 -> 进入 Settings -> 选择 User -> Developer -> AccessToken -> Generate new Token。你将会得到类似 `dapi8d336faXXXXXXXXXa6aa18a086c0e` 的 Token。
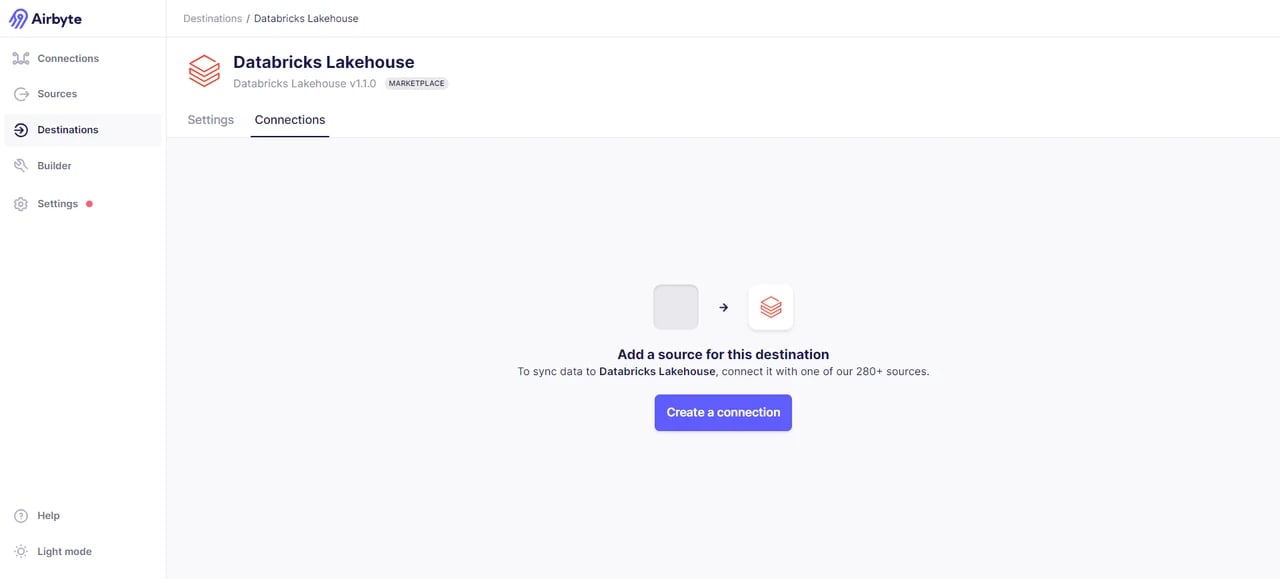
拿到凭证信息后,进行数据终点的创建,如果成功即可看到如下界面:
* 选择集群右上角用户 -> 进入 Settings -> 选择 User -> Developer -> AccessToken -> Generate new Token。你将会得到类似 `dapi8d336faXXXXXXXXXa6aa18a086c0e` 的 Token。
拿到凭证信息后,进行数据终点的创建,如果成功即可看到如下界面:
 ### 发起连接并传输数据
数据源和数据终点都已就绪,现在我们开始建立连接。选择 Airbyte 左侧边栏 -> Connections -> 选择数据源和数据终点 -> 建立连接。
### 发起连接并传输数据
数据源和数据终点都已就绪,现在我们开始建立连接。选择 Airbyte 左侧边栏 -> Connections -> 选择数据源和数据终点 -> 建立连接。
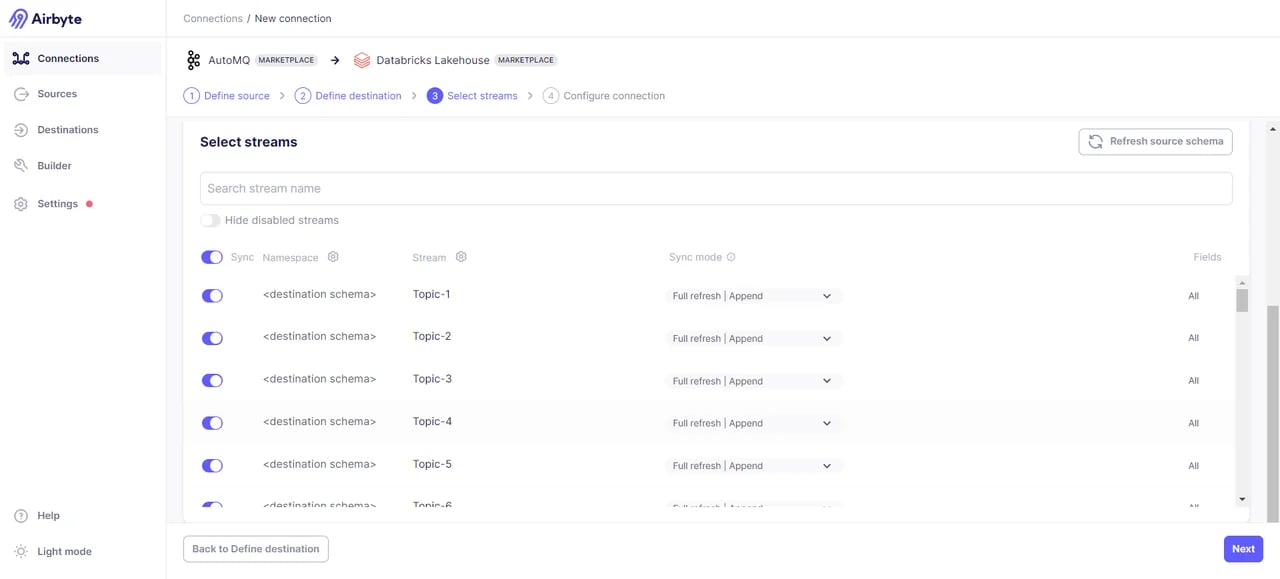
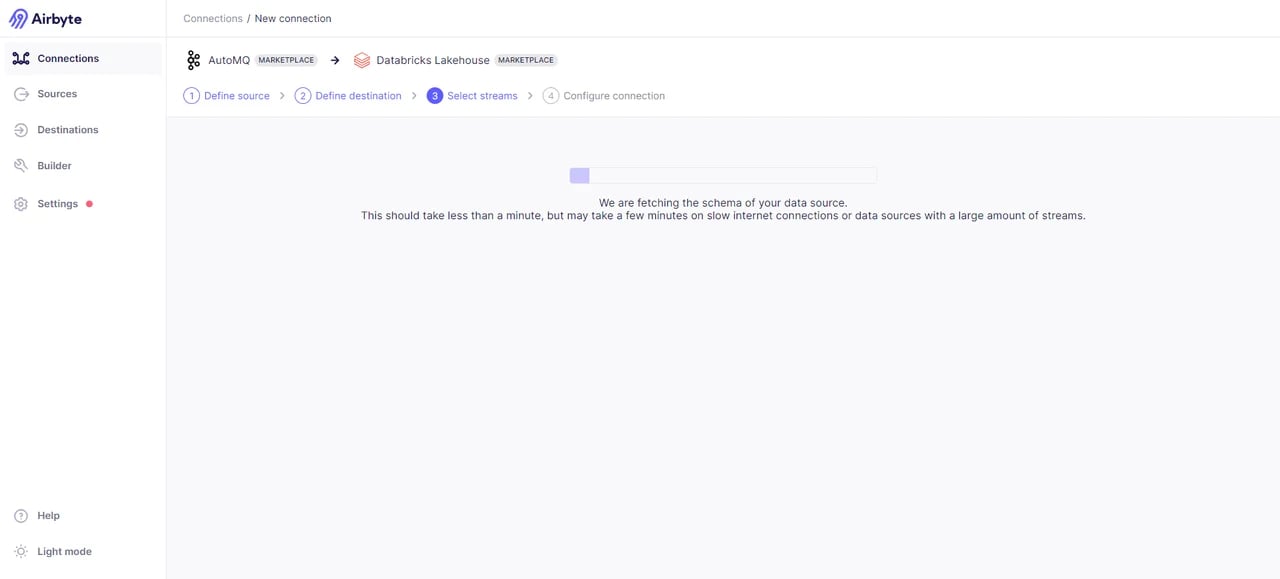 连接成功后,需要选择数据传输的方式,这里提供了增量同步以及全量同步方式,我选择的是全量同步方式:
选择具体需要传输的 Topics 数据:
连接成功后,需要选择数据传输的方式,这里提供了增量同步以及全量同步方式,我选择的是全量同步方式:
选择具体需要传输的 Topics 数据:
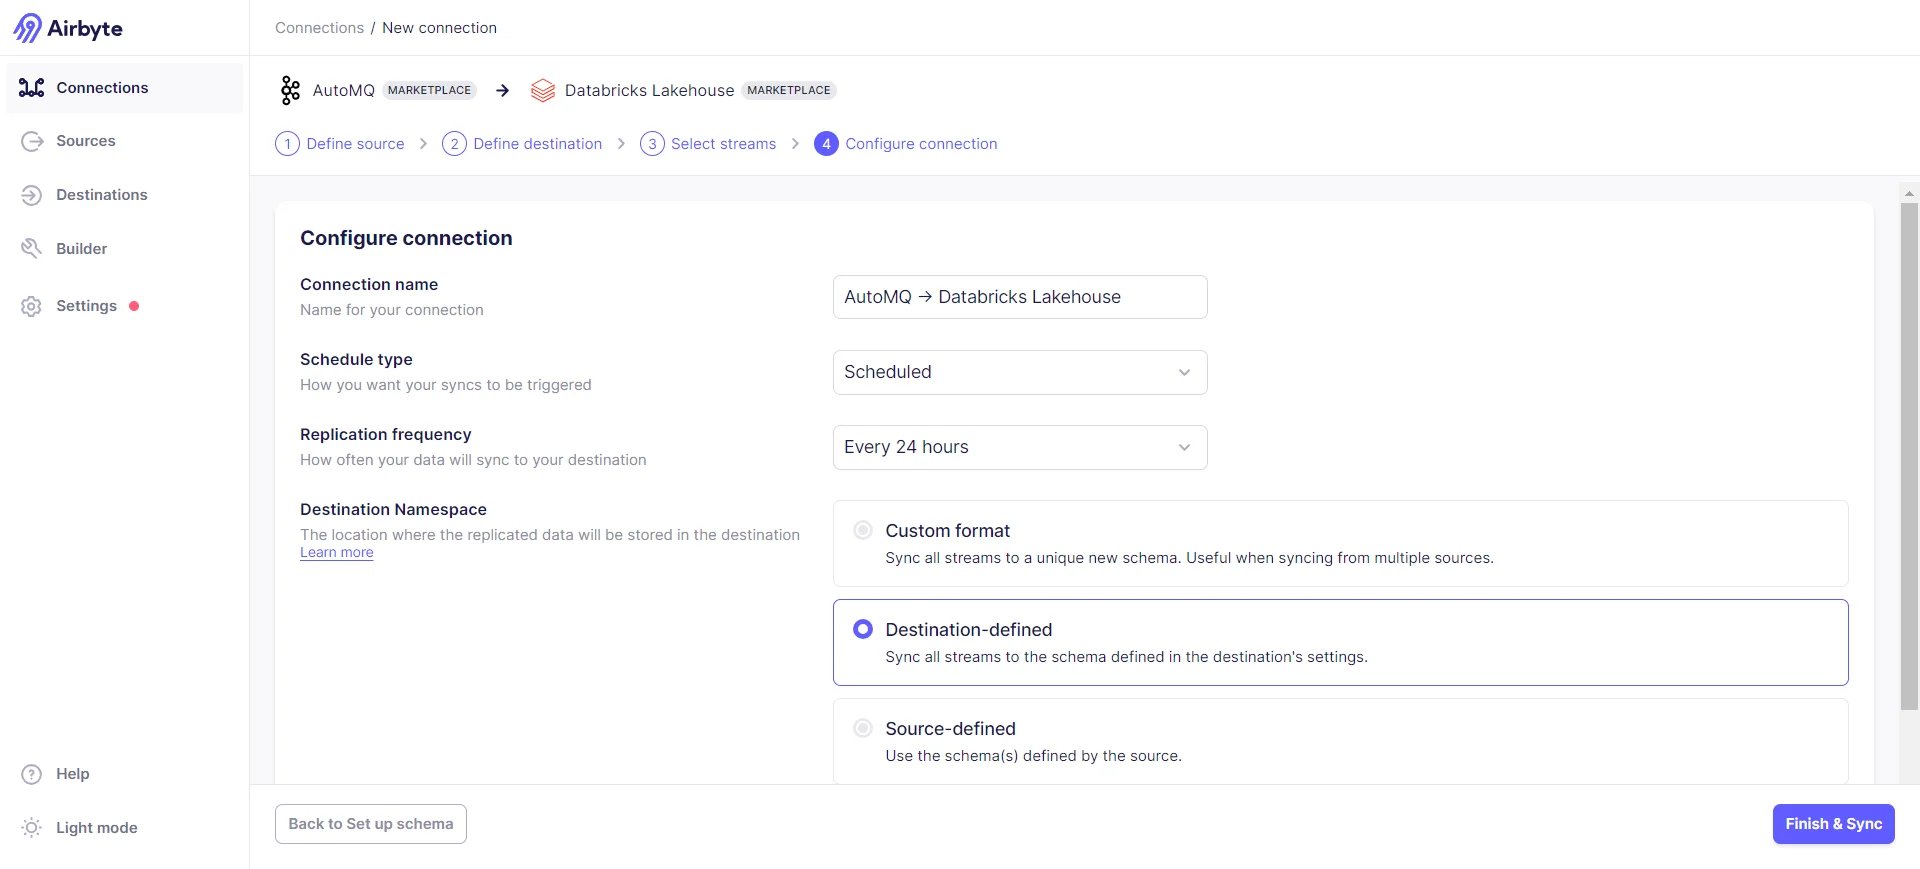
 确定同步频率以及目标数据格式等配置:
 开始同步:
开始同步:
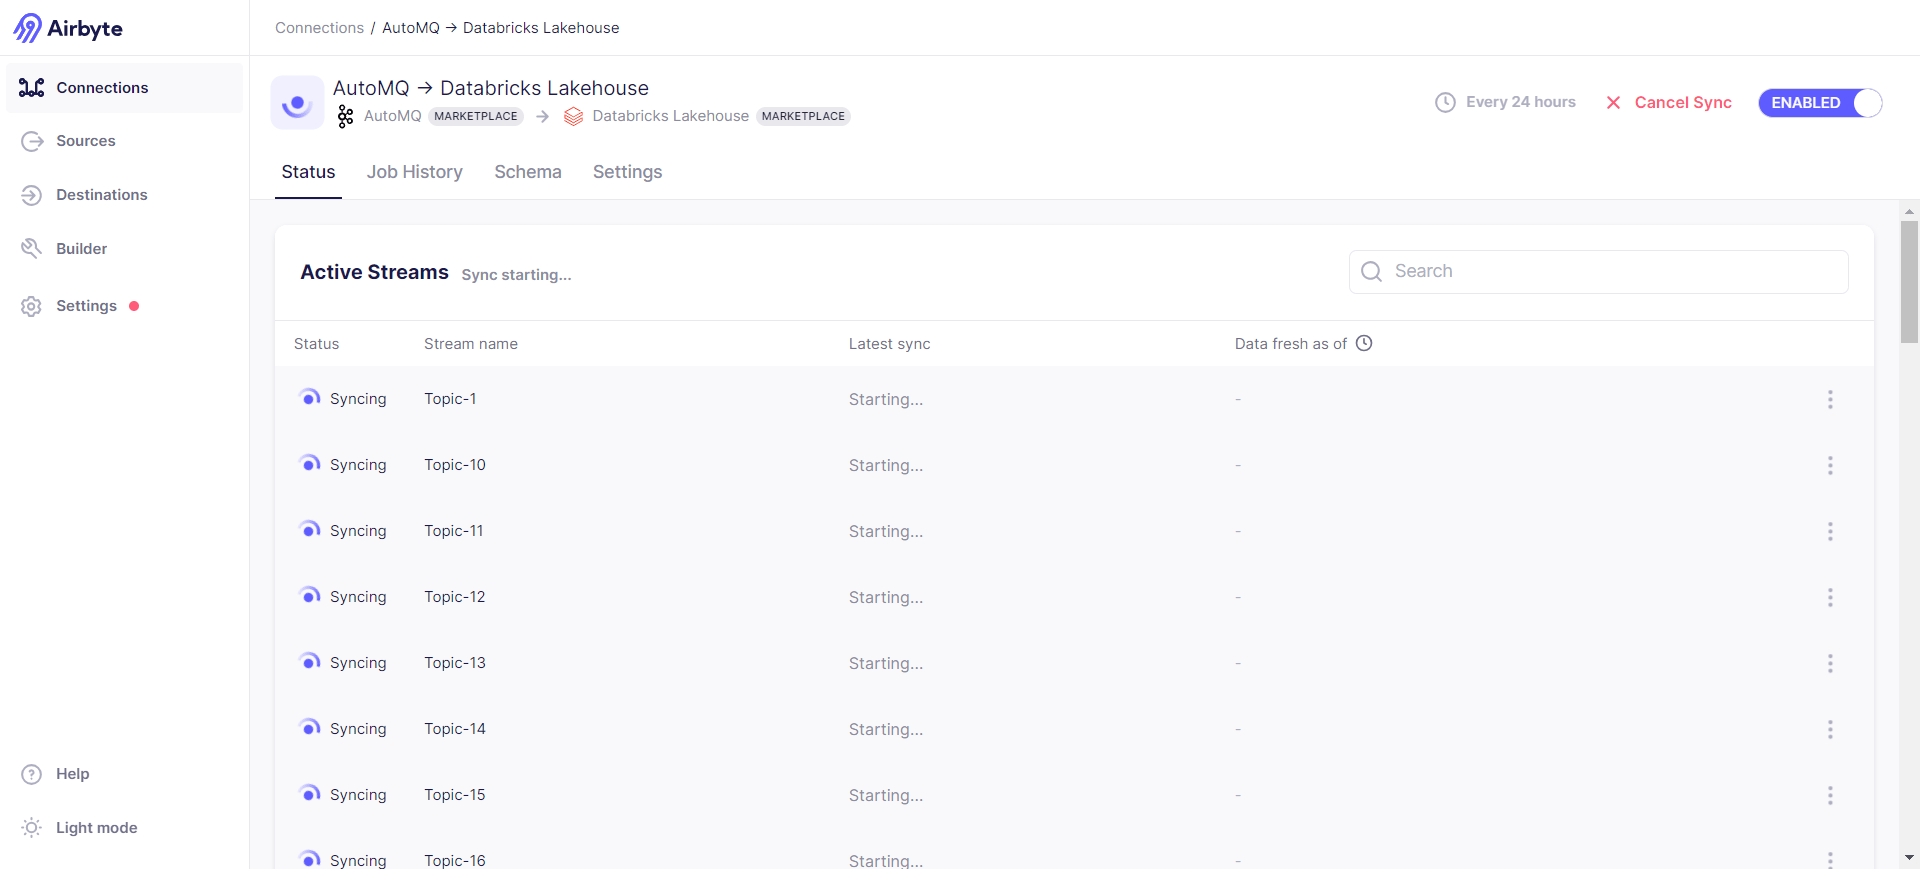 可以通过Job History -> Job -> Logs 查看同步情况,其中部分日志内容为:
```text theme={null}
2024-07-29 08:53:33 source > INFO o.a.k.c.c.i.AbstractCoordinator(resetStateAndGeneration):998 [Consumer clientId=consumer-airbyte-consumer-group-1, groupId=airbyte-consumer-group] Resetting generation and member id due to: consumer pro-actively leaving the group
2024-07-29 08:53:33 source > INFO o.a.k.c.c.i.AbstractCoordinator(requestRejoin):1045 [Consumer clientId=consumer-airbyte-consumer-group-1, groupId=airbyte-consumer-group] Request joining group due to: consumer pro-actively leaving the group
2024-07-29 08:53:33 source > INFO o.a.k.c.m.Metrics(close):659 Metrics scheduler closed
2024-07-29 08:53:33 source > INFO o.a.k.c.m.Metrics(close):663 Closing reporter org.apache.kafka.common.metrics.JmxReporter
2024-07-29 08:53:33 source > INFO o.a.k.c.m.Metrics(close):669 Metrics reporters closed
2024-07-29 08:53:33 source > INFO o.a.k.c.u.AppInfoParser(unregisterAppInfo):83 App info kafka.consumer for consumer-airbyte-consumer-group-1 unregistered
2024-07-29 08:53:33 source > INFO i.a.c.i.b.IntegrationRunner(runInternal):231 Completed integration: io.airbyte.integrations.source.kafka.KafkaSource
2024-07-29 08:53:33 source > INFO i.a.i.s.k.KafkaSource(main):62 Completed source: class io.airbyte.integrations.source.kafka.KafkaSource
2024-07-29 08:53:33 replication-orchestrator > (pod: airbyte-abctl / source-kafka-read-2-0-pbvbp) - Closed all resources for pod
2024-07-29 08:53:33 replication-orchestrator > Total records read: 0 (0 bytes)
2024-07-29 08:53:33 replication-orchestrator > Schema validation was performed to a max of 10 records with errors per stream.
2024-07-29 08:53:33 replication-orchestrator > readFromSource: done. (source.isFinished:true, fromSource.isClosed:false)
2024-07-29 08:53:33 replication-orchestrator > processMessage: done. (fromSource.isDone:true, forDest.isClosed:false)
2024-07-29 08:53:33 replication-orchestrator > thread status... heartbeat thread: false , replication thread: true
2024-07-29 08:53:33 replication-orchestrator > writeToDestination: done. (forDest.isDone:true, isDestRunning:true)
2024-07-29 08:53:33 replication-orchestrator > thread status... timeout thread: false , replication thread: true
2024-07-29 08:53:35 destination > INFO i.a.i.d.j.JdbcBufferedConsumerFactory(lambda$onStartFunction$1):147 Preparing raw table in destination started for stream Topic-27. schema: default, table name: _airbyte_raw_topic_27
2024-07-29 08:53:40 destination > INFO i.a.i.d.j.JdbcBufferedConsumerFactory(lambda$onStartFunction$1):147 Preparing raw table in destination started for stream Topic-24. schema: default, table name: _airbyte_raw_topic_24
2024-07-29 08:53:45 destination > INFO i.a.i.d.j.JdbcBufferedConsumerFactory(lambda$onStartFunction$1):147 Preparing raw table in destination started for stream Topic-25. schema: default, table name: _airbyte_raw_topic_25
2024-07-29 08:53:50 destination > INFO i.a.i.d.j.JdbcBufferedConsumerFactory(lambda$onStartFunction$1):147 Preparing raw table in destination started for stream Topic-28. schema: default, table name: _airbyte_raw_topic_28
2024-07-29 08:53:55 destination > INFO i.a.i.d.j.JdbcBufferedConsumerFactory(lambda$onStartFunction$1):147 Preparing raw table in destination started for stream Topic-29. schema: default, table name: _airbyte_raw_topic_29
2024-07-29 08:54:01 destination > INFO i.a.i.d.j.JdbcBufferedConsumerFactory(lambda$onStartFunction$1):147 Preparing raw table in destination started for stream Topic-30. schema: default, table name: _airbyte_raw_topic_30
2024-07-29 08:54:06 destination > INFO i.a.i.d.j.JdbcBufferedConsumerFactory(lambda$onStartFunction$1):147 Preparing raw table in destination started for stream Topic-33. schema: default, table name: _airbyte_raw_topic_33
2024-07-29 08:54:10 destination > INFO i.a.i.d.j.JdbcBufferedConsumerFactory(lambda$onStartFunction$1):147 Preparing raw table in destination started for stream Topic-34. schema: default, table name: _airbyte_raw_topic_34
2024-07-29 08:54:15 destination > INFO i.a.i.d.j.JdbcBufferedConsumerFactory(lambda$onStartFunction$1):147 Preparing raw table in destination started for stream Topic-31. schema: default, table name: _airbyte_raw_topic_31
2024-07-29 08:54:19 destination > INFO i.a.i.d.j.JdbcBufferedConsumerFactory(lambda$onStartFunction$1):147 Preparing raw table in destination started for stream Topic-32. schema: default, table name: _airbyte_raw_topic_32
```
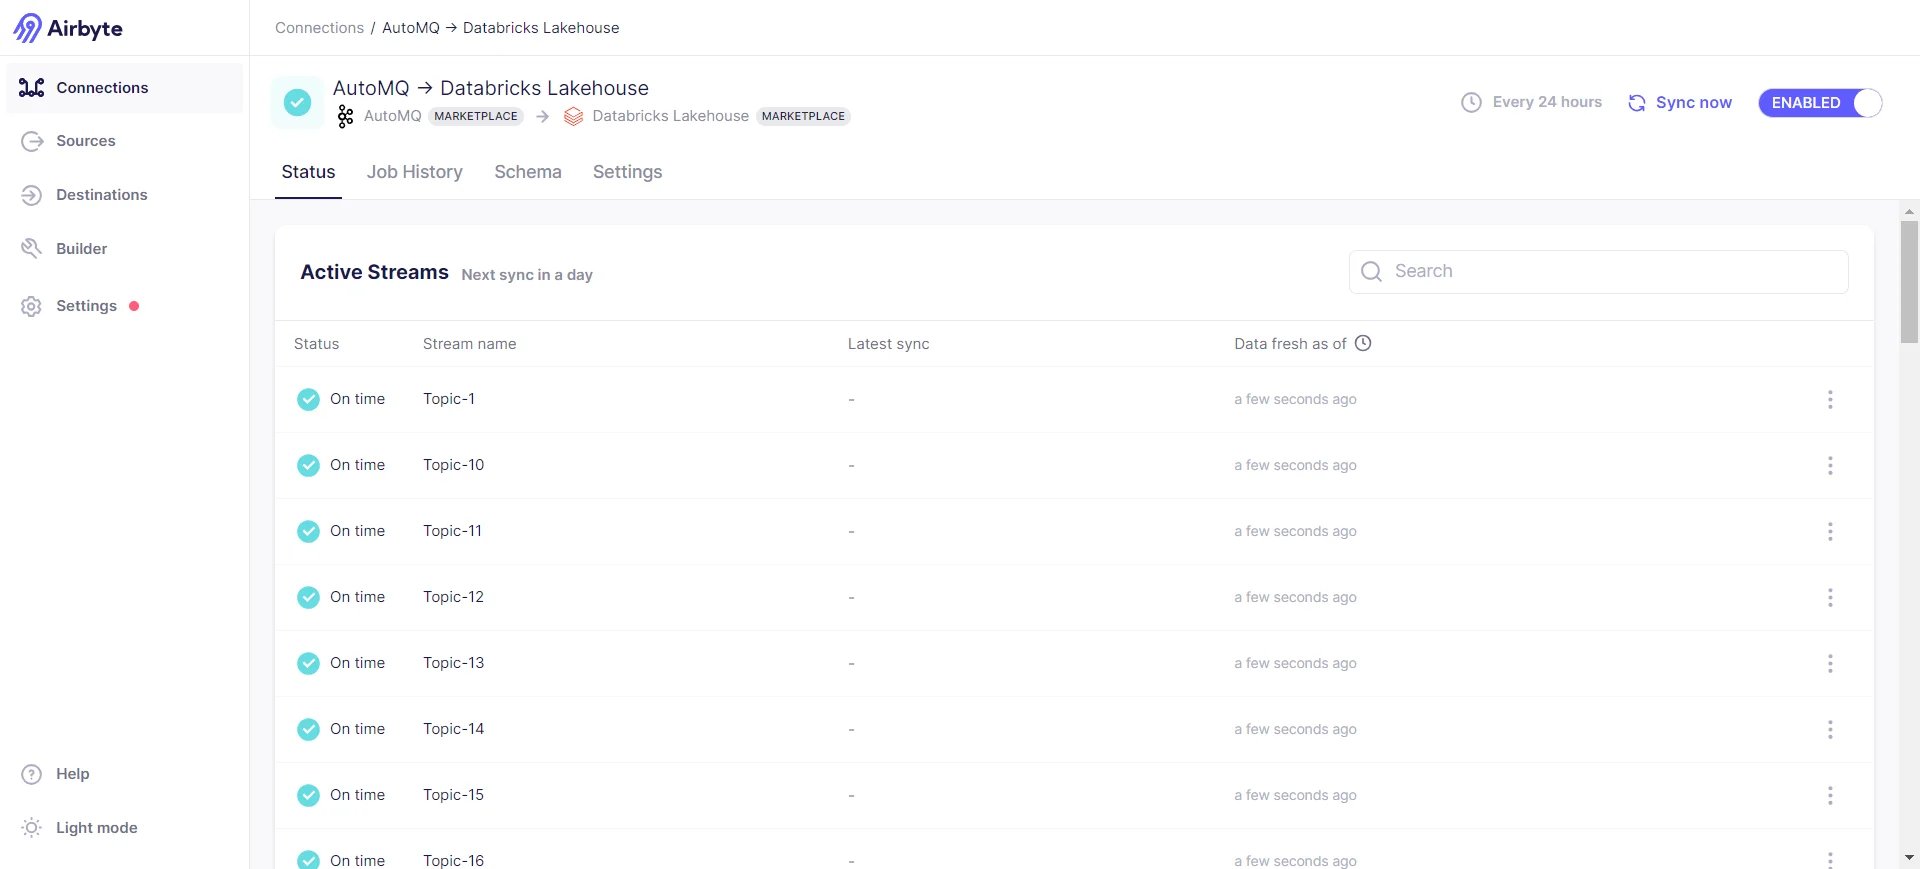
同步成功:
可以通过Job History -> Job -> Logs 查看同步情况,其中部分日志内容为:
```text theme={null}
2024-07-29 08:53:33 source > INFO o.a.k.c.c.i.AbstractCoordinator(resetStateAndGeneration):998 [Consumer clientId=consumer-airbyte-consumer-group-1, groupId=airbyte-consumer-group] Resetting generation and member id due to: consumer pro-actively leaving the group
2024-07-29 08:53:33 source > INFO o.a.k.c.c.i.AbstractCoordinator(requestRejoin):1045 [Consumer clientId=consumer-airbyte-consumer-group-1, groupId=airbyte-consumer-group] Request joining group due to: consumer pro-actively leaving the group
2024-07-29 08:53:33 source > INFO o.a.k.c.m.Metrics(close):659 Metrics scheduler closed
2024-07-29 08:53:33 source > INFO o.a.k.c.m.Metrics(close):663 Closing reporter org.apache.kafka.common.metrics.JmxReporter
2024-07-29 08:53:33 source > INFO o.a.k.c.m.Metrics(close):669 Metrics reporters closed
2024-07-29 08:53:33 source > INFO o.a.k.c.u.AppInfoParser(unregisterAppInfo):83 App info kafka.consumer for consumer-airbyte-consumer-group-1 unregistered
2024-07-29 08:53:33 source > INFO i.a.c.i.b.IntegrationRunner(runInternal):231 Completed integration: io.airbyte.integrations.source.kafka.KafkaSource
2024-07-29 08:53:33 source > INFO i.a.i.s.k.KafkaSource(main):62 Completed source: class io.airbyte.integrations.source.kafka.KafkaSource
2024-07-29 08:53:33 replication-orchestrator > (pod: airbyte-abctl / source-kafka-read-2-0-pbvbp) - Closed all resources for pod
2024-07-29 08:53:33 replication-orchestrator > Total records read: 0 (0 bytes)
2024-07-29 08:53:33 replication-orchestrator > Schema validation was performed to a max of 10 records with errors per stream.
2024-07-29 08:53:33 replication-orchestrator > readFromSource: done. (source.isFinished:true, fromSource.isClosed:false)
2024-07-29 08:53:33 replication-orchestrator > processMessage: done. (fromSource.isDone:true, forDest.isClosed:false)
2024-07-29 08:53:33 replication-orchestrator > thread status... heartbeat thread: false , replication thread: true
2024-07-29 08:53:33 replication-orchestrator > writeToDestination: done. (forDest.isDone:true, isDestRunning:true)
2024-07-29 08:53:33 replication-orchestrator > thread status... timeout thread: false , replication thread: true
2024-07-29 08:53:35 destination > INFO i.a.i.d.j.JdbcBufferedConsumerFactory(lambda$onStartFunction$1):147 Preparing raw table in destination started for stream Topic-27. schema: default, table name: _airbyte_raw_topic_27
2024-07-29 08:53:40 destination > INFO i.a.i.d.j.JdbcBufferedConsumerFactory(lambda$onStartFunction$1):147 Preparing raw table in destination started for stream Topic-24. schema: default, table name: _airbyte_raw_topic_24
2024-07-29 08:53:45 destination > INFO i.a.i.d.j.JdbcBufferedConsumerFactory(lambda$onStartFunction$1):147 Preparing raw table in destination started for stream Topic-25. schema: default, table name: _airbyte_raw_topic_25
2024-07-29 08:53:50 destination > INFO i.a.i.d.j.JdbcBufferedConsumerFactory(lambda$onStartFunction$1):147 Preparing raw table in destination started for stream Topic-28. schema: default, table name: _airbyte_raw_topic_28
2024-07-29 08:53:55 destination > INFO i.a.i.d.j.JdbcBufferedConsumerFactory(lambda$onStartFunction$1):147 Preparing raw table in destination started for stream Topic-29. schema: default, table name: _airbyte_raw_topic_29
2024-07-29 08:54:01 destination > INFO i.a.i.d.j.JdbcBufferedConsumerFactory(lambda$onStartFunction$1):147 Preparing raw table in destination started for stream Topic-30. schema: default, table name: _airbyte_raw_topic_30
2024-07-29 08:54:06 destination > INFO i.a.i.d.j.JdbcBufferedConsumerFactory(lambda$onStartFunction$1):147 Preparing raw table in destination started for stream Topic-33. schema: default, table name: _airbyte_raw_topic_33
2024-07-29 08:54:10 destination > INFO i.a.i.d.j.JdbcBufferedConsumerFactory(lambda$onStartFunction$1):147 Preparing raw table in destination started for stream Topic-34. schema: default, table name: _airbyte_raw_topic_34
2024-07-29 08:54:15 destination > INFO i.a.i.d.j.JdbcBufferedConsumerFactory(lambda$onStartFunction$1):147 Preparing raw table in destination started for stream Topic-31. schema: default, table name: _airbyte_raw_topic_31
2024-07-29 08:54:19 destination > INFO i.a.i.d.j.JdbcBufferedConsumerFactory(lambda$onStartFunction$1):147 Preparing raw table in destination started for stream Topic-32. schema: default, table name: _airbyte_raw_topic_32
```
同步成功:
 ## 验证结果
数据传输成功后,我们可以进入 Databricks 集群里查看传输结果:
## 验证结果
数据传输成功后,我们可以进入 Databricks 集群里查看传输结果:
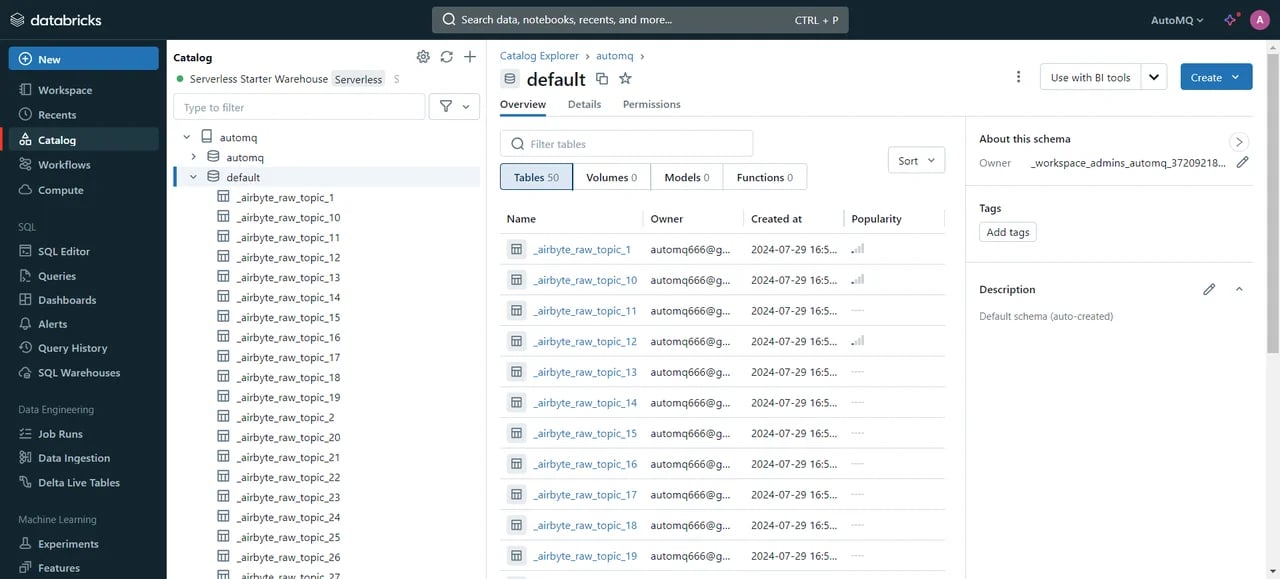 可以看到我们已经成功的将 AutoMQ 节点中选择的 Topics 数据同步到了 Databricks 中,接下来可以通过 SQL 进行数据检索和处理。具体语法可参考官方文档:[SQL language ](https://docs.databricks.com/en/sql/language-manual/index.html)\[11]。
## 总结
通过本文的介绍,我们展示了如何将 AutoMQ、Airbyte 和 Databricks 集成,以实现实时数据的高效流动和分析。通过将 AutoMQ 的高效流处理、Airbyte 的灵活数据集成和 Databricks 的强大数据分析能力结合起来,企业可以构建一个高效、灵活且可扩展的数据处理平台。这一集成不仅降低了存储和运维成本,还提高了数据处理效率和业务决策的及时性。希望本文能为企业在实时数据处理和分析方面提供有价值的参考。
## 引用
\[1] AutoMQ: [https://www.automq.com/zh](https://www.automq.com/zh)
\[2] Airbyte:httpsyte:[https://airbyte.com/](https://airbyte.com/)
\[3] Databricks: [https://www.databricks.com/](https://www.databricks.com/)
\[4] 快速开始 AutoMQ: [https://docs.automq.com/automq/deployment/deploy-multi-nodes-cluster-on-linux](https://docs.automq.com/automq/deployment/deploy-multi-nodes-cluster-on-linux)
\[5] Redpanda Console: [https://www.redpanda.com/redpanda-console-kafka-ui](https://www.redpanda.com/redpanda-console-kafka-ui)
\[6] Kafdrop: [https://github.com/obsidiandynamics/kafdrop](https://github.com/obsidiandynamics/kafdrop)
\[7] Quickstart Airbyte: [https://docs.airbyte.com/using-airbyte/getting-started/oss-quickstart](https://docs.airbyte.com/using-airbyte/getting-started/oss-quickstart)
\[8] Docker Install: [https://docs.docker.com/desktop/install/linux-install/](https://docs.docker.com/desktop/install/linux-install/)
\[9] Google databricks: [https://cloud.google.com/databricks?hl=zh\_cn](https://cloud.google.com/databricks?hl=zh_cn)
\[10] Destinations : [https://docs.airbyte.com/integrations/destinations/](https://docs.airbyte.com/integrations/destinations/)
\[11] SQL language: [https://docs.databricks.com/en/sql/language-manual/index.html](https://docs.databricks.com/en/sql/language-manual/index.html)
可以看到我们已经成功的将 AutoMQ 节点中选择的 Topics 数据同步到了 Databricks 中,接下来可以通过 SQL 进行数据检索和处理。具体语法可参考官方文档:[SQL language ](https://docs.databricks.com/en/sql/language-manual/index.html)\[11]。
## 总结
通过本文的介绍,我们展示了如何将 AutoMQ、Airbyte 和 Databricks 集成,以实现实时数据的高效流动和分析。通过将 AutoMQ 的高效流处理、Airbyte 的灵活数据集成和 Databricks 的强大数据分析能力结合起来,企业可以构建一个高效、灵活且可扩展的数据处理平台。这一集成不仅降低了存储和运维成本,还提高了数据处理效率和业务决策的及时性。希望本文能为企业在实时数据处理和分析方面提供有价值的参考。
## 引用
\[1] AutoMQ: [https://www.automq.com/zh](https://www.automq.com/zh)
\[2] Airbyte:httpsyte:[https://airbyte.com/](https://airbyte.com/)
\[3] Databricks: [https://www.databricks.com/](https://www.databricks.com/)
\[4] 快速开始 AutoMQ: [https://docs.automq.com/automq/deployment/deploy-multi-nodes-cluster-on-linux](https://docs.automq.com/automq/deployment/deploy-multi-nodes-cluster-on-linux)
\[5] Redpanda Console: [https://www.redpanda.com/redpanda-console-kafka-ui](https://www.redpanda.com/redpanda-console-kafka-ui)
\[6] Kafdrop: [https://github.com/obsidiandynamics/kafdrop](https://github.com/obsidiandynamics/kafdrop)
\[7] Quickstart Airbyte: [https://docs.airbyte.com/using-airbyte/getting-started/oss-quickstart](https://docs.airbyte.com/using-airbyte/getting-started/oss-quickstart)
\[8] Docker Install: [https://docs.docker.com/desktop/install/linux-install/](https://docs.docker.com/desktop/install/linux-install/)
\[9] Google databricks: [https://cloud.google.com/databricks?hl=zh\_cn](https://cloud.google.com/databricks?hl=zh_cn)
\[10] Destinations : [https://docs.airbyte.com/integrations/destinations/](https://docs.airbyte.com/integrations/destinations/)
\[11] SQL language: [https://docs.databricks.com/en/sql/language-manual/index.html](https://docs.databricks.com/en/sql/language-manual/index.html)