Migrating from Apache Kafka to AutoMQ
This article offers an in-depth look at the strategy and execution for transitioning from Apache Kafka® to AutoMQ.
Prerequisites
Feature List
Currently, AutoMQ provides only the Kafka Server component, lacking other components of the ecosystem. Hence, before switching to AutoMQ, it's crucial to check if you're using the following features and adhere to the accompanying guidelines:
Kafka Server: AutoMQ presents a more affordable and flexible Kafka Server solution, compatible with Apache Kafka versions 0.9.x to 3.4.x. If your current Apache Kafka Server version falls outside this supported range, please reach out to us for assistance and updates.
Kafka Client: AutoMQ supports the original Apache Kafka Client SDK; just make sure the existing SDK version is within 0.9.x to 3.4.x for compatibility.
Kafka Connector: AutoMQ is compatible with the Apache Kafka Connector. If you currently use a Kafka Connector, we recommend keeping the existing service and simply changing the Kafka Server endpoint in the Connector settings to the AutoMQ instance endpoint.
Business Scope
In a production setting, it is generally best to transition from Apache Kafka® to AutoMQ by incrementally migrating in batches, strategically selecting Topics and Consumer Groups from the source cluster based on business relevance and scope.
Thus, it's recommended to adhere to the following steps to assess the business scope:
- Inventory List of Source Cluster Resources: Use the Kafka Admin CLI or similar tools to export all Topics and Consumer Groups from the source cluster, organizing them by their associated business systems. It's wise to clean up any unclaimed or inactive Topics and Consumer Groups beforehand.
Be sure to review the Topics in the source cluster and eliminate those that have not been actively written to or subscribed to for a considerable period, thereby narrowing the scope of what needs to be reassigned.
Divide into Batches by Business System: In the production environment, it's advisable to organize the reassignment into batches based on business systems, beginning with offline and non-essential system businesses, and gradually broadening the reassignment scope to mitigate unforeseen risks.
Coordinate with Business Personnel for the Reassignment: Follow a systematic approach to reassignment in line with the business systems.
Once the Apache Kafka Client establishes a server-side connection, maintaining its link to the source cluster, changing to a new AutoMQ cluster still necessitates restarting the client application to connect, even if accessing the server via a domain name.
Reassignment Process.
Migrating from Apache Kafka® to AutoMQ involves several key considerations:
Message Data Migration: Kafka retains historical data of both consumed and unconsumed messages; it is crucial to ensure that this data is accurately transferred to the new cluster without any loss.
Consumer Progress Metadata Migration: It is essential to reconstruct metadata, such as consumer progress from the original cluster, in the new cluster to prevent loss of progress and avoid reprocessing, which could result in significant duplication.
Producer Switch: Beyond data synchronization, the migration process also entails timing the switch of producer applications to connect with the target cluster for generating new messages.
Consumer Switch: Similarly, the migration requires timing the switch of consumer applications to ensure they connect to the target cluster and resume message consumption seamlessly from where they left off.
The overall migration plan follows this process flow:
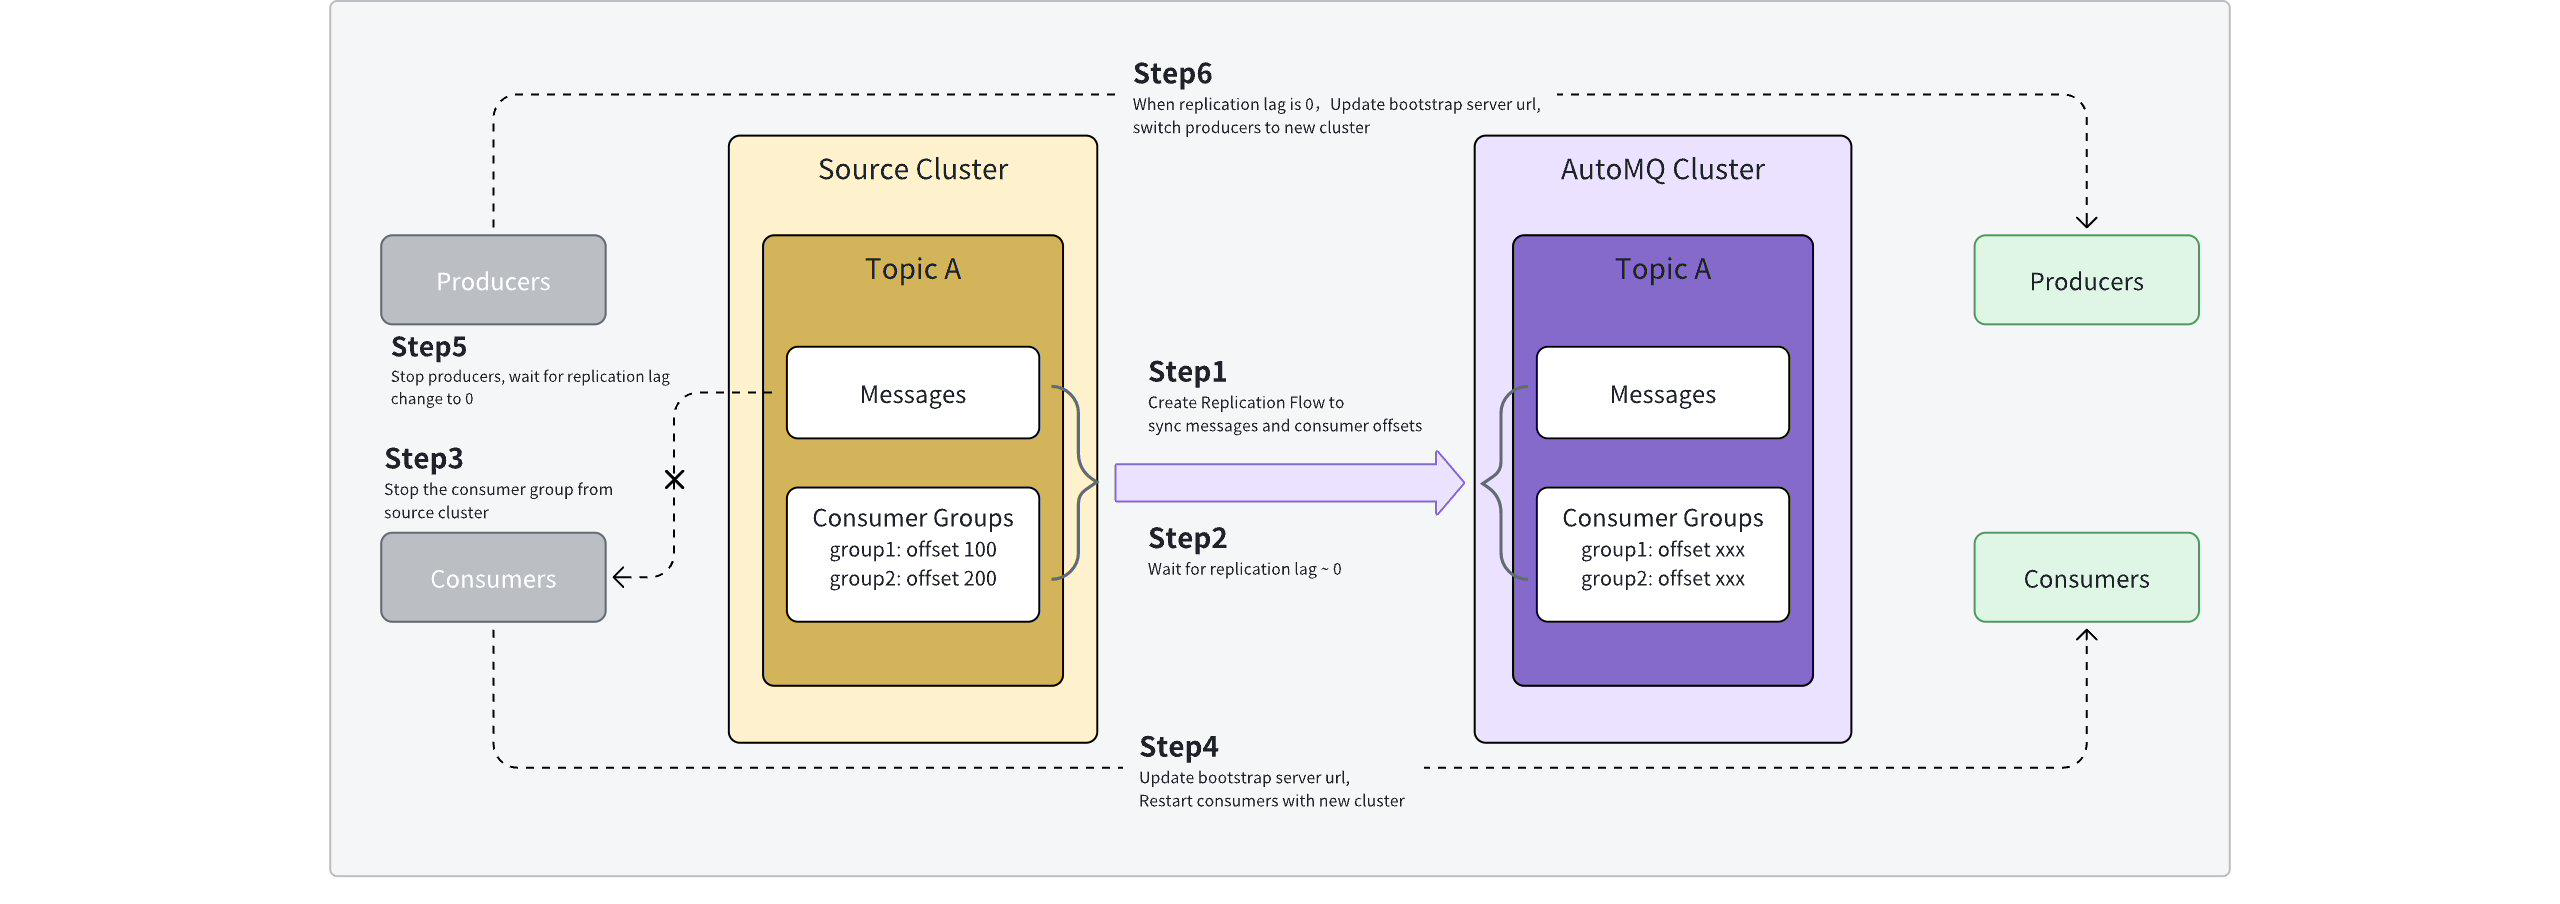
Step 1: Create a Migration Task, Synchronize Data
As detailed in Overview▸, AutoMQ suggests using a dedicated MirrorMaker2 Connector for each batch task to facilitate data synchronization, promoting better isolation. This involves configuring the following parameters according to the specific requirements:
Source Cluster: Specify the source cluster for the reassignment.
Target Cluster: Specify the target cluster for the reassignment, choosing an AutoMQ cluster in this case.
List of Topics to Synchronize: Set up the list of topics to be included in the reassignment task. This list supports wildcard entries, enabling the configuration of multiple topics simultaneously.
The AutoMQ reassignment tool facilitates the automatic synchronization of dynamic topic updates. Once a synchronization task is established, any new topics created or changes in the number of partitions for existing topics will be automatically synchronized to the target cluster, as long as they match the criteria specified in the current list.
- Synchronize Consumption Progress: Enabling this feature is recommended. Once activated, the reassignment task will map the consumption progress from the source cluster's Consumer Group to the target cluster, allowing consumers to resume where they left off after the transition, thus preventing extensive redundant processing.
It is crucial to understand that the message offsets synchronized between the two clusters using MirrorMaker2 are not identical; hence, the consumption progress from the source cluster will be remapped to the target cluster. This adjustment may result in a slight rollback of offsets.
- List of Topics to Exclude: If wildcards are employed in the List of Topics to Synchronize but certain topics need to be omitted from synchronization, configure the List of Topics to Exclude to remove these topics from the synchronization process.
Step 2: Monitor the Synchronization Progress, Waiting for the Synchronization to near Completion
MirrorMaker2 offers JMX metrics to track synchronization delays effectively. Users should monitor these sync delay metrics closely, aiming for them to near zero.
Monitoring the synchronization as it nears completion helps minimize the waiting time for subsequent application switching.
In MirrorMaker2, the synchronization delay is the elapsed time from when messages are produced in the source cluster's reassigning Topic until synchronization is fully completed. For tasks involving multiple Topics, the delay is measured by the longest time taken among them.
It's crucial to regularly check both synchronization delay and backlog metrics according to the reassignment plan. It's advisable to prepare for application switching when the synchronization delay is under 1 minute.
Step 3: Stop the Source Cluster Consumers
Switching applications effectively requires first transitioning the consumers; hence, it's prudent to halt the consumer applications, ensuring the consumer progress data from the source cluster is synchronized to the target cluster before making the switch.
A recommended practice is to allow some time for the complete synchronization of consumer progress. This interval is generally set at 60s but can be adjusted in the advanced settings of the reassignment task.
Additionally, applications might initiate new consumers within the same Consumer Close on the target cluster prior to stopping the consumers on the source cluster, leading to a period where both ends are consuming simultaneously.
Step 4: Switch the Consumer to the Target Cluster
Once Step 3 is completed, modify the consumer configuration by replacing the access point with the one provided by the AutoMQ instance, then restart the application.
Due to the technical implementation of MirrorMaker2, during Steps 3 and 4, consumers might experience some message duplication. To reduce the probability of duplication, custom configurations can be set in the advanced parameters of the reassignment task.
Step 5: Shutdown the Producers in the Source Cluster
For each Topic, ensure that all consumers have been switched over by repeating Steps 3 and 4, then stop the producers in the source cluster and wait for all message data to synchronize to the target cluster.
Stopping the producers helps prevent the target cluster from receiving simultaneous message writes from both the producers and MirrorMaker2, which could lead to message disorder.
Step 6: Switch the Producer to the Target Cluster
Monitor the synchronization delay of the reassignment task. Once the synchronization delay reaches zero, restart the producer with the new access point address, connecting to the AutoMQ target cluster, thereby completing the entire reassignment task.
After switching producers, continuous monitoring of both upstream and downstream applications associated with the Topic is crucial to ensure they perform as expected.
Step 7: Repeat Steps 3 to 6 Until the Reassignment Is Finalized, Then Proceed to Delete the Reassignment Task.
Repeatedly check that all Topic reassignments are complete. Steps 3 to 6 involve managing operations according to the specificity of the Topic and its linked producers and consumers. It's imperative to verify repeatedly until all Topics within the ongoing reassignment task are finalized.
Delete the reassignment task. Once the reassignment of all Topics is accomplished, click to confirm and delete the task; AutoMQ will then clear out the underlying machine resources and configurations.
After the reassignment task is deleted, it cannot be restored. Even if a reassignment task for the same Topic is recreated, it will be considered a new task and will not resume from where the last reassignment left off. Therefore, it is essential to ensure that the current reassignment task is thoroughly completed before proceeding with its deletion.
Rollback Process
In case of unexpected issues during various stages of the reassignment process that are not promptly identifiable, users may consider the following rollback procedures and monitor the resulting effects.
| Reassignment Stage | Rollback Plan | Impact of Rollback |
|---|---|---|
| Step 1: Create Task |
| This phase does not affect the application as the switch has not yet occurred. |
| Step 2: Monitor Sync Progress |
| This phase does not affect the application as the switch has not yet occurred. |
| Step 3: Consumer on the source cluster has been stopped |
| No impact on data, only causes temporary consumption pause and delay. |
| Step 4: Consumers have switched to the target cluster |
| Rolling back to the source cluster will lead to re-consumption of data produced during the switch period. |
| Step 5: Producer on the source cluster has been stopped |
| Rolling back to the source cluster will lead to re-consumption of data produced during the switch period. |
| Step 6: Producers have switched to the target cluster |
| Messages produced to the target cluster during Step 6 cannot be synchronized back to the source cluster and must be handled by the application. |
| Step 7: Migration task has been deleted |
| Not applicable. |