Executing Migration
After completing the Prerequisites▸, you can begin the reassignment process. This article provides a comprehensive overview of both the strategy and the steps for migrating from Apache Kafka® to AutoMQ.
Reassignment Strategy
The migration from Apache to AutoMQ typically involves the following key activities:
Message data reassignment: Kafka retains a record of both consumed and unconsumed message data. It is critical during the reassignment to replicate this message data as needed to the new cluster, ensuring no message loss occurs.
Consumer progress metadata reassignment: It's essential to rebuild metadata, such as the consumption progress that Kafka consumers have made in the original cluster, in the new cluster. This prevents any loss of progress during the transition, which could otherwise lead to significant message duplication.
Producer switch-over: The reassignment includes not only data synchronization but also carefully timing the transition of producer applications to connect to the new cluster for generating new messages.
Consumer switch-over: Similarly, the reassignment involves precisely timing the transition of consumer applications so they connect to the new cluster and resume message consumption from where they stopped.
Below is a flowchart detailing the overall plan for the reassignment:
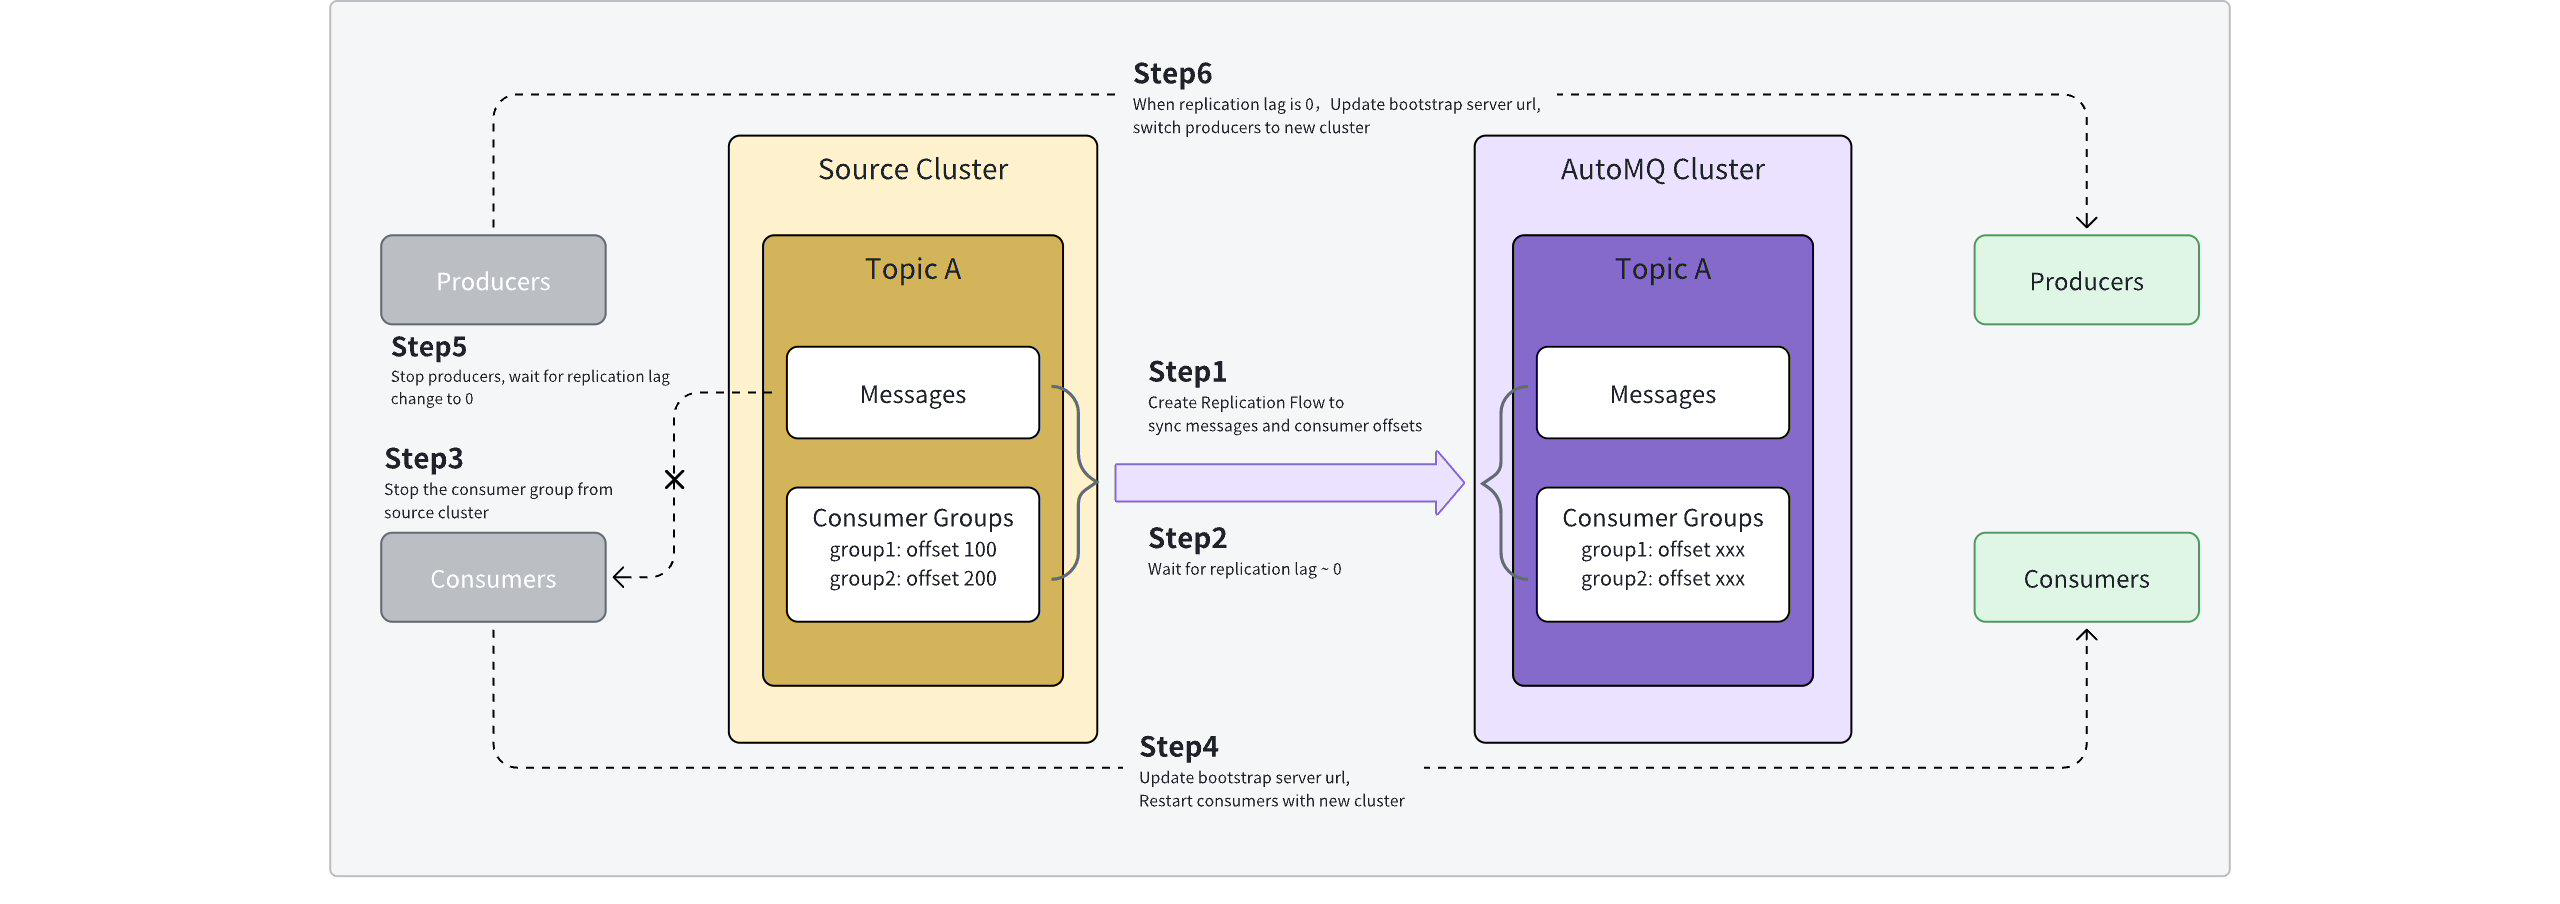
The reassignment steps are described as follows:
Step 1: Create a reassignment task and synchronize data. Refer to Overview▸, AutoMQ Cloud offers a comprehensive reassignment tool that enables users to create reassignment tasks in bulk, synchronizing Topic messages and related Consumer Group metadata from the source cluster to the target cluster.
Step 2: Monitor the synchronization progress and wait for it to near completion. AutoMQ Cloud reassignment tools provide task management and detailed views. Users need to monitor the number of messages accumulating and synchronization latency metrics, waiting for both indicators to approach zero.
Monitoring the synchronization nearing completion is to reduce the subsequent observation waiting time when switching applications.
- Step 3: Stop consumers in the source cluster. Switching applications involves transitioning consumers first, thus it is advisable to halt the consumer application initially, wait for the consumption progress data from the source cluster to synchronize to the target cluster before making the switch.
It is advisable to allow a period for the consumption progress to synchronize as thoroughly as possible. This period is typically set to 10s.
Applications may also initiate new consumers in the same Consumer Group on the target cluster first, then halt the consumers in the source cluster. This approach allows for simultaneous consumption at both ends for a period.
- Step 4: Transition consumers to the target cluster. Utilize the new access point address to activate consumers, connecting them to the AutoMQ target cluster.
According to the implementation of MirrorMaker2, consumers may experience some message duplication during steps 3 and 4. To reduce the likelihood of duplicates, custom configurations can be set in the advanced parameters of the reassignment task.
- Step 5: Shut down the source cluster's producers. Once the consumer switch is complete, it's essential to switch the producers. First, cease message production in the source cluster, then wait for all messages to be synchronized to the target cluster.
Stopping the producers is crucial to preventing the target cluster from receiving concurrent message writes from both the producers and MirrorMaker2, which could lead to message disorder.
- Step 6: Switch the producers to the target cluster. Monitor the backlog and latency of the reassignment task, and once the synchronization backlog reaches zero, restart the producers using the new endpoint address, connecting to the AutoMQ target cluster, thus completing the entire reassignment task.
After completing the reassignment and ensuring the application performs as expected, it is advisable to promptly delete the reassignment task to free up machine resources and avoid ongoing resource costs.
Reassignment Process
Step 1: Create the Reassignment Task, Synchronize Data
After completing the Prerequisites▸, the source cluster, target cluster, Topic, and Consumer Group to be reassigned are defined, now proceed to create the reassignment task.
- Set up a source cluster integration configuration. Sign into the environment console as an Admin or Operator and navigate to the integration page to establish an Apache Kafka® integration.
Each source cluster requires only a single integration setup, which can then be used for multiple reassignment tasks.
Apache Kafka® integration is also compatible with other Kafka distributions; simply input the necessary access point parameters.
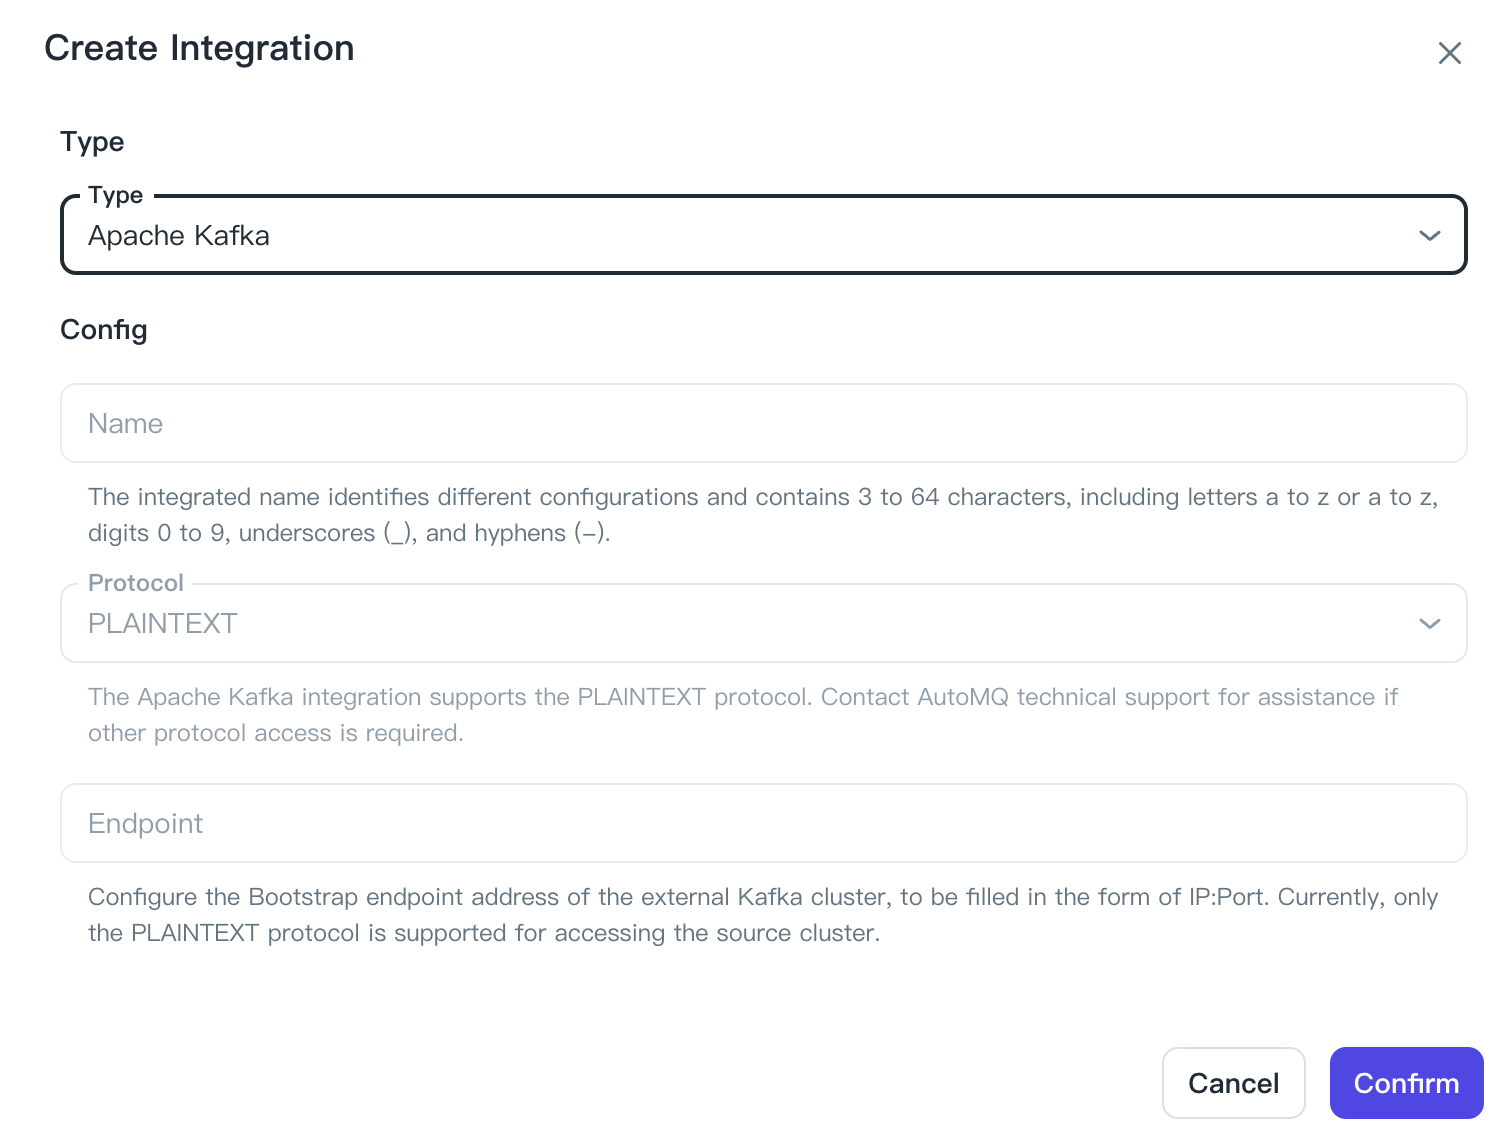
To configure an Apache Kafka® integration, you must provide the following details:
Integration name: This serves as a nickname to identify the source cluster, which can be customized by the user for better recognition later.
Access point protocol: Select the suitable access point protocol depending on the type of source cluster.
Access point address: Enter the Bootstrap address list for the chosen protocol.
The AutoMQ reassignment tool currently supports the PLAINTEXT protocol and does not accommodate SASL_PLAINTEXT, SSL, or SASL_SSL protocols. If needed, please promptly reach out to AutoMQ technical support for assistance.
- Initiate a reassignment task. Navigate to the reassignment page to create a task, and adhere to the provided guidelines to enter the necessary task parameters.
Among these, you will need to input the following parameters based on your specific situation:
| Parameter Name | Parameter Description |
|---|---|
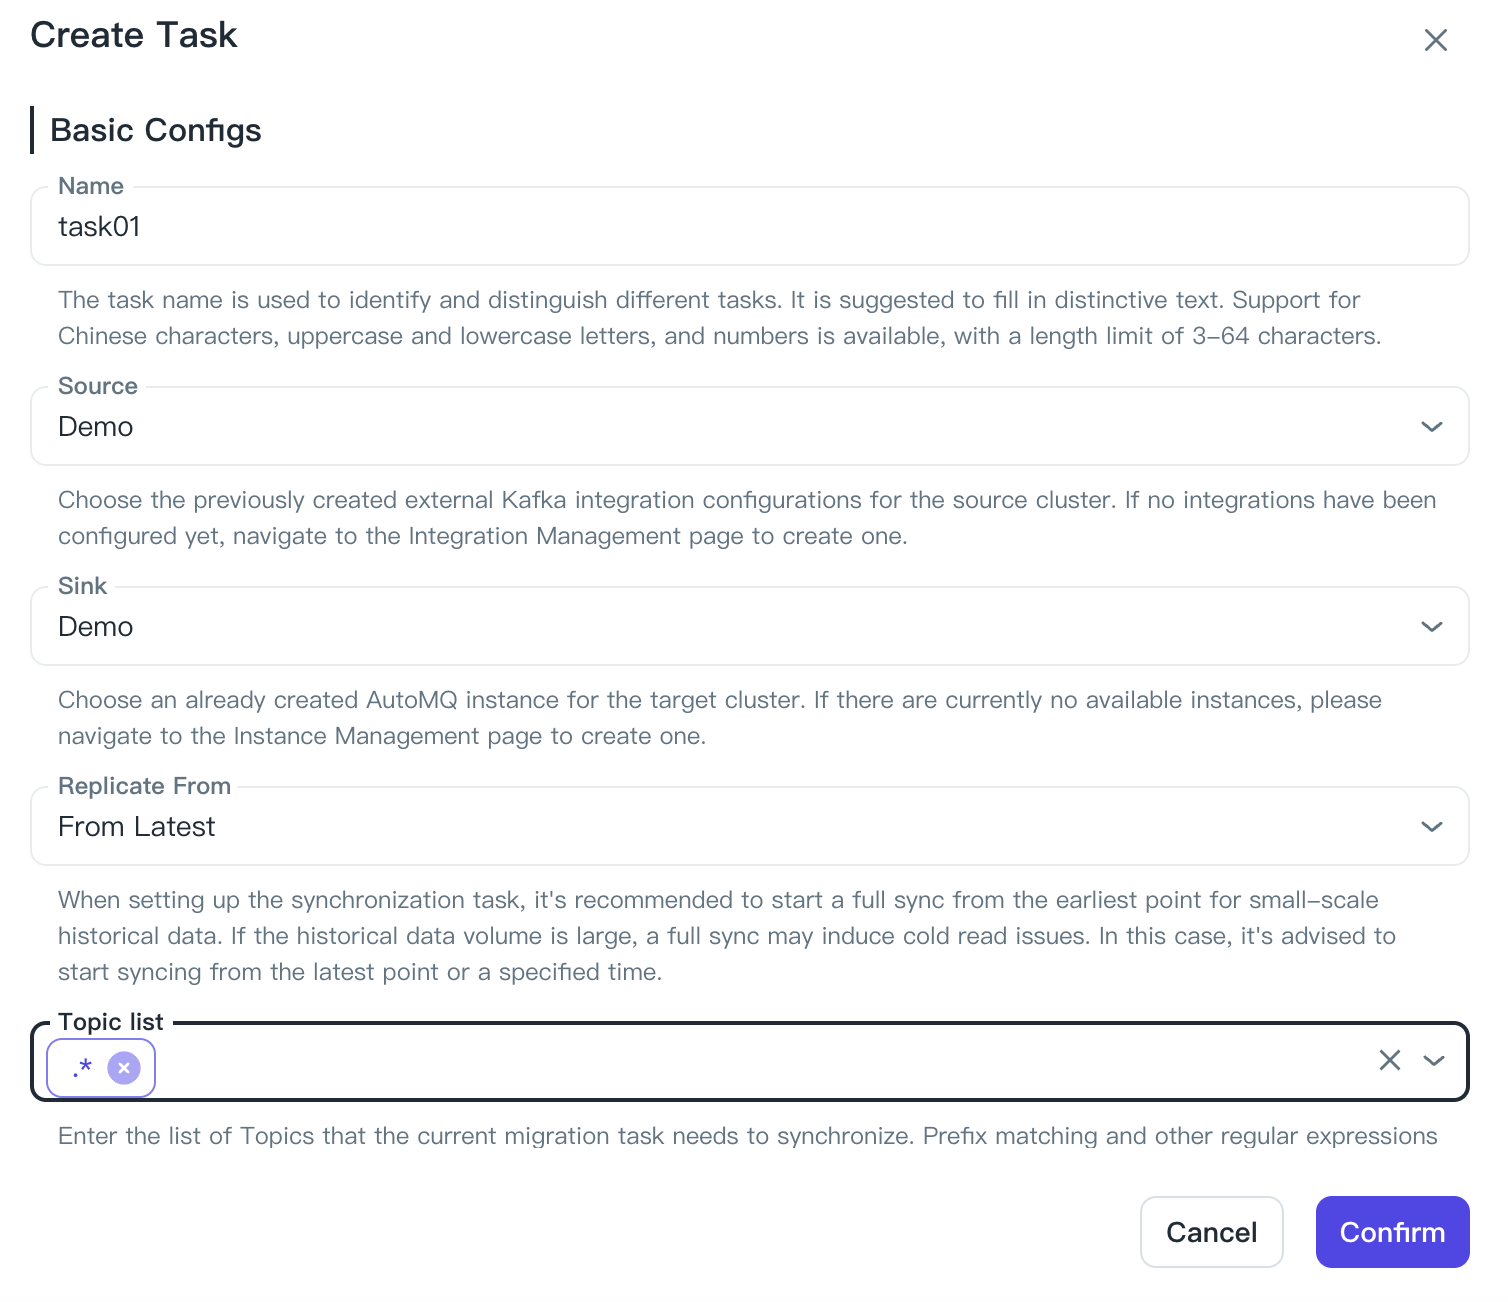
| Task Name | Used to represent a group of reassignment tasks, generally recommended to be a short, easily recognizable phrase. |
| Source Cluster | Specify the source cluster to be reassigned, selecting the Apache Kafka integration created in the previous step. |
| Target Cluster | Specify the target cluster for the reassignment, selecting the AutoMQ instance already created. |
| Starting Sync Position | Specify the starting position for message synchronization after the reassignment task starts. The following options are supported:
In production environments, if the volume of historical data is large, be mindful of the cold read pressure caused by reading historical messages when choosing to synchronize from the earliest position. If the timing of the reassignment is not critical, it is advisable to start syncing from the latest position until the data in both clusters is nearly consistent. |
| List of Topics to be Synced | Set the list of Topics covered by the reassignment task. This list supports wildcard input, allowing multiple Topics to be configured at once. AutoMQ's reassignment tool supports the automatic synchronization of dynamic Topic updates. Once a sync task is created, whether a new Topic is added or the number of partitions in an existing Topic is changed, as long as it meets the current list criteria, it will automatically be synchronized to the target cluster. |
In addition to basic configurations, AutoMQ reassignment tasks also offer the following optional settings to customize functional behaviors:
| Parameter Name | Parameter Description |
|---|---|
| Synchronize Consumer Progress | It is recommended to enable this option. Once enabled, the reassignment task will map the consumption progress of the ConsumerGroup from the source cluster to the target cluster, ensuring that consumers can continue from the previous progress after the switch, thus avoiding extensive reprocessing. |
Step 2: Monitor Synchronization Progress, and Wait Until It Is Nearly Complete
After creating the reassignment task, you can visit the task management page and details page to observe the synchronization progress, waiting for the data synchronization task to run.
- View the task list to understand the general information on the current synchronization tasks.
AutoMQ reassignment tool provides an overview of information on the task list page:
Synchronization delay: Synchronization delay refers to the time it takes for messages in the reassigned Topic from production in the source cluster to completion of synchronization. In a reassignment task involving multiple Topics, the maximum delay among all Topics is taken.
Synchronization backlog: Synchronization backlog refers to the number of messages that have been produced in the reassigned Topic but have not yet been synchronized. In a reassignment task involving multiple Topics, the total backlog for all Topics is considered.
View task details to understand the configuration details, operational status, and worker information of the reassignment task. During the execution of the synchronization task, users can temporarily pause or resume the task as needed, and the reassignment can continue from where it left off.
Wait until the synchronization is nearly complete. Refer to the description of the reassignment plan, and regularly observe the synchronization delay and synchronization backlog metrics. It is advisable to prepare for the next step of application switchover when the synchronization delay is less than 1 minute.
Step 3: Shut Down the Source Cluster Consumers.
After completing Step 2, start the reassignment of consumer applications. It is recommended to stop the source cluster consumers before switching to the target cluster.
Once the source cluster's consumption is halted, the consumption checkpoint of the source it will no longer update, allowing for synchronization with the target cluster.
After synchronization is complete, switch the consumers to the target cluster to prevent duplicate consumption across the source and target clusters.
Step 4: Switch Consumers to the Target Cluster.
After completing Step 3, modify the consumer configuration's access point, replacing it with the access point provided by the AutoMQ instance, and restart the application.
Step 5: Stop the Source Cluster Producers.
For each Topic, ensure that all consumers for the current Topic have been switched following Steps 3 and 4 before stopping the source cluster producers.
Halting the producer is crucial to prevent message disorder, as it avoids simultaneous message writes from both the producer and MirrorMaker2 to the target cluster.
Step 6: Switch the Producer to the Target Cluster
Monitor and wait for the Topic synchronization to complete. After completing Step 5, proceed to the task details page -> status details page to monitor the specified Topic's synchronization delay and backlog. Both should reduce to zero to ensure complete data synchronization of that Topic.
Modify the producer configuration endpoint. Replace it with the endpoint provided by the AutoMQ instance, and restart the application. At this point, new messages will be sent to the AutoMQ target instance.
After switching the producer, continuous monitoring of the Topic's upstream and downstream applications is necessary to confirm if they meet the expected outcomes.
Step 7: Repeat Steps 3 to Step 6 Until the Reassignment Is Complete and Remove the Reassignment Task
Repeatedly check if all Topic reassignments are complete. Steps 3 to 6 should be conducted based on the granularity of the Topics and associated producer and consumer applications. Hence, keep checking until all Topics in the current reassignment task are fully reassigned.
Remove the reassignment task. Once all Topics are reassigned, confirm and delete the task. AutoMQ will then clean up the underlying hardware resources and configuration information.
Once a reassignment task is deleted, it cannot be recovered, and creating a new reassignment task with the same Topic will be treated as a completely new task and will not continue the previous reassignment state. Therefore, before deleting the task, ensure that the current reassignment task has successfully completed its work.
Rollback Process
During each stage of the reassignment process, if unexpected anomalies occur and the cause cannot be quickly identified, users can follow the steps below to attempt a rollback and monitor the impacts of the rollback.
| Reassignment Stage | Rollback Plan | Impact of Rollback |
|---|---|---|
| Step 1, Create Task |
| This stage has no impact on the application as the application has not been switched yet |
| Step 2, Monitor Synchronization Progress |
| This stage has no impact on the application as the application has not been switched yet |
| Step 3, Consumption by the Source Cluster has been Stopped |
| Data is unaffected, only causing temporary consumption pause and delay |
| Step 4, Consumers have been Switched to the Target Cluster |
| Rolling back to the source cluster will lead to repeated consumption of data during the switch period |
| Step 5, the producer of the source cluster has been stopped. |
| Rolling back to the source cluster will lead to re-consuming the data during the switch period. |
| Step 6, the producer has been switched to the target cluster. |
| During Step 6, messages produced to the target cluster cannot be synchronously reversed back to the source cluster; application-level handling is required. |
| Step 7, the reassignment task has been deleted. |
| Not applicable. |
Related References
For more details on the reassignment tools and strategies offered by AutoMQ Cloud, please see the following material: