Manage Environment Ops Authing
During the usage of the AutoMQ Cloud BYOC product, the BYOC environment will generate system logs, metrics, and other data at the underlying level. AutoMQ service providers require users to provide the necessary operational authorization to conduct system stability monitoring and fault self-healing operations.
In this article, references to AutoMQ product service providers, AutoMQ service providers, or AutoMQ specifically refer to AutoMQ HK Limited.
Authorization Principle
The operational authorization for AutoMQ includes two scenarios:
Scenario 1: System monitoring and alerts, requiring read permissions. During the operation of the AutoMQ Cloud BYOC environment, the environment console and AutoMQ data plane cluster generate system logs, inspection logs, and system metrics data. This data is automatically uploaded to the operational Bucket specified when the user created the environment. The AutoMQ service provider needs the user's cloud account authorization to read this operational Bucket so that the AutoMQ operations platform can monitor the stability of the user's cluster and enable fault self-healing.
Scenario 2: Subscription license dynamic updates and new version push, requiring write permissions. When the subscription license of the AutoMQ BYOC environment triggers renewal, scaling, or new version release, the control components within the environment need to be aware of the new subscription information and the metadata of the new version. At this time, the AutoMQ service provider writes new information into the operational Bucket, and the environment console dynamically loads it.
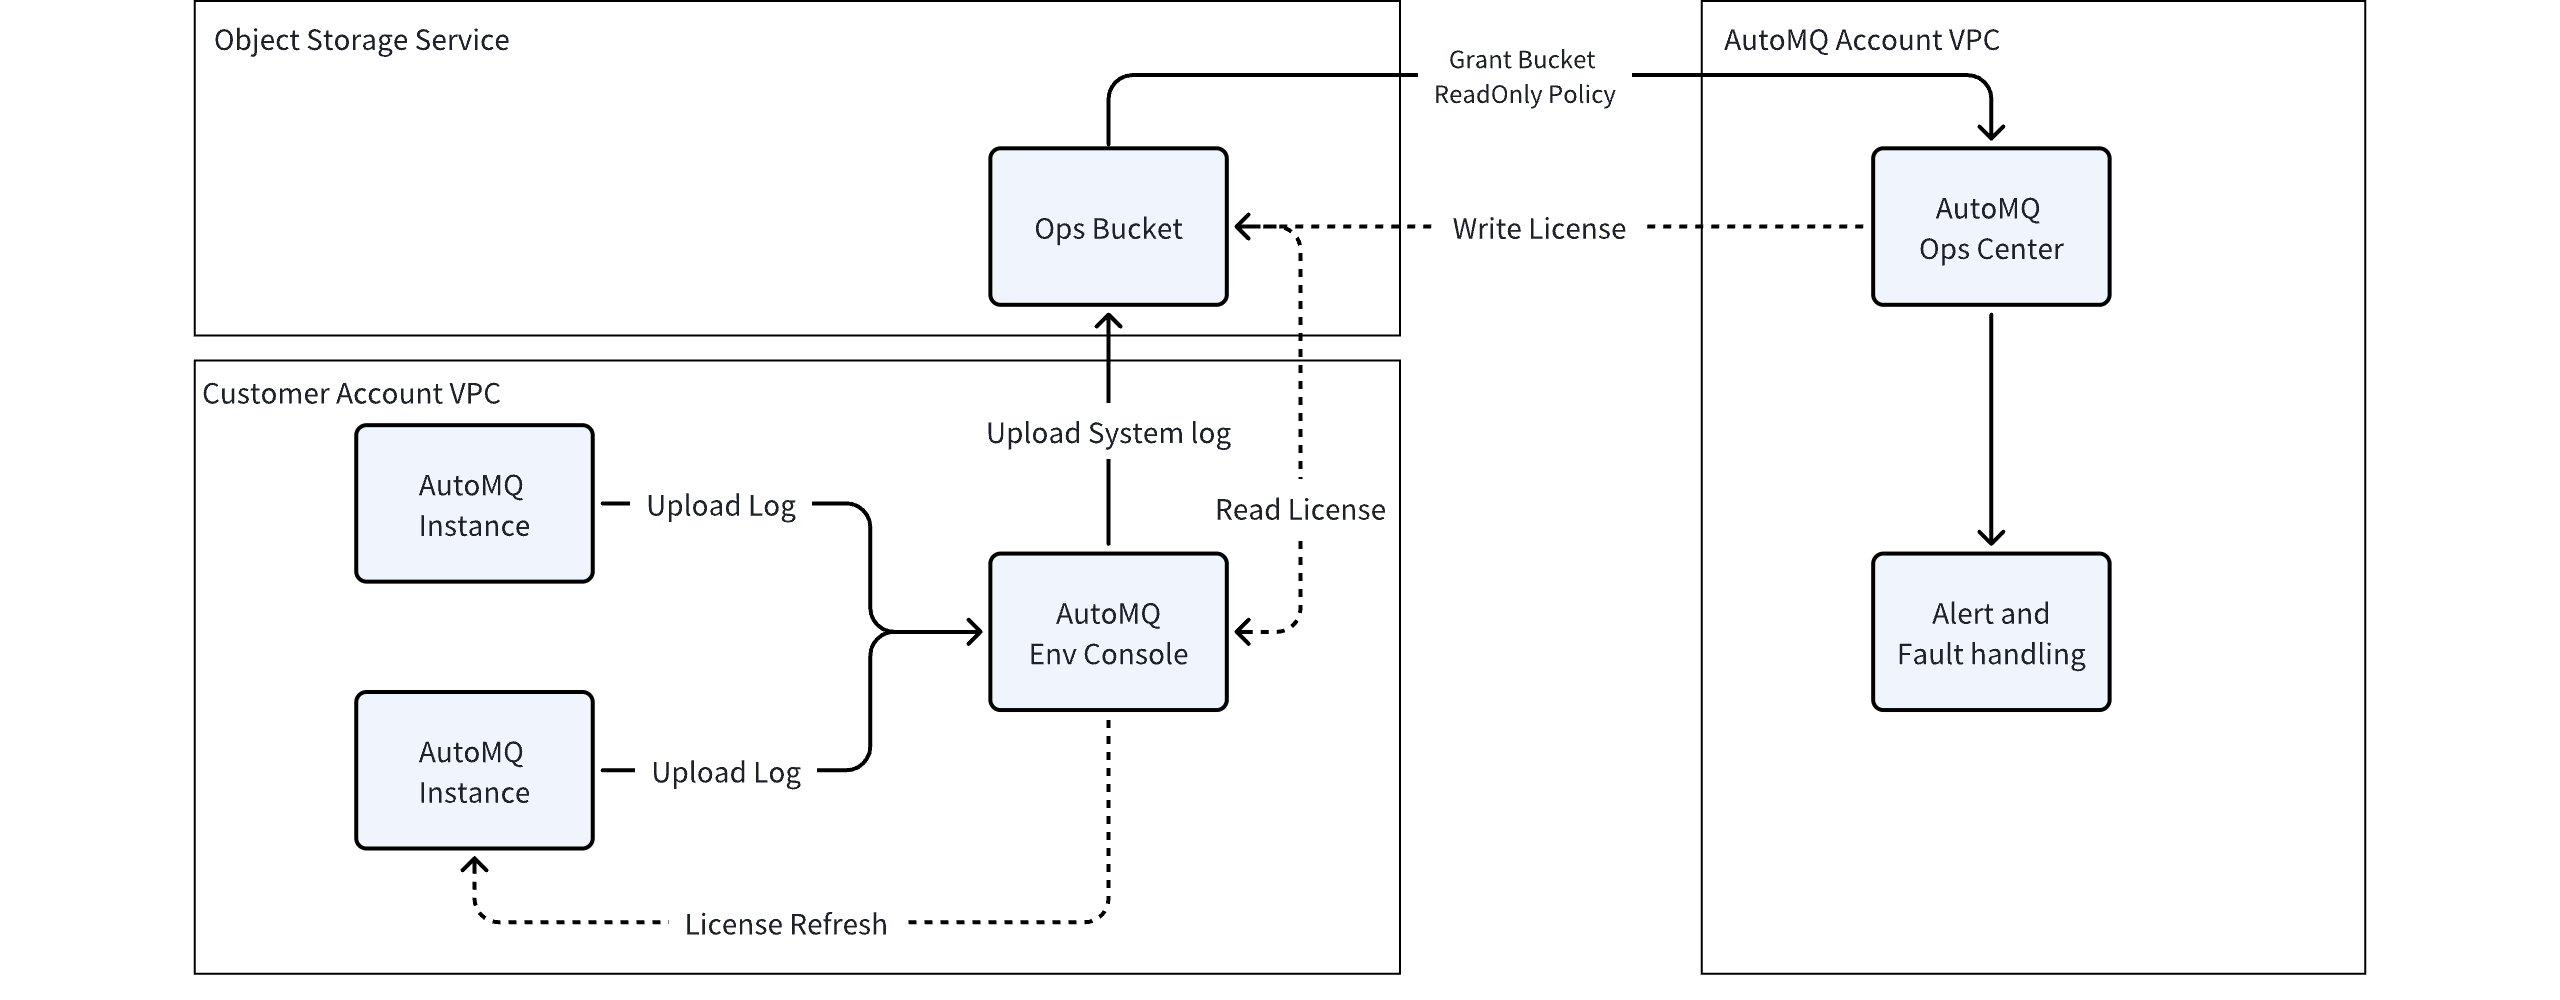
The authorization operation is completed through the Bucket authorization policy provided by cloud providers' object storage, i.e., the user, as the owner of the Bucket, grants the AutoMQ service provider's cloud account permission to read the specified operational Bucket.
The detailed read permissions to be granted are as follows:
| Cloud Provider | AutoMQ Service Provider Cloud Account ID | List of Granted Permissions |
|---|---|---|
| Alibaba Cloud | 1431115939942888 |
|
| AWS | 381492316447 |
|
| Huawei Cloud | 2ef0b956b1524da8a0cdd6e11c65625f/* |
|
Maintenance Authorization Declaration:
The operational Bucket must be isolated from the data Bucket and other Buckets used by applications. The operational Bucket only stores system logs and metrics data, excluding user business messages and other data, ensuring no data security risks.
Authorized Operations
Alibaba Cloud Environment Authorization
Alibaba Cloud OSS provides a web interface and simplified authorization templates, eliminating the need for users to write authorization policies themselves.
Console Operation Steps
Log in to the cloud account that owns the maintenance Bucket, or use a sub-account with authorized operational capabilities, and navigate to the OSS Console:
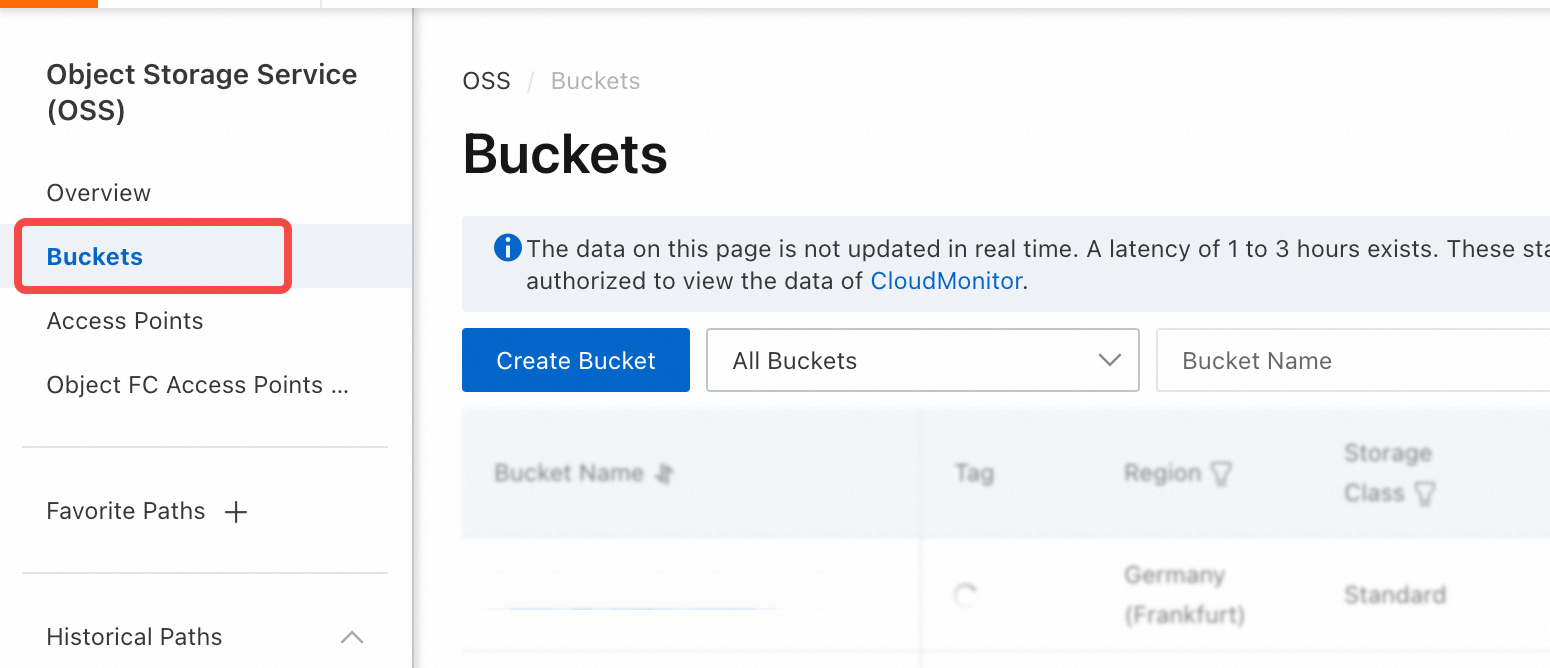
- Go to the Bucket list page and find the target Bucket. Users access the OSS Console, click on Bucket List in the left navigation bar to enter the list page. Search for the maintenance Bucket configured for the current environment and click on details.
- Go to the permissions control menu and find the Bucket authorization policy. Click on the Bucket authorization policy to open the new authorization form.
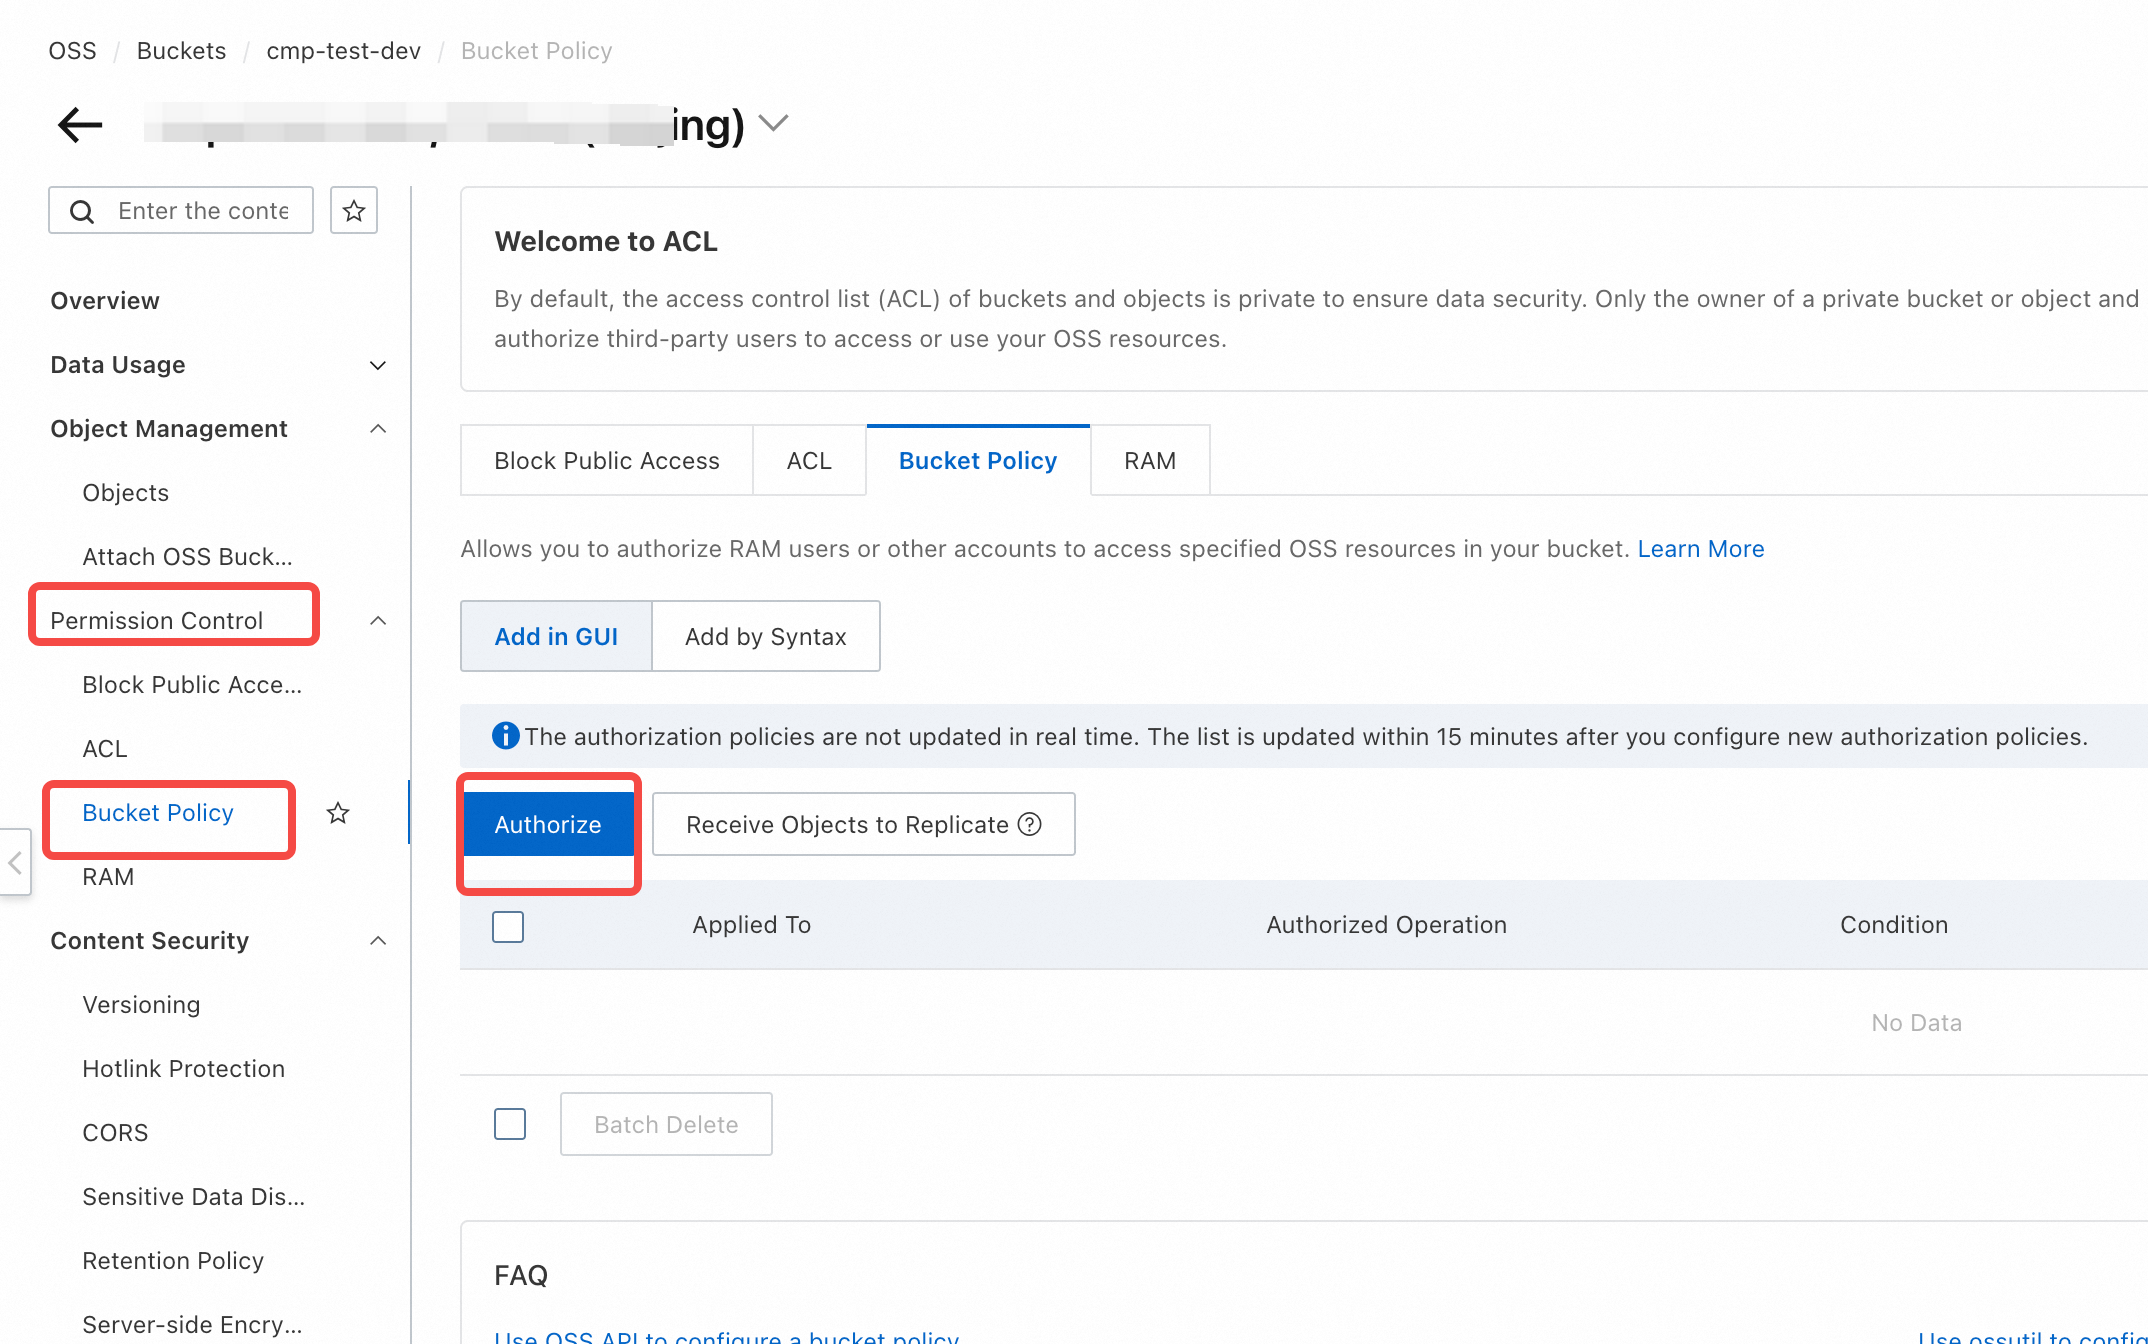
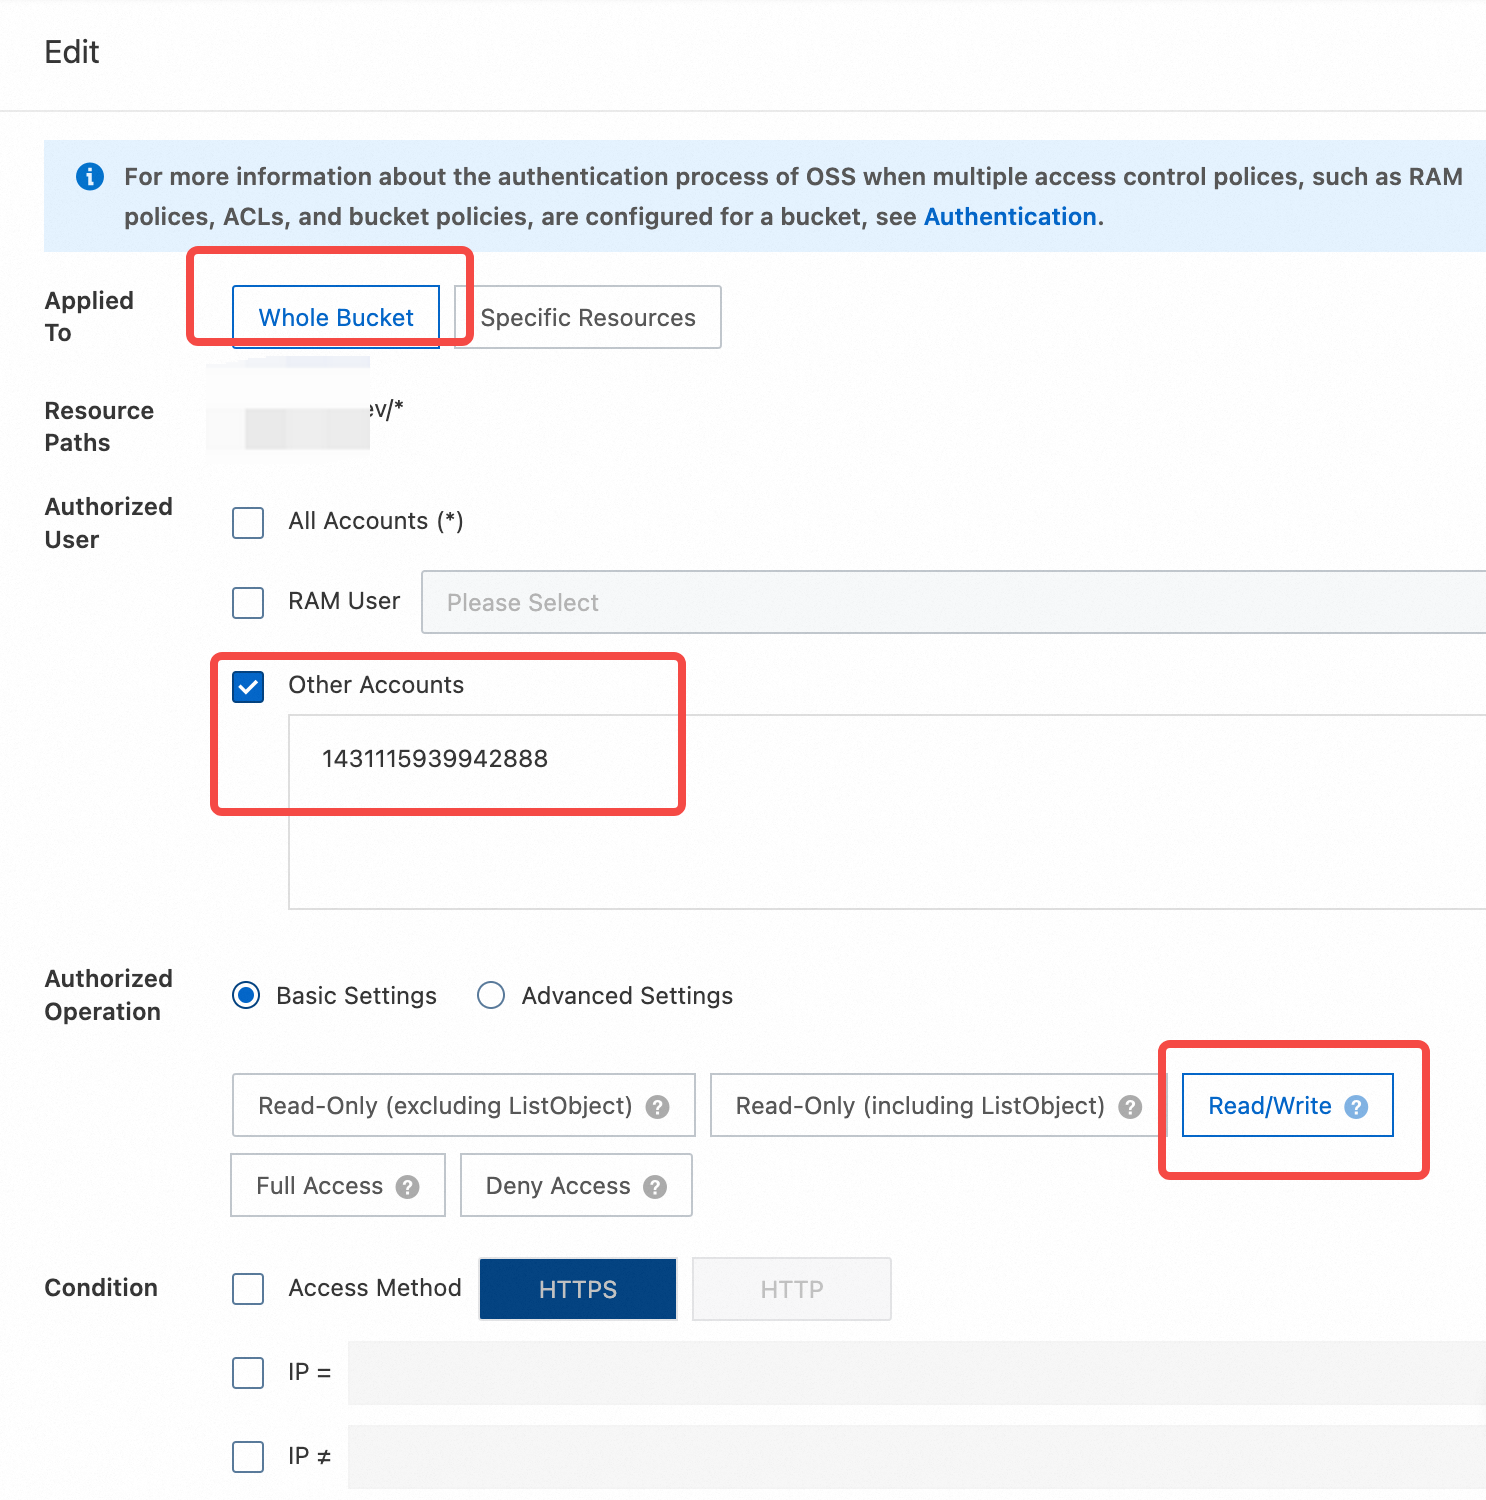
Fill in the authorization information and create the Bucket authorization policy. Refer to the following instructions to fill in the corresponding authorization information, click confirm to complete the creation of the authorization policy.
Authorized Resource: Select the entire Bucket.
Resource Path: Check if it is the current maintenance Bucket.
Authorized User: Select another account and fill in the AutoMQ service provider cloud account ID above.
Authorization operation: Select simple settings and choose read/write operations.
AWS Environment Authorization
The AWS S3 console provides a Bucket Policy authorization feature. Refer to the document below for operation steps.
Console Operation Steps
Log in to the cloud account that owns the operations Bucket, or a sub-account with authorization capabilities. Navigate to the S3 Console:
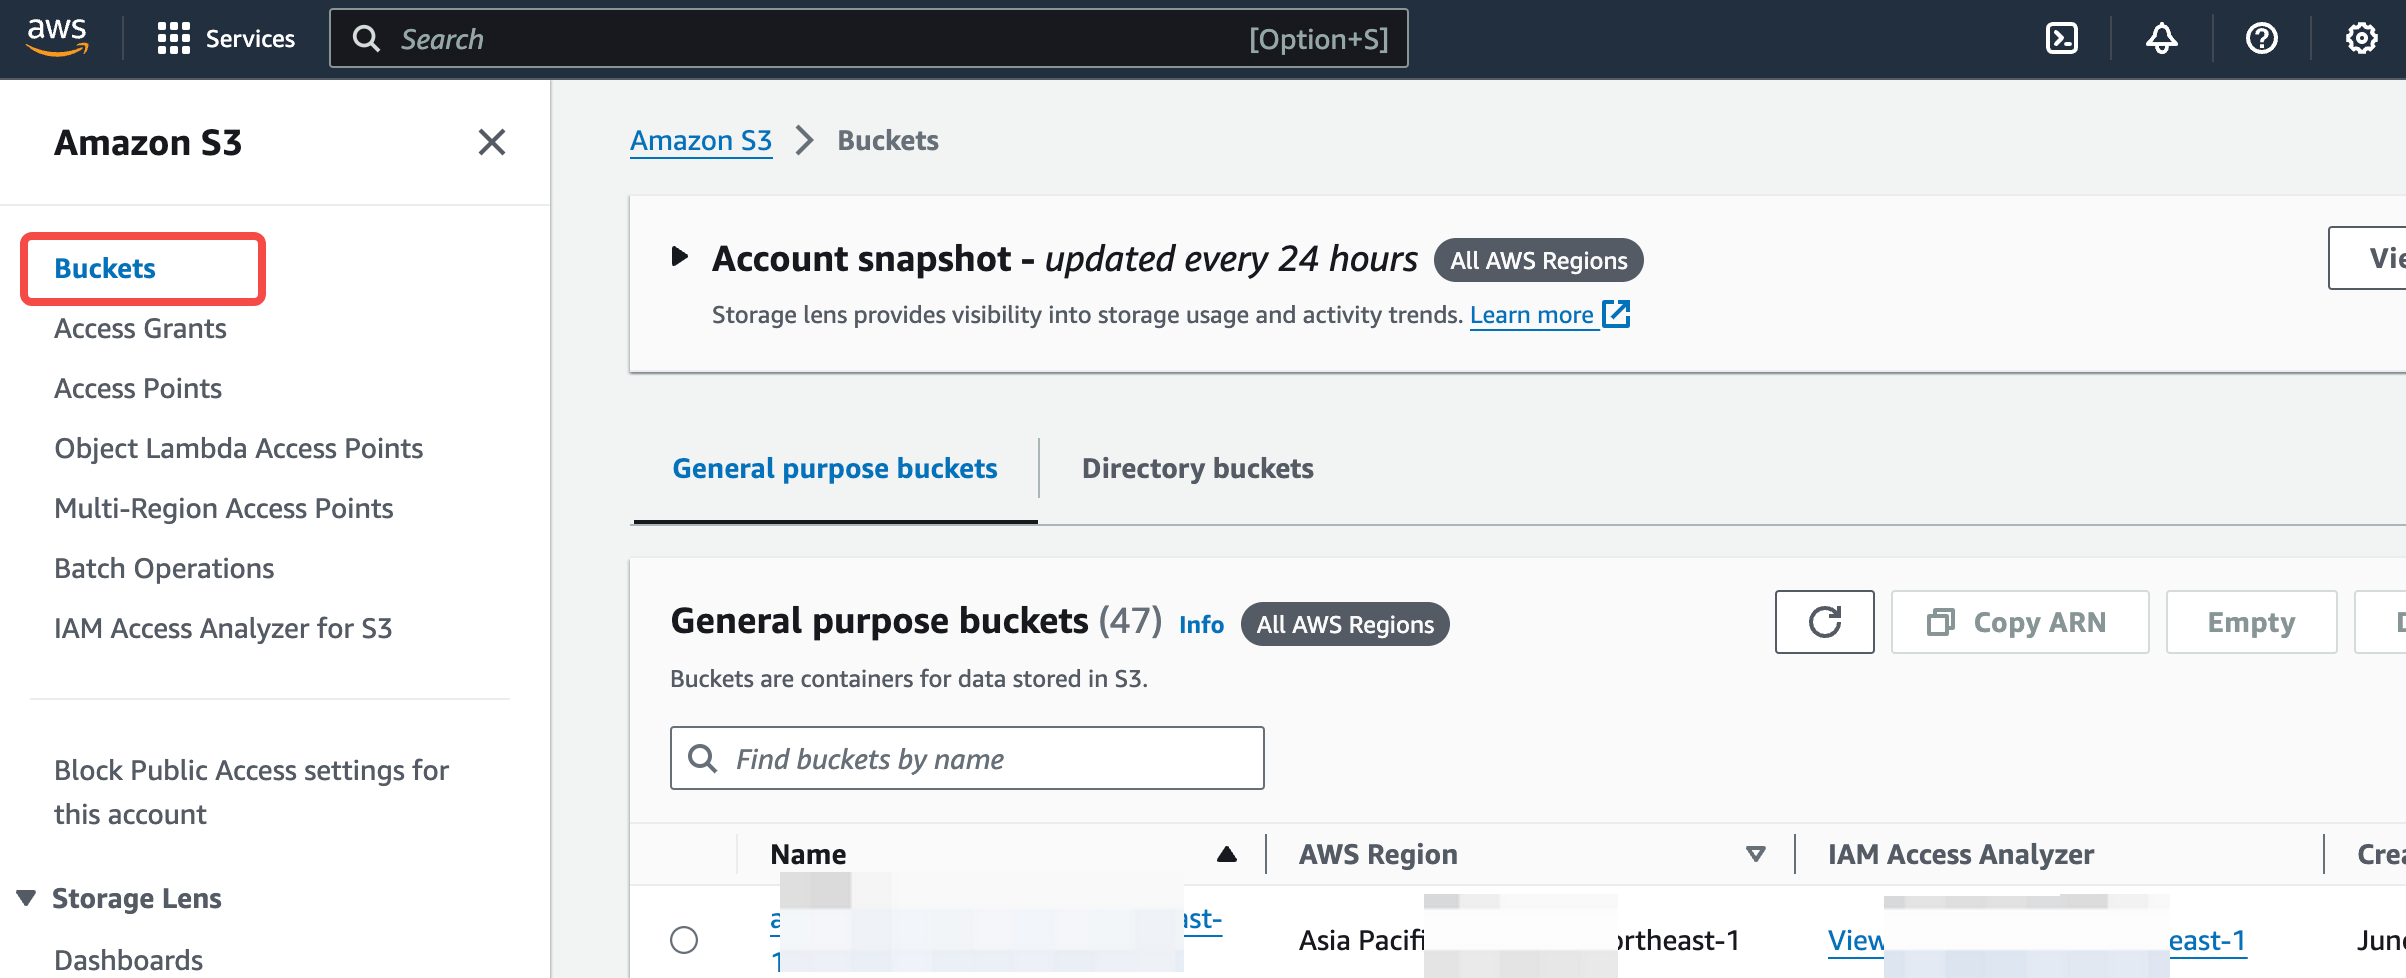
- Go to the Bucket list page and find the target Bucket. Access the S3 console, click on the left navigation bar Bucket List, and enter the list page. Search and find the operations Bucket configured for the current environment and click on the details.
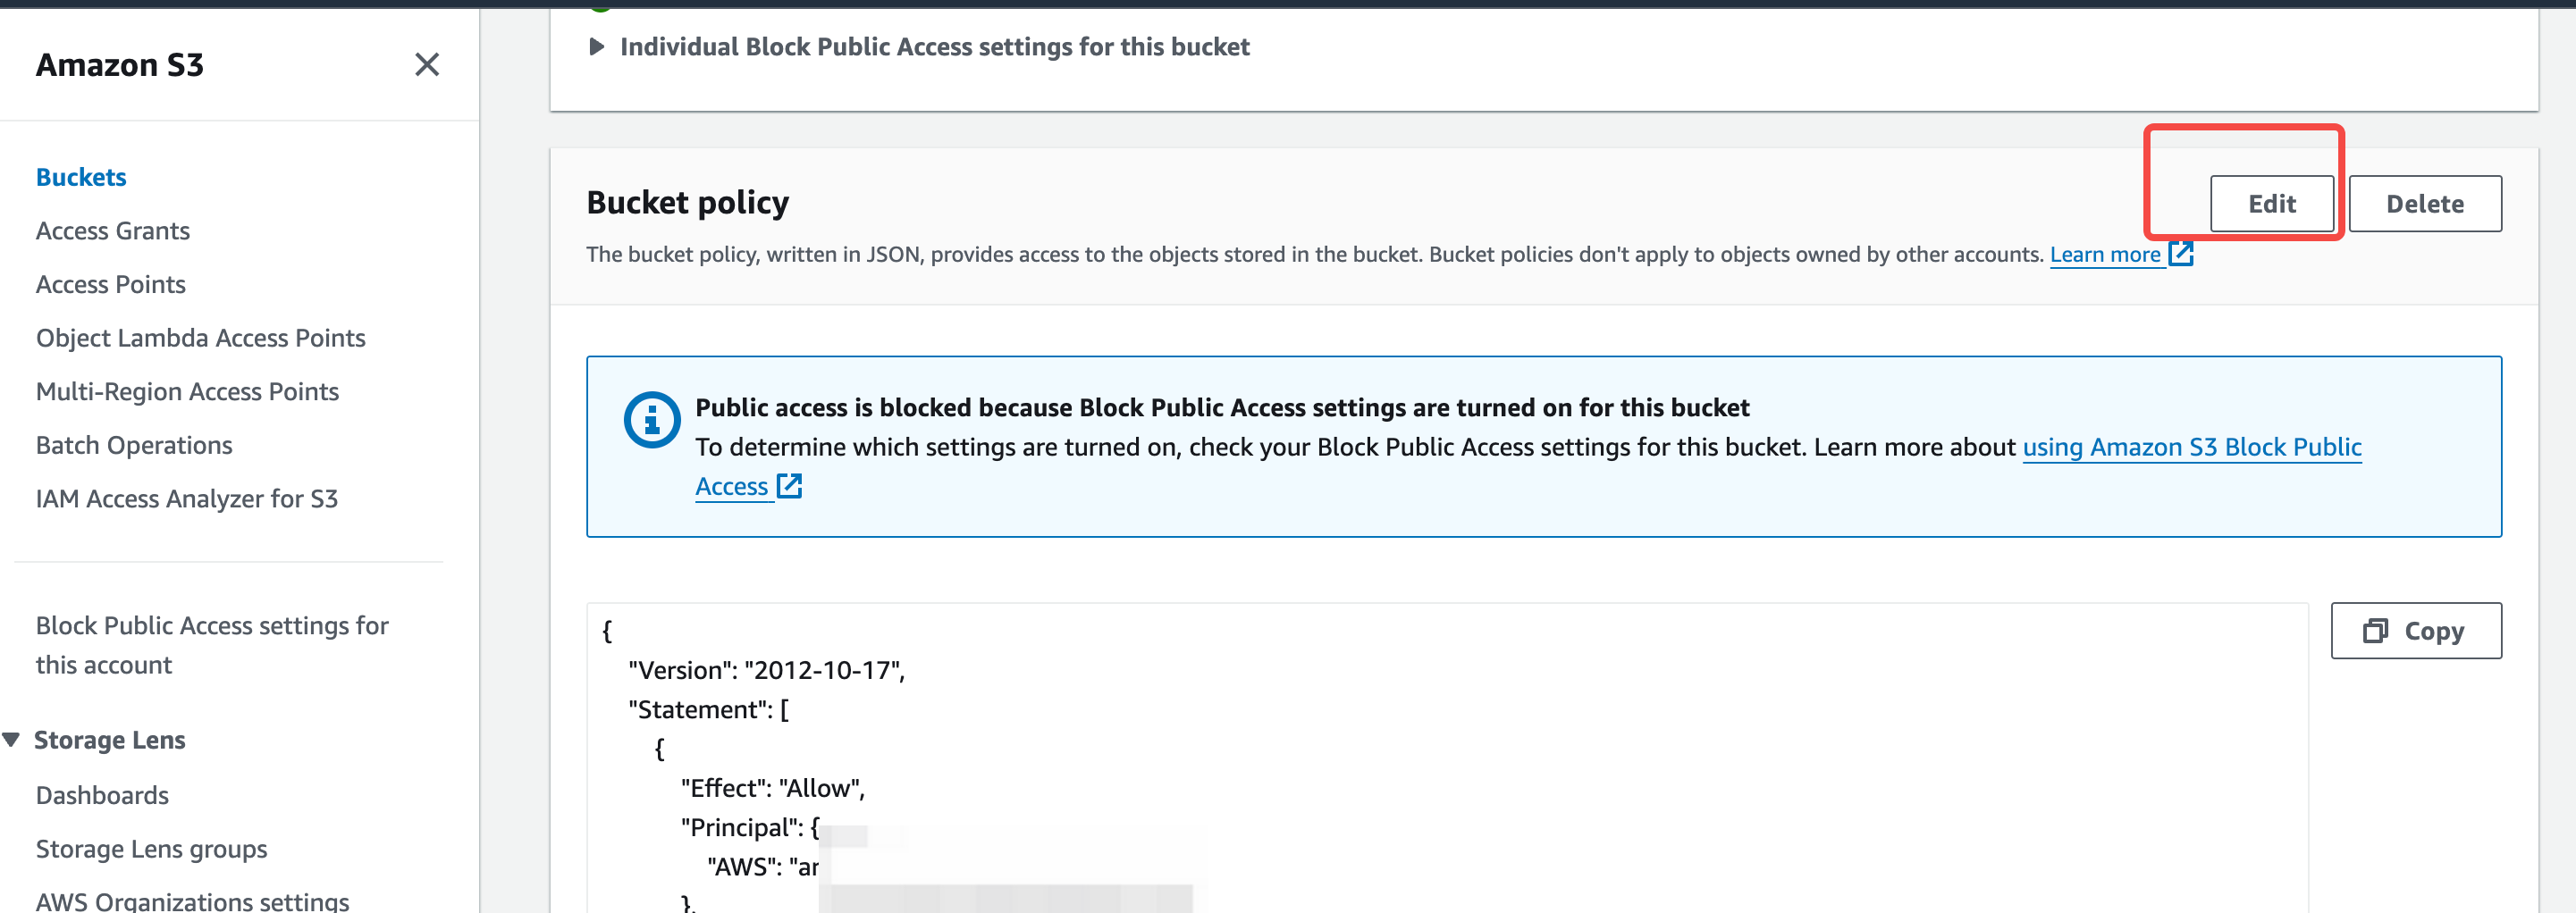
- Go to the Permissions menu and find Bucket Policy. Click Edit to open the authorization form.
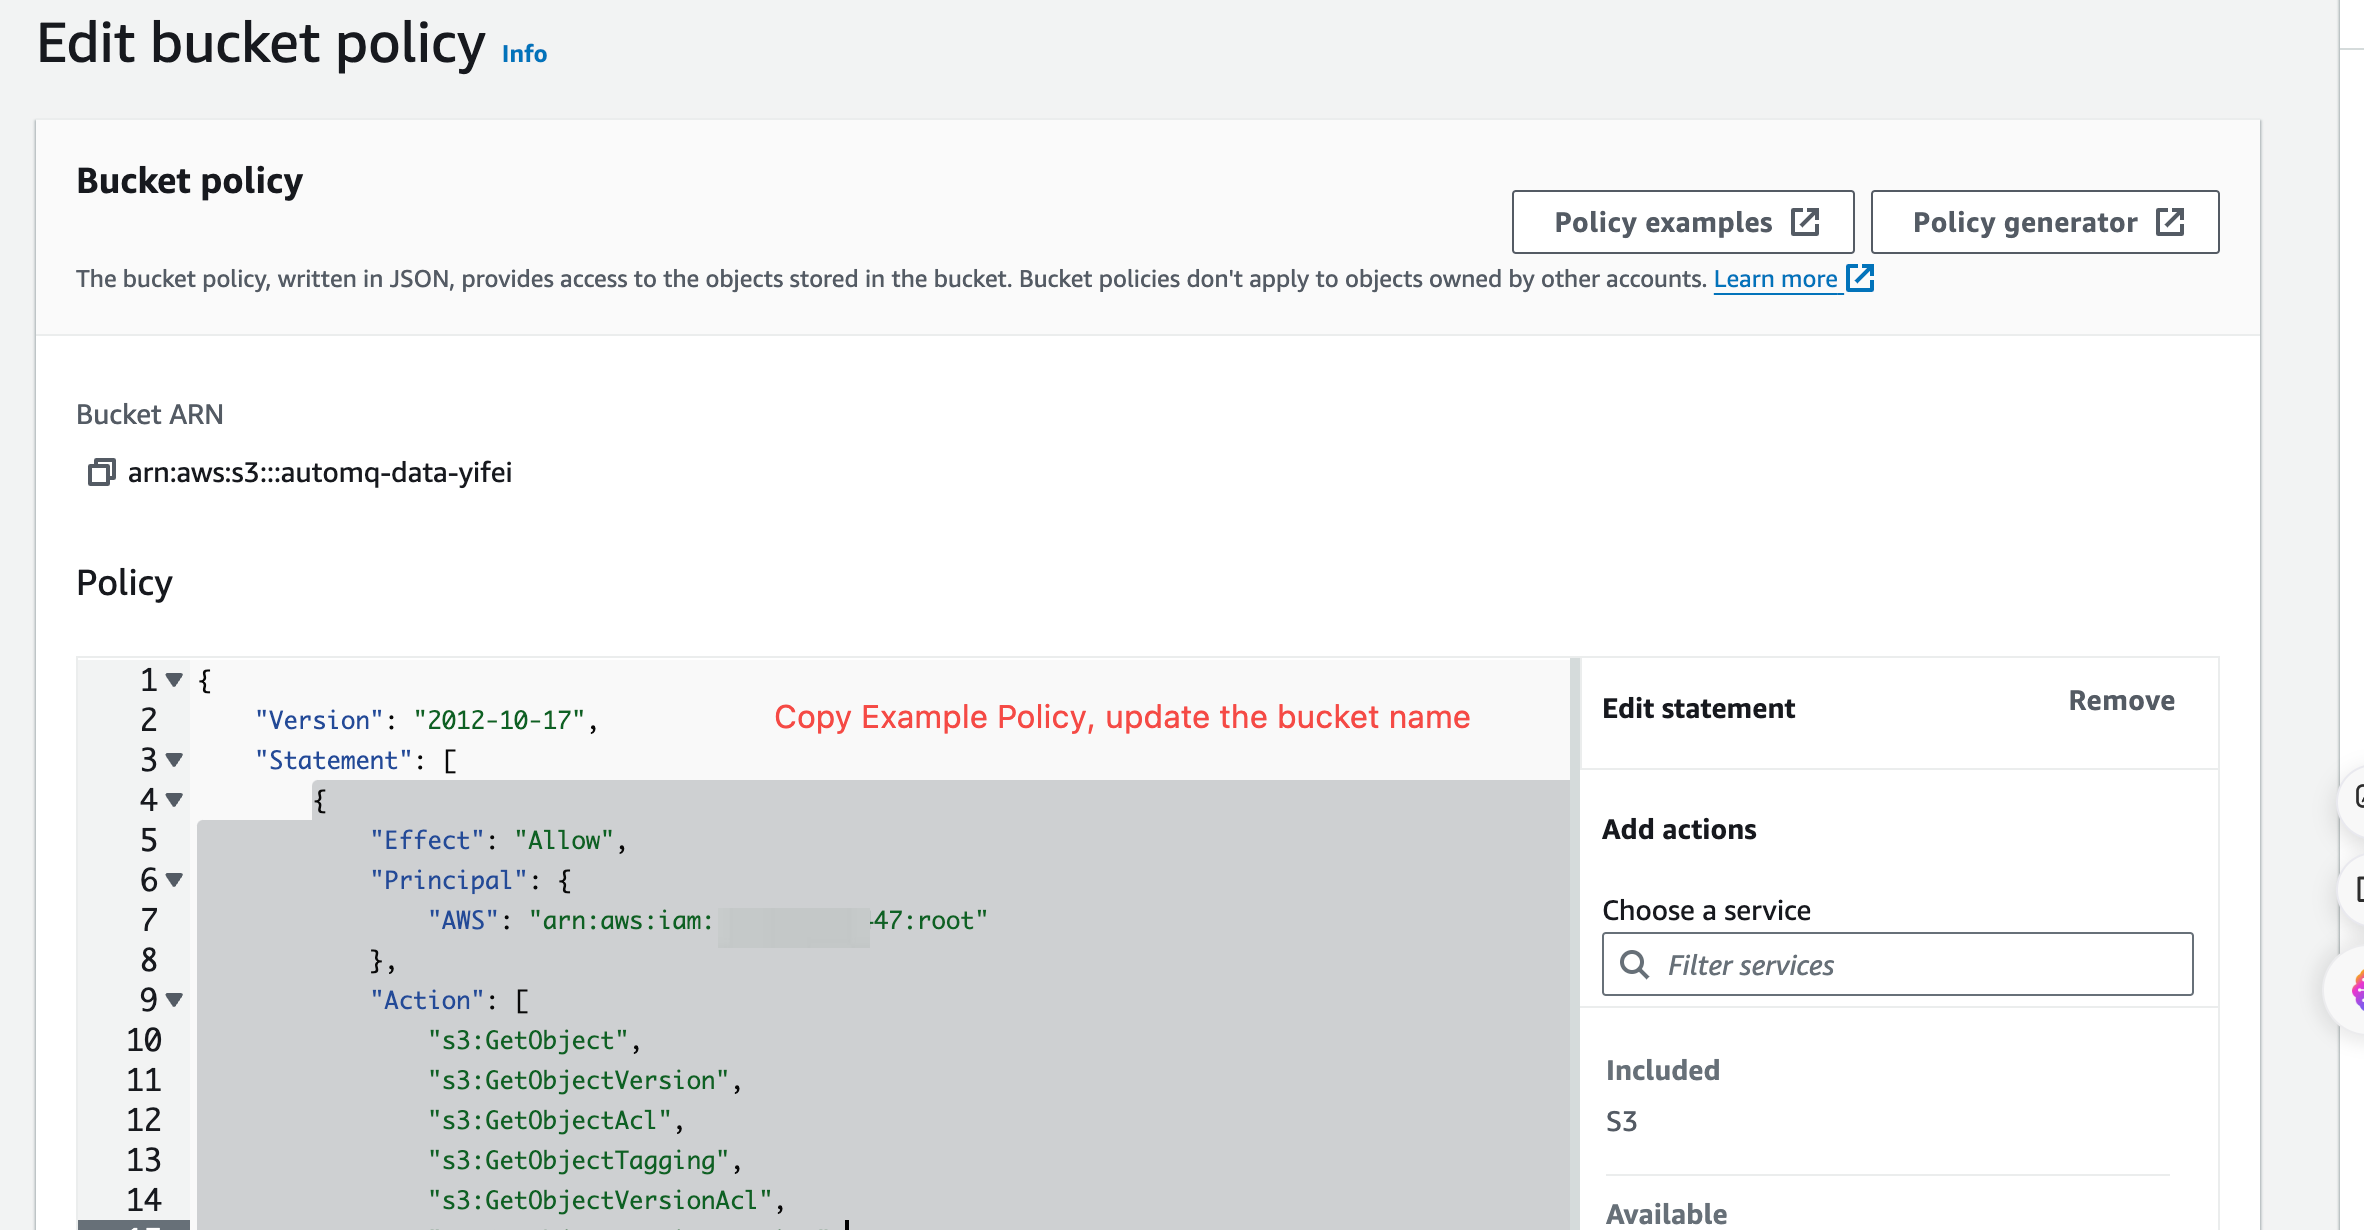
Fill in the authorization information and create the Bucket authorization policy. Refer to the following instructions to fill in the corresponding authorization information, click confirm to complete the creation of the authorization policy.
Granting Resources: Select the specified Ops Bucket.
Granting User: Enter the AutoMQ service provider's cloud account ID mentioned above.
Granting Actions: Refer to the policy below.
{
        "Version": "2012-10-17",
        "Statement": [
                {
                        "Effect": "Allow",
                        "Principal": {
                                "AWS": "arn:aws:iam::381492316447:root"
                        },
                        "Action": [
                                "s3:GetObject",
                                "s3:GetObjectVersion",
                                "s3:GetObjectAcl",
                                "s3:GetObjectTagging",
                                "s3:GetObjectVersionAcl",
                                "s3:GetObjectVersionTagging",
                                "s3:ListBucket",
                                "s3:ListBucketVersions",
                                "s3:ListBucketMultipartUploads",
                                "s3:PutObject"
                        ],
                        "Resource": [
                                "arn:aws:s3:::{Ops Bucket Name}",
                                "arn:aws:s3:::{Ops Bucket Name}/*"
                        ]
                }
        ]
}
Huawei Cloud Environment Authorization
Huawei Cloud OBS provides a web interface and simplified authorization templates, eliminating the need for users to write authorization policies manually.
Console Operation Steps
Log in to the cloud account owning the operations bucket, or a sub-account with authorization capabilities, and navigate to the OBS Console:
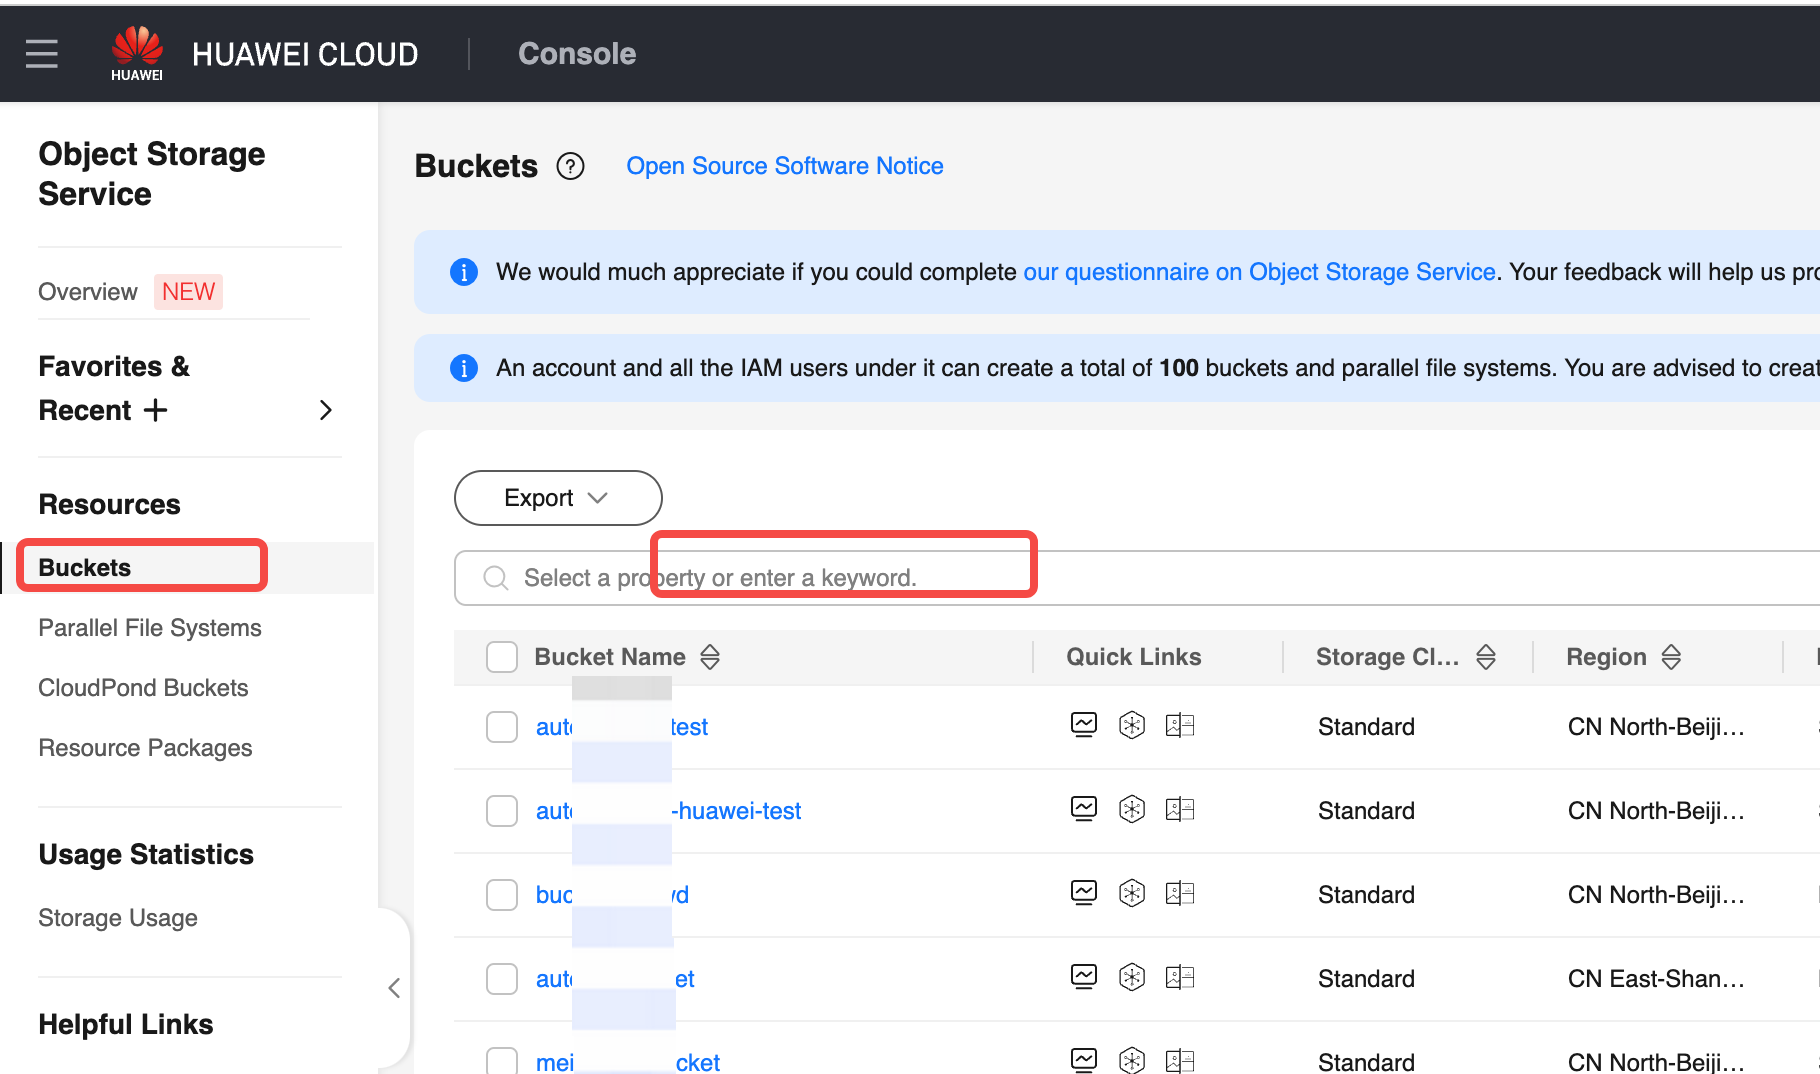
- Go to the Bucket List page and find the target bucket. Users access the OBS console, click the Bucket List on the left navigation bar to enter the list page. Search for the operations bucket configured for the current environment, and click details.
- Go to the Bucket Policy menu. Click the bucket policy access, and open the new authorization form.
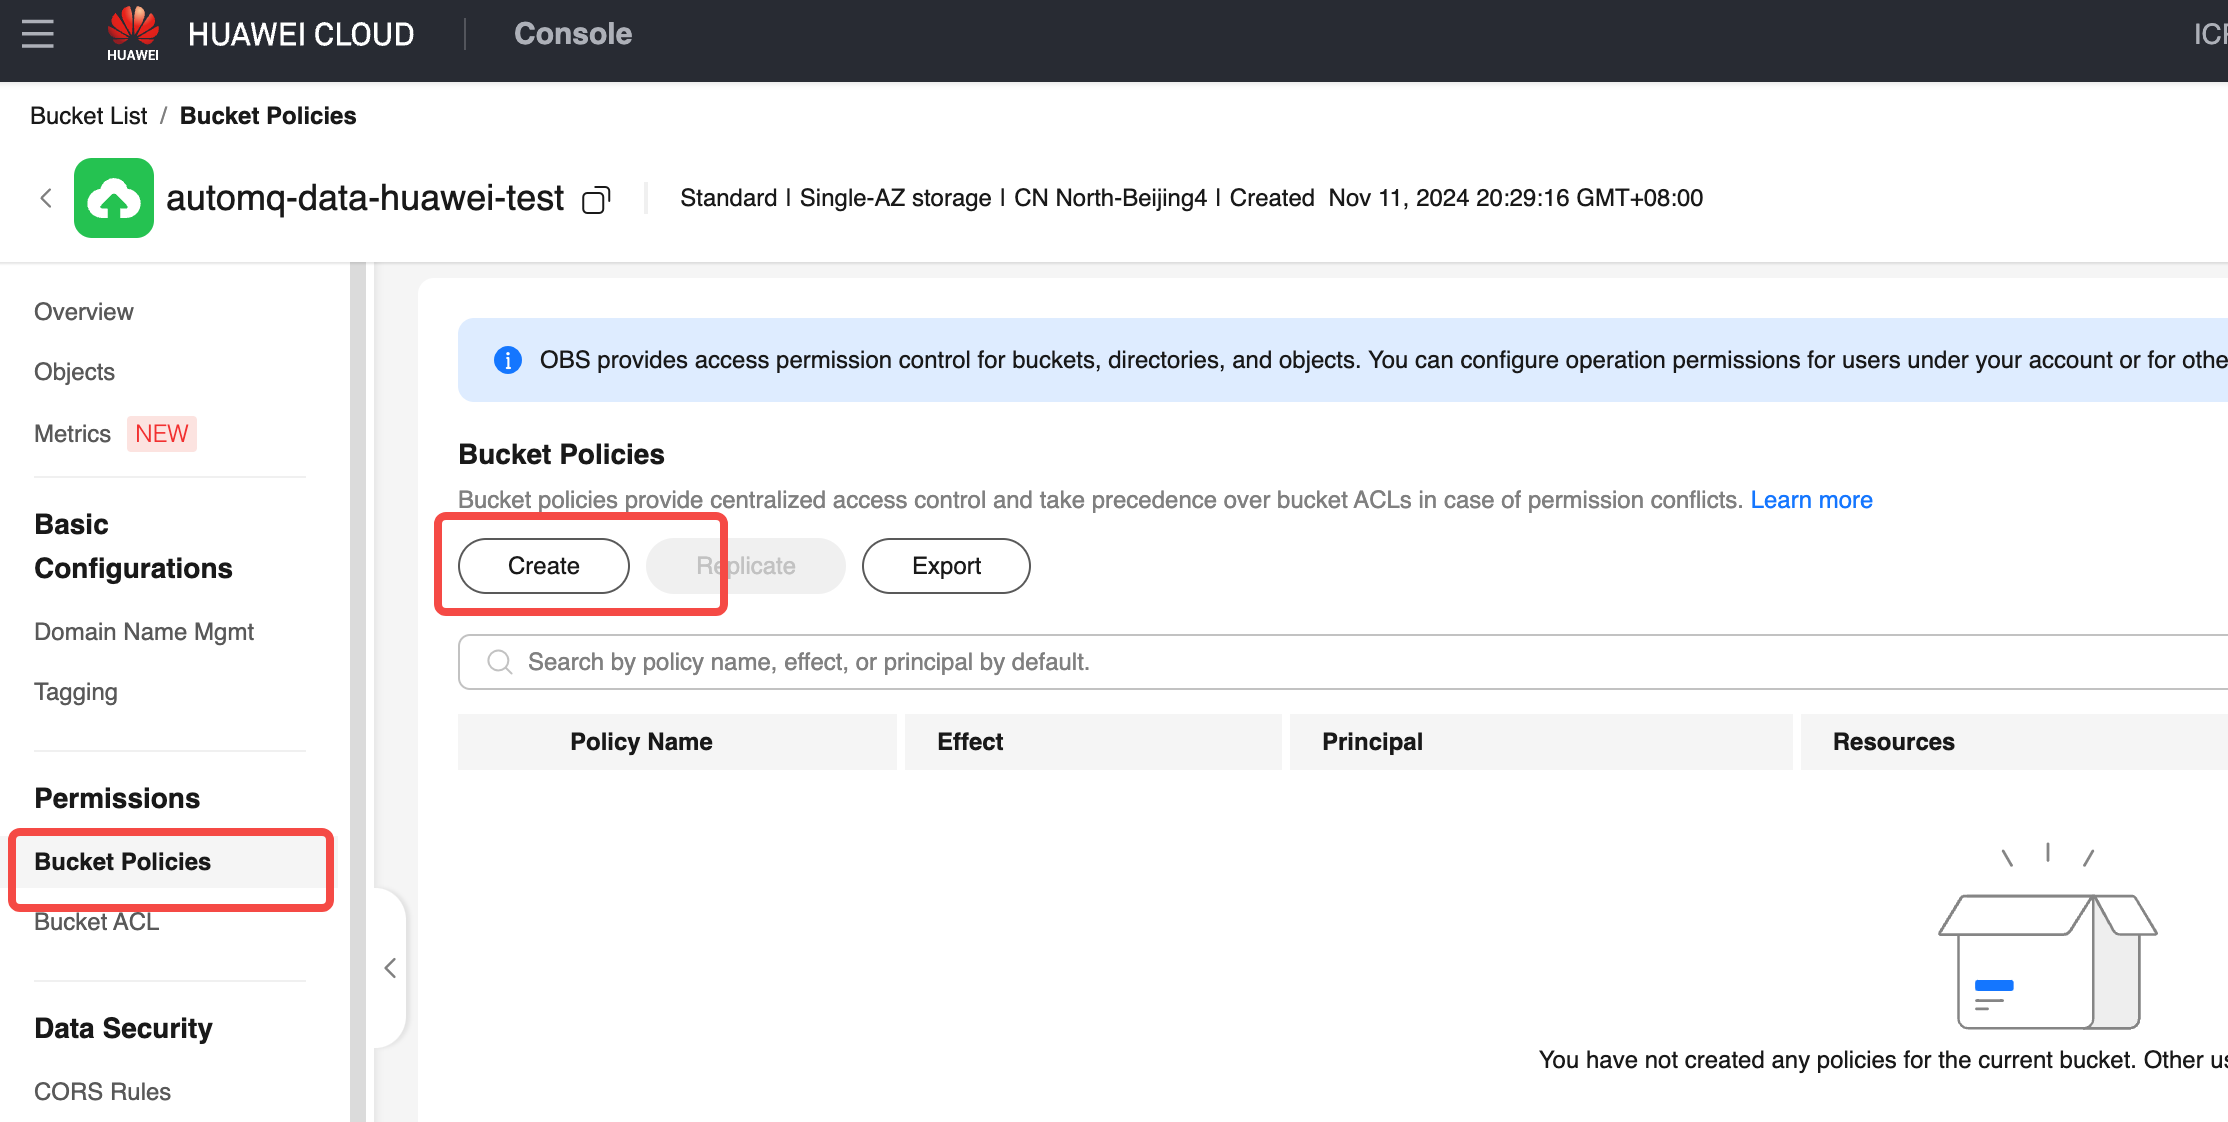
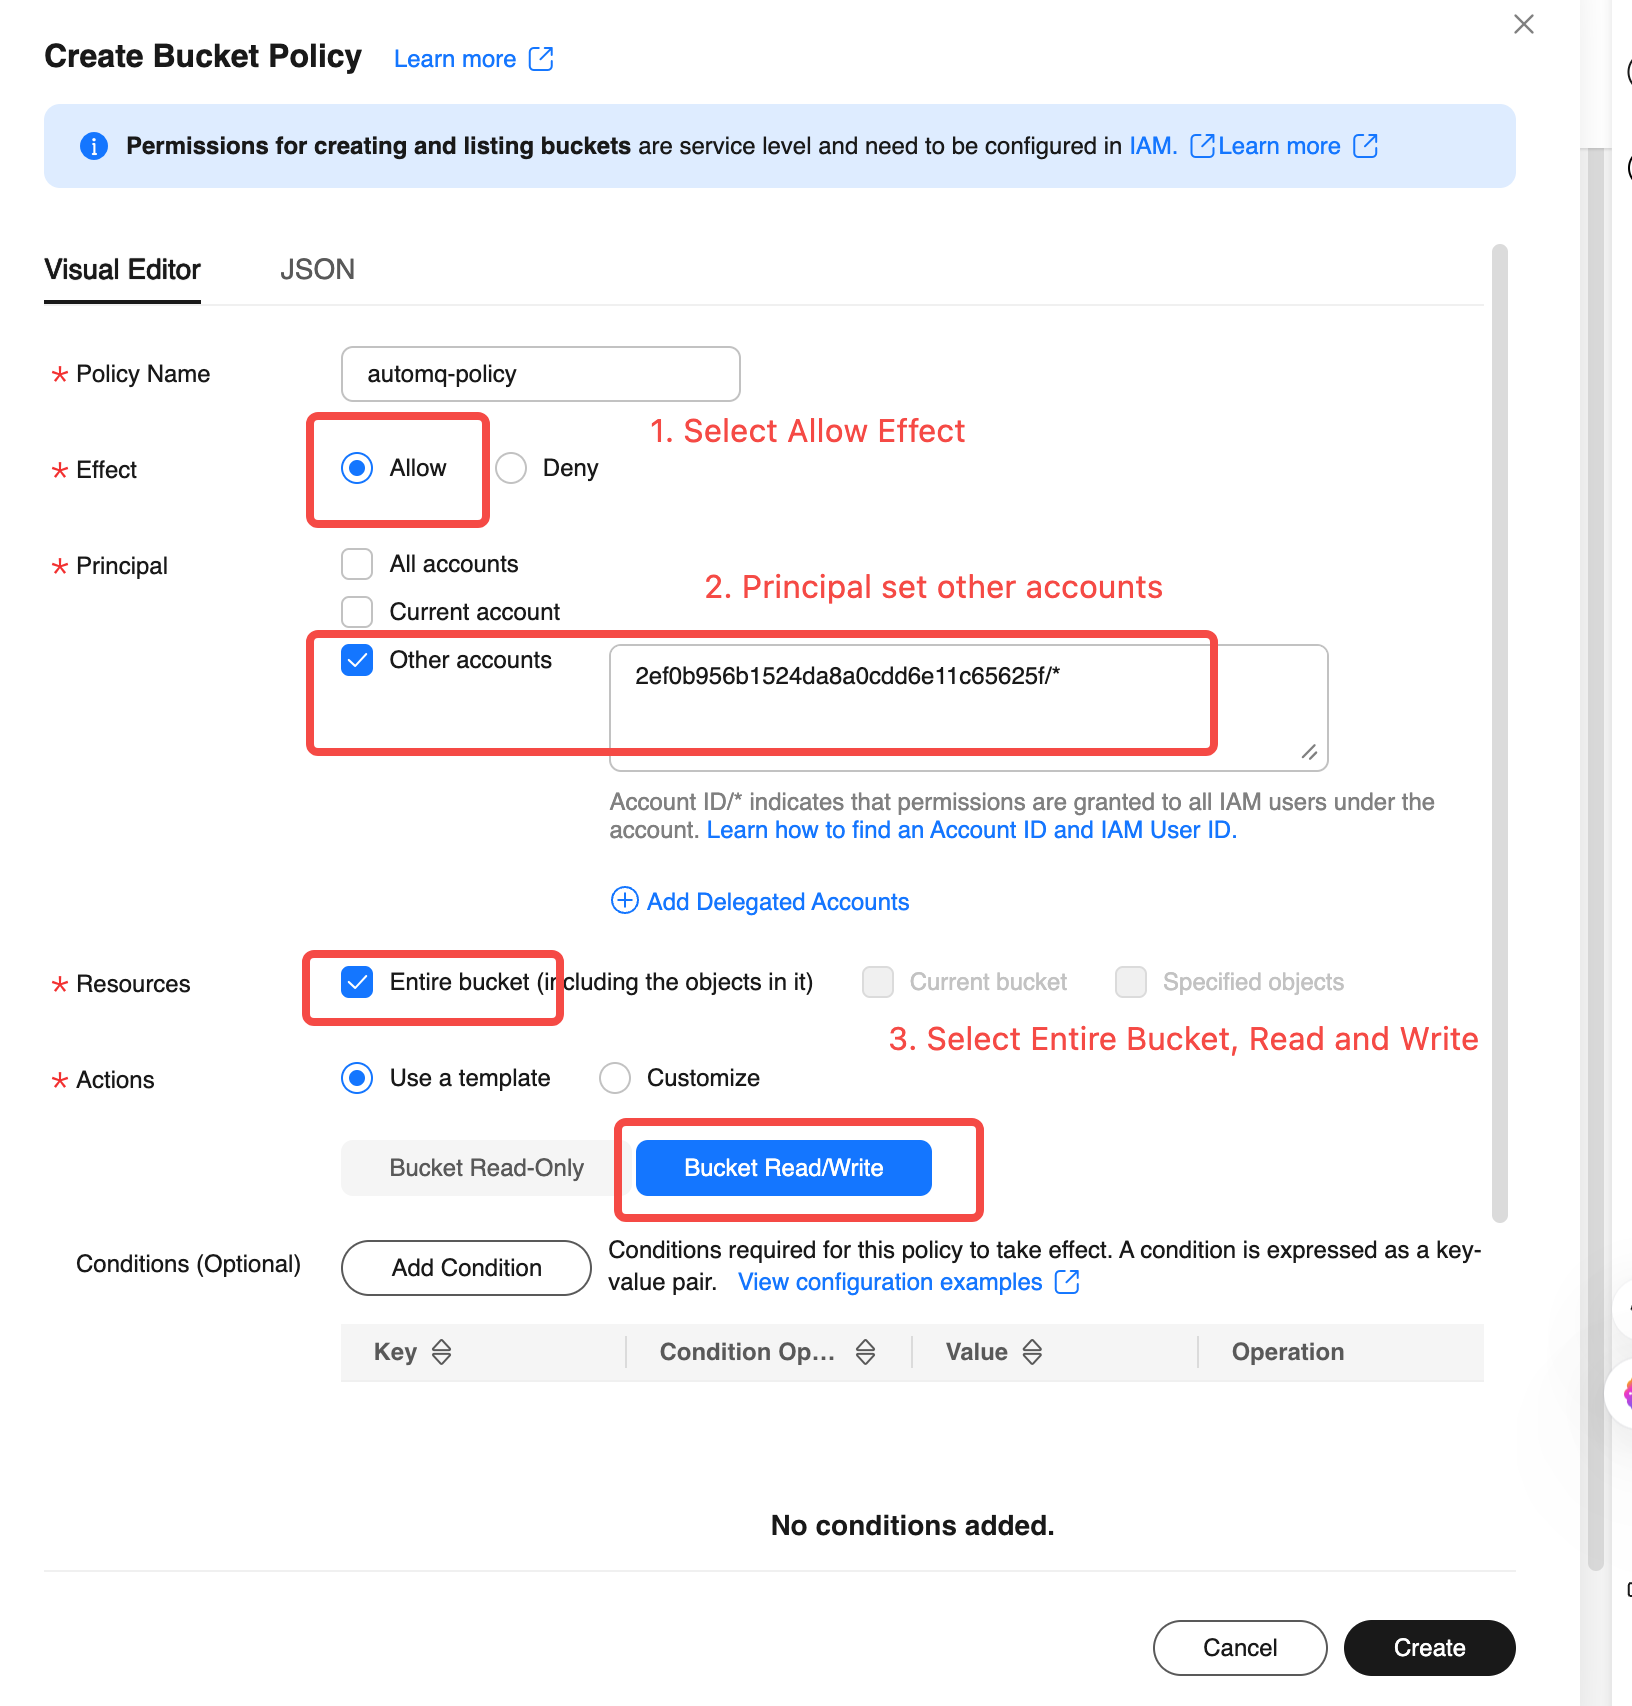
Fill in authorization information and create a bucket policy. Refer to the following instructions to fill in the appropriate authorization information, click confirm, and complete the creation of the authorization policy.
Authorized Resource: Select the entire Bucket.
Authorized User: Select another account and fill in the AutoMQ service provider cloud account ID above.
Grant operation: Select template settings, choose read/write operations.
