This article introduces the basic concepts of instances, related constraints, and operations such as instance creation, viewing, modification, and deletion.
Instance
Basic Concepts
An instance is the top-level operational resource of the AutoMQ product. A Kafka instance corresponds to an independent Apache Kafka cluster.
Lifecycle
The complete lifecycle of an instance from creation to release is illustrated in the figure below:

-
Creating: The initial creation of an instance is an asynchronous process. When the creation operation is completed, the backend will asynchronously deploy the instance. During this process, users cannot make any changes until the creation is completed.
-
Running: The current instance is in a valid running state and can provide normal messaging functions and API services.
-
Modifying: The current instance is undergoing operational changes, version upgrades, etc. Since this execution process is asynchronous, it requires waiting until completion. During this period, any changes to the instance’s operations are prohibited.
-
Service Exception: The current instance is unable to provide normal services due to exceptions in creation, operational changes, or underlying infrastructure.
-
Deleting: The current instance is being manually deleted and released. Instances undergoing deletion will no longer accept services. Resources and data will be cleaned up asynchronously in the background.
-
Deleted: The current instance has been manually deleted and released. Once released, the instance cannot be recovered.
Create Instance
Operation Steps
-
To experience AutoMQ Kafka’s message sending and receiving capabilities, you first need to create a Kafka instance.
-
Log in to the environment console and click on “Instance List” in the left-side navigation bar.
-
On the “Instance List” page, click “Create Instance.” In the pop-up instance creation page, refer to the following information to add configuration.
Parameter
| Value Description
|
|---|
Instance Name
| - Description: The instance name is an alias used to distinguish instances. User-defined input.
- Restrictions: Refer to Restrictions▸.
|
Instance Remarks
| - Description: Instance remarks are custom descriptions used to differentiate the instance’s purpose, typically the business scenario. User-defined input.
- Restrictions: Refer to Restrictions▸.
|
Availability Zone Information (VM Mode)
| - Description: AutoMQ instances currently support single availability zone and three availability zone deployments. Choose the appropriate deployment mode based on your business needs.
- Options:
- Single Availability Zone: All nodes of the Kafka cluster are deployed within the user’s specified availability zone.
- Three Availability Zones: All nodes of the Kafka cluster are evenly distributed across three specified availability zones.
|
Subnet Information (VM Mode)
| - Description: AutoMQ instances currently support setting up only one subnet within each availability zone. If you need multiple availability zones and subnets, please see Obtaining Services▸ .
- Options: The subnet provided by the user should have sufficient available IPs (at least 100 recommended) to prevent the risk of instance failure due to lack of IP addresses in the future.
|
Node Pool (Kubernetes Mode)
| - Description: In Kubernetes mode, you need to select a node pool when creating an instance. The node pool determines the availability zone, subnet, and other location information for instance deployment.
|
Compute Specifications
| - Description: Compute specifications represent the message send/receive throughput capability of the current AutoMQ Kafka instance. Refer to the product billing explanation and evaluate based on the number of AKUs. For details, see Billing Instructions for BYOC▸ .
- Limitations: The upper limit of AKUs for creating an instance is subject to version restrictions. For details, see Restrictions▸ .
|
Storage Specifications
| - Description: AutoMQ Kafka uses object storage as the message storage medium, so there is no need to reserve storage capacity in advance. Usage during operation is based on actual message volume and billed accordingly.
|
Node Type (Advanced Options)
| - Description: AutoMQ in the Alibaba Cloud environment supports users freely selecting between pay-as-you-go or subscription-based ECS types. Users can choose based on their operational habits.
- Options:
- Pay-as-you-go ECS: Default recommendation for creating, scaling, and deleting instances. AutoMQ Environment Console synchronously manages the ECS lifecycle.
- Subscription ECS: Recommended for long-term stable business use with low discounts on subscription-based ECS. After selecting this ECS type for scaling down or deleting instances, users need to manually manage the subscription cancellation and ECS recovery.
When using subscription ECS, AutoMQ will automatically enable instance renewal by default to prevent nodes from being released due to expiration and causing instance unavailability.
When using subscription ECS, scaling down or deleting operations in AutoMQ instances might generate ECS instances pending recovery that users must manually cancel and recover through the cloud provider console to avoid ongoing charges.
|
- After selecting the appropriate parameters, click Confirm to create the instance.
View Instance
Procedure
-
Go to the Instance List page.
-
Locate the instance that needs to be updated in the instance list and click the target instance name.
-
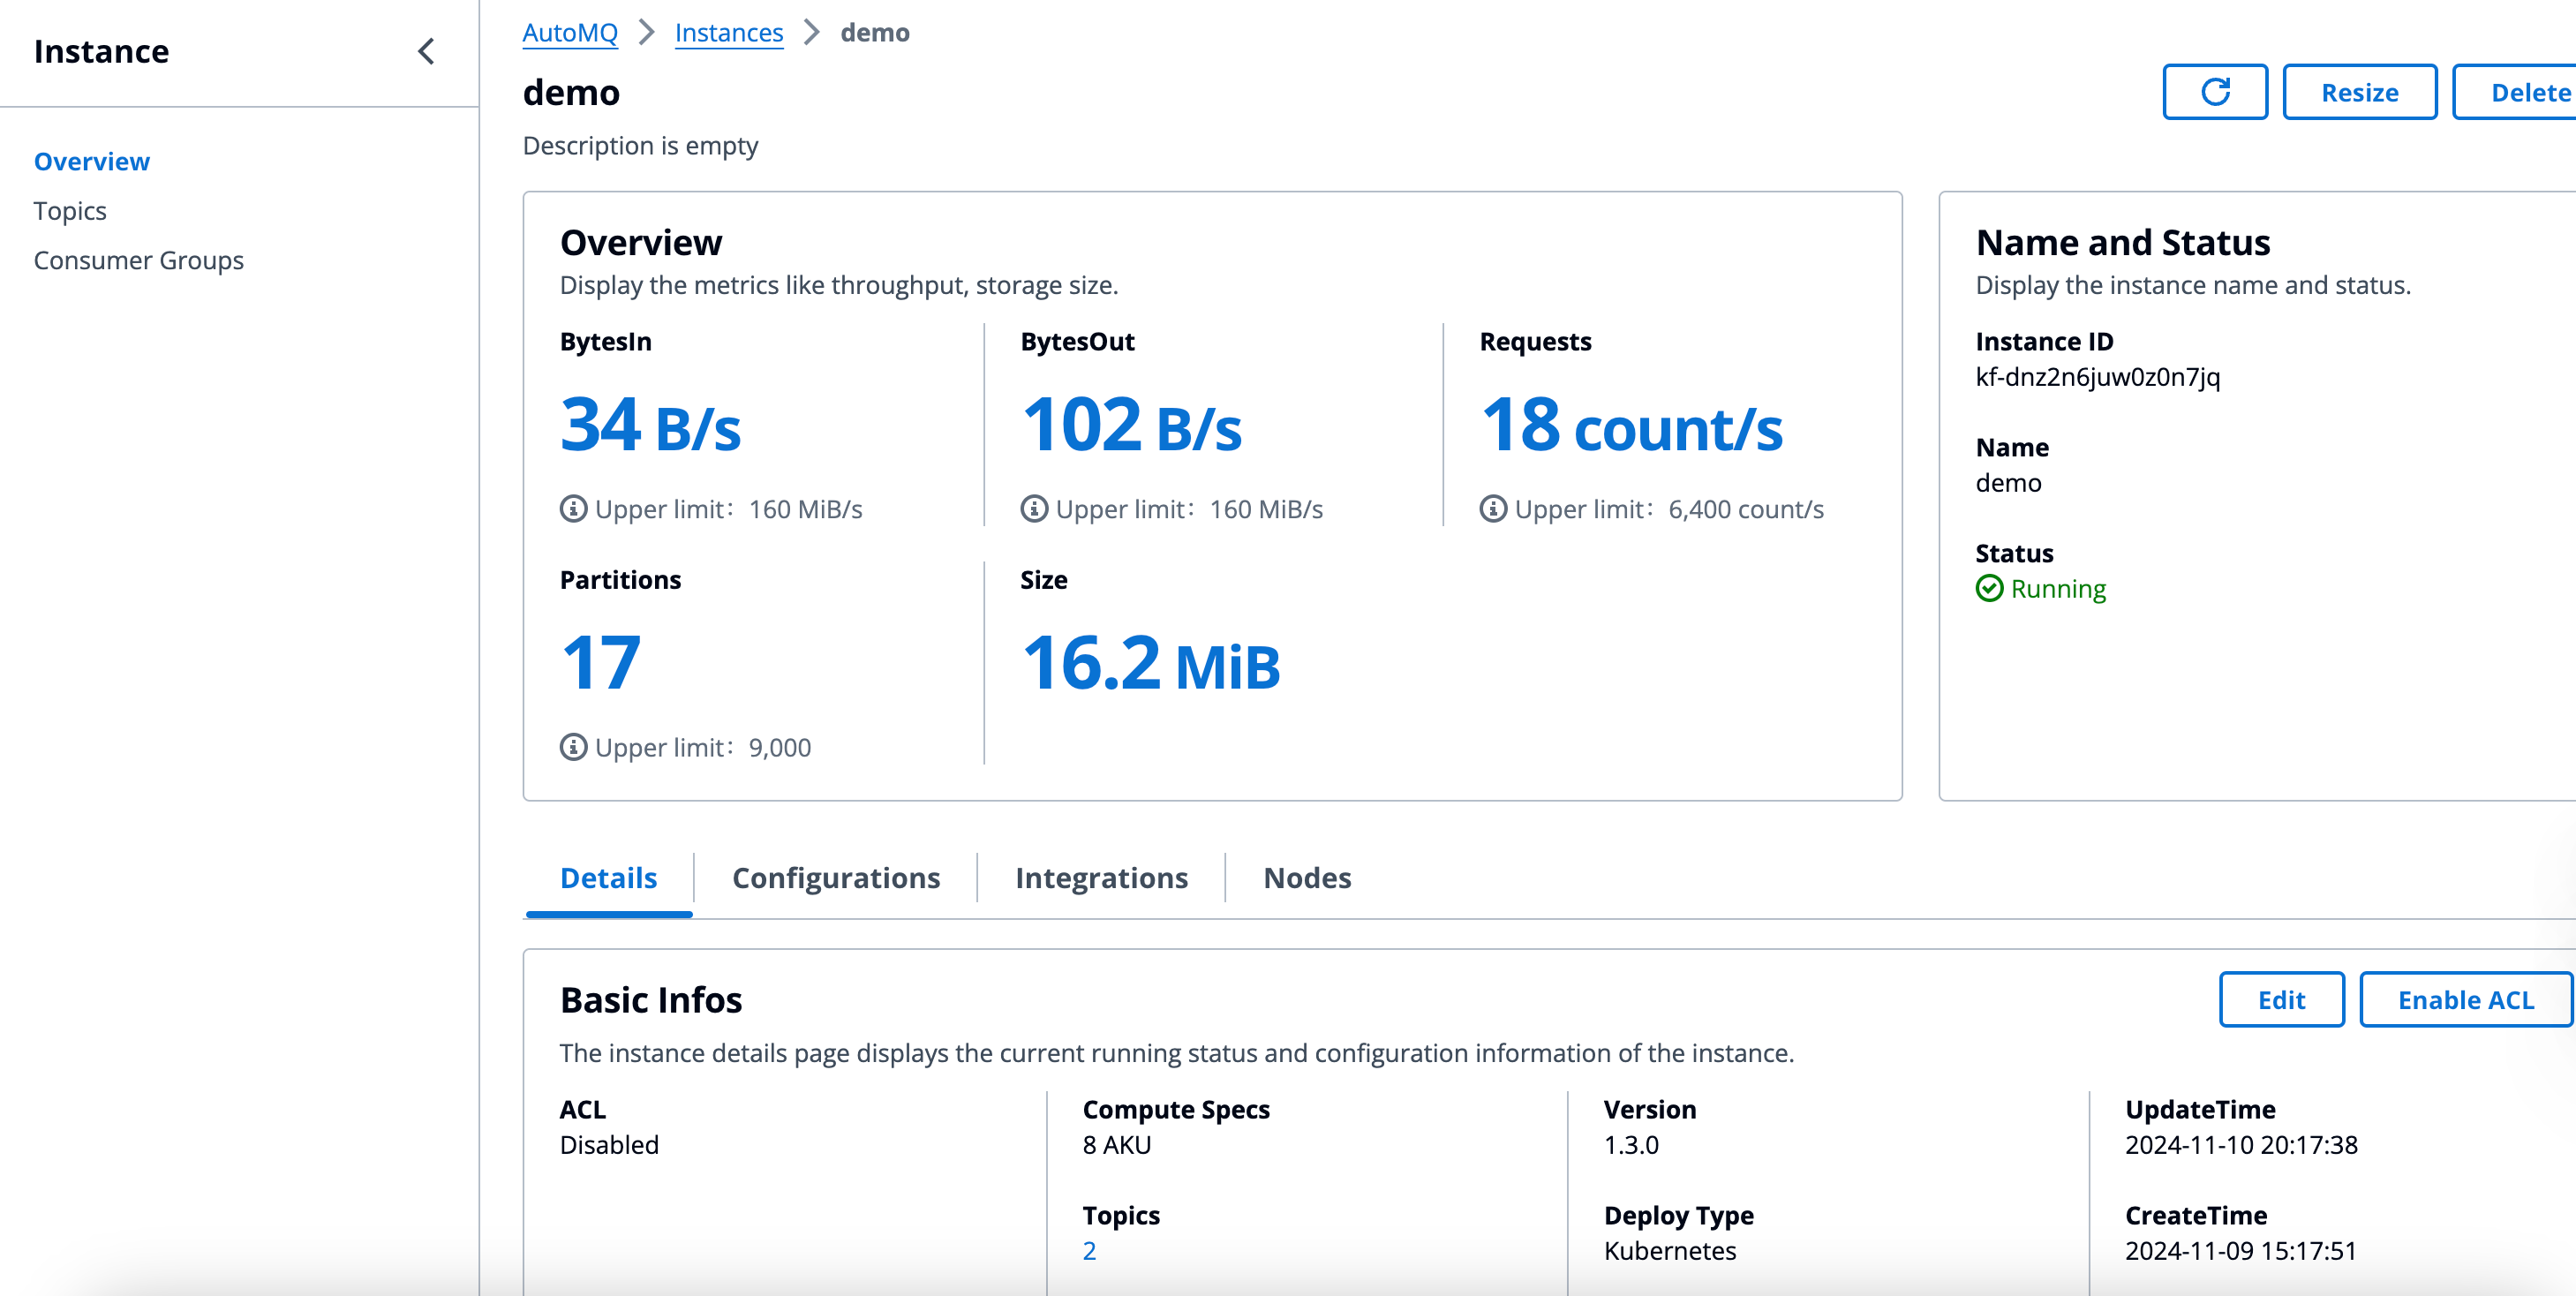
On the Instance Details page, view the instance information.
Instance Scaling
Steps:
-
Go to the Instance List page.
-
Locate the instance that requires updating in the instance list and click on the target instance name.
-
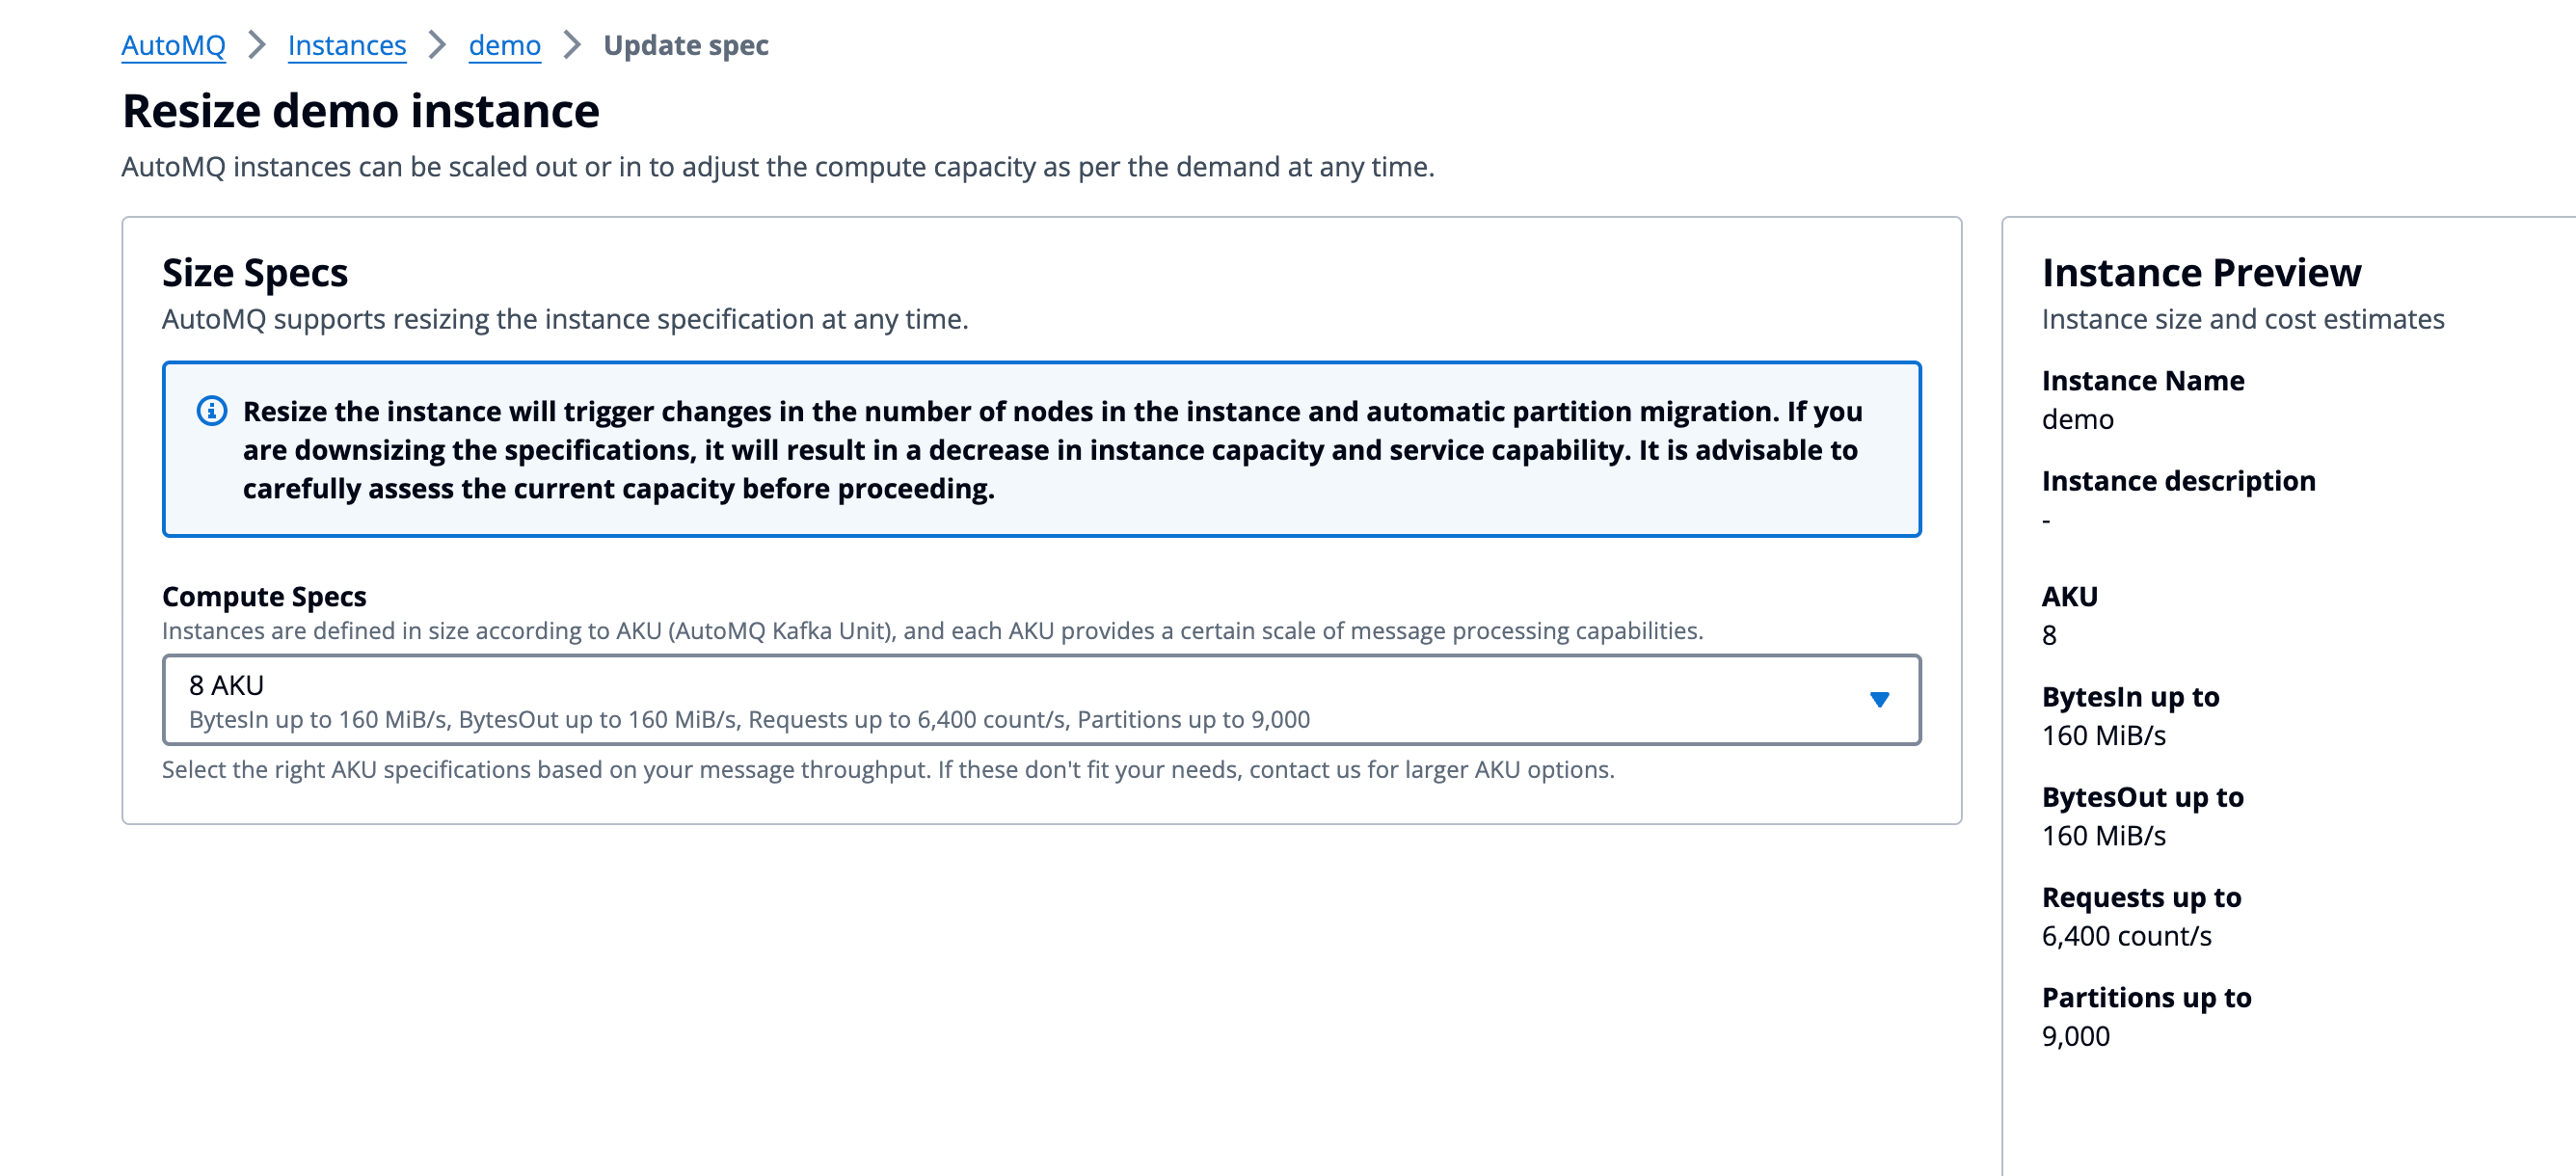
On the Instance Details page, click the Change Configuration button, adjust the instance’s compute specifications according to your actual needs, and click Confirm to complete the modification.
Instance Version Upgrade
Instance Version
AutoMQ BYOC environment, refer to the instance version management documentation Release Notes▸.
To upgrade the instance version, you must first ensure the environment console is at the correct version. If not, please complete the console upgrade first. For details on upgrading the environment console, refer to Upgrade Environment Version▸.
Steps
-
Navigate to the Instance List page.
-
In the instance list, locate the instance that needs to be updated and click on the target instance name.
-
On the Instance Details page, check the current instance version and the recommended upgrade version. Click the Upgrade button, confirm the new version, and proceed with the rolling upgrade.
AutoMQ instances are upgraded through a rolling upgrade strategy, which completes changes in batches and ensures that message sending and receiving are not disrupted during the process.
Deleting an Instance
Deleting an instance indicates that the business no longer requires the instance, necessitating its deletion and the release of underlying resources.
Operational Steps
-
Navigate to the Instance List page.
-
Locate the instance you want to update in the instance list, then click the dropdown menu on the right-hand side.
-
Find the delete button, click it, and confirm the action to complete the deletion process.
