Step 2: Initializing the Environment
After installing the BYOC environment, initial configuration is essential upon first accessing the environment. This article outlines the steps required for environment initialization.
Initial Configuration Items
All AutoMQ instances are hosted within a user-provided infrastructure and private network setting. Users can create or delete instances via the front-end interface of the environment console. The console's backend manages the creation and maintenance of essential resources such as compute and storage, along with deploying AutoMQ software. Thus, it is crucial to complete the initial setup upon your first visit to the environment console. For additional information, see Overview▸.
Drawing on the technical architecture of AutoMQ Kafka, the initial configuration items are outlined below:
| Parameter | Example Value |
|---|---|
| Object Storage S3 Bucket |
|
| Role Authorization |
|
Step One: Initialize Object Storage S3 Bucket Configuration
AutoMQ leverages object storage services to store message data as well as the cluster's observability data (Metrics, Trace, etc.). Therefore, during the initial setup, users must specify a Bucket for data storage.
When setting up a BYOC environment, each environment requires two Buckets. To avoid any impact on the production environment, it is advisable for users to provide Buckets that are isolated from other application systems.
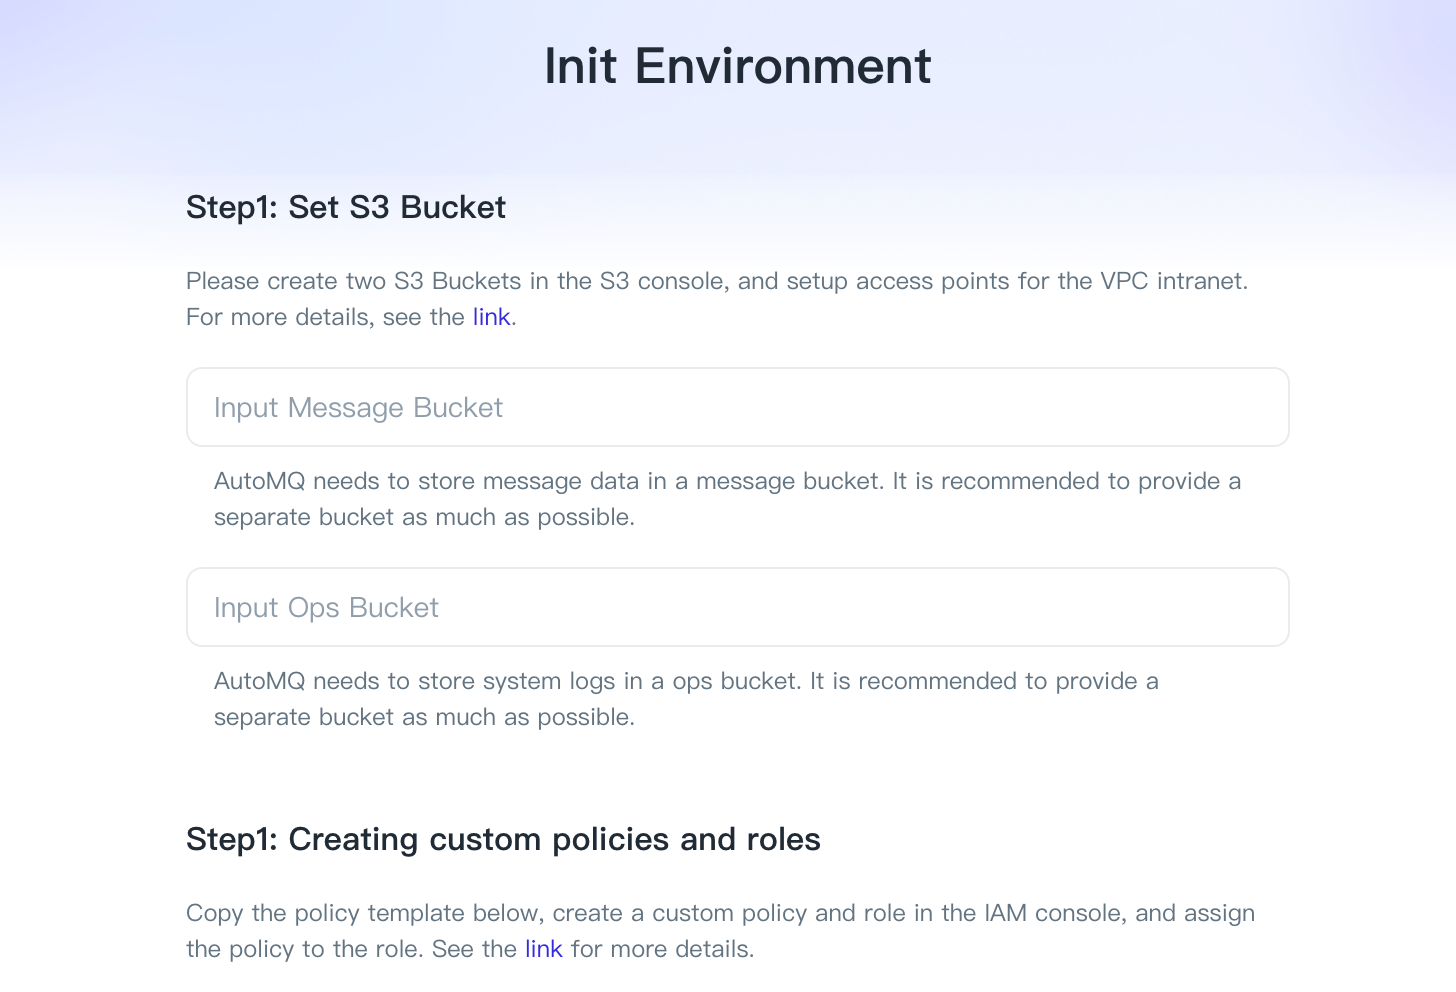
Step Two: IAM Role Authorization
Authorizing a role essentially involves the user crafting a custom authorization policy in the AWS IAM console, then creating an IAM role, and linking the previously crafted authorization policy to this role. The EC2 instance in the environment console is then permitted to assume this IAM role to facilitate infrastructure initialization and management on behalf of the user.
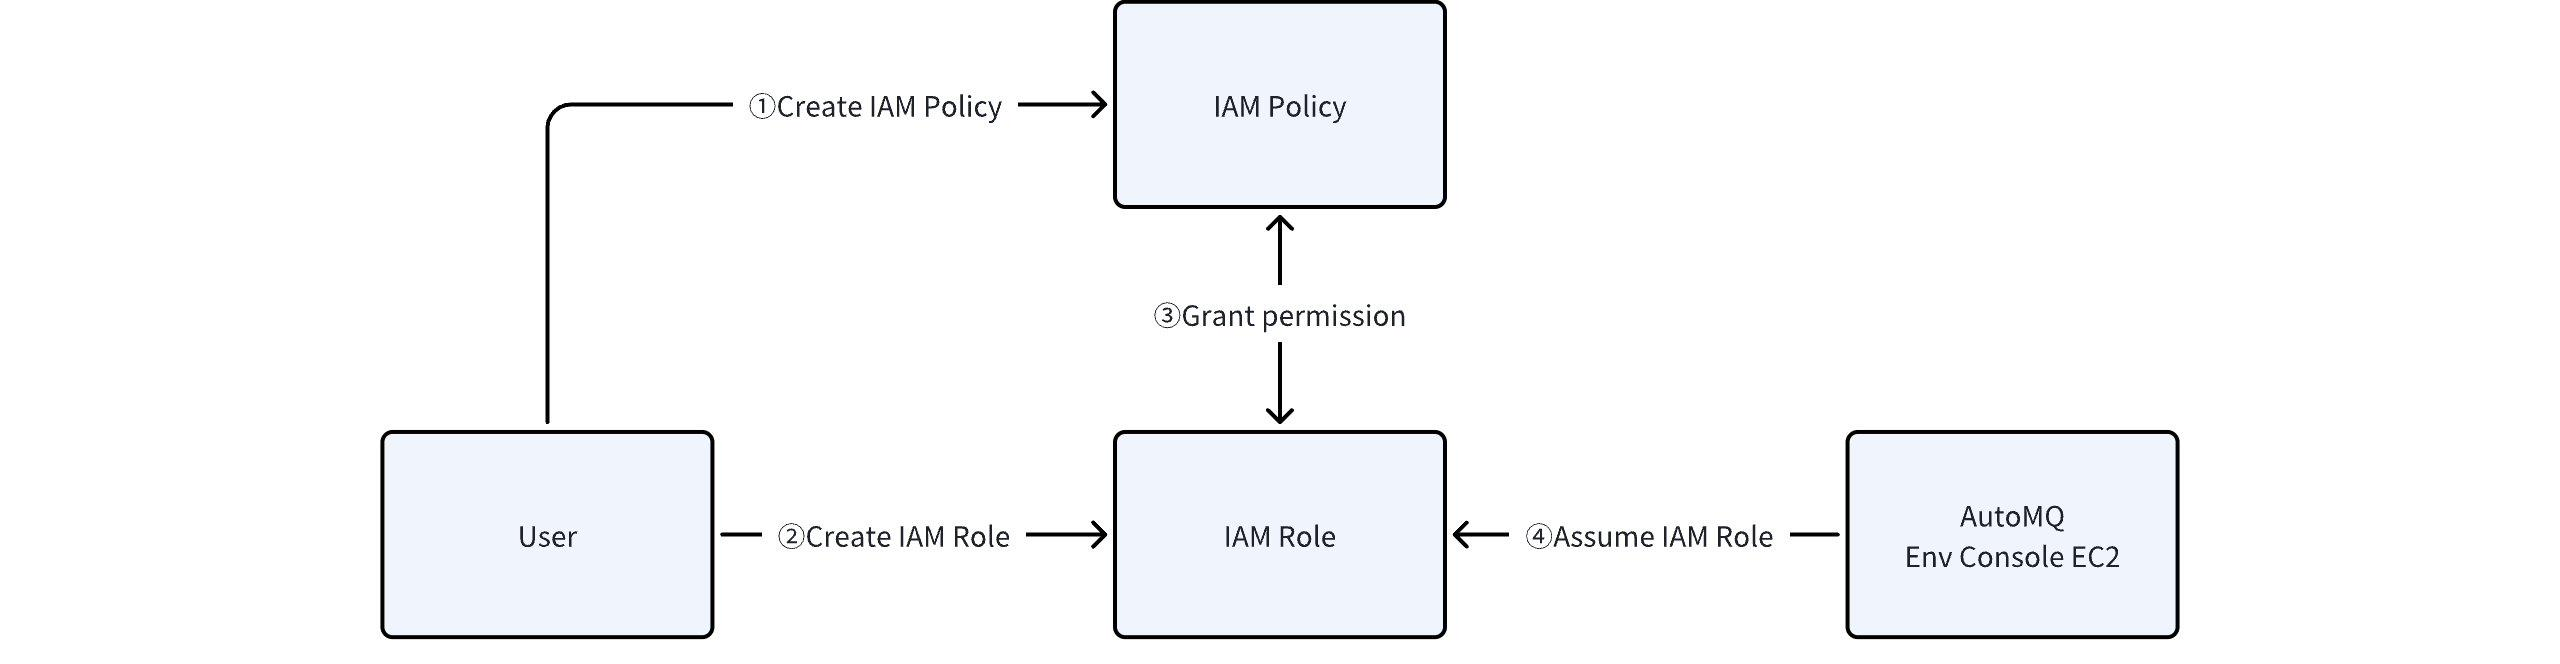
The steps are as follows:
- Create a custom authorization policy. Ensure you are using a production account, then proceed to create the policy in the AWS Access Management (IAM) product console.
AutoMQ requires specific operation permissions based on the cloud product resources it utilizes, adhering to the principle of least privilege and following the access control standards of the cloud provider. Below is a list of permission templates:
Note: In the policy template below, ensure that the read and write permissions for S3 Bucket resources are clearly specified after entering the appropriate message Bucket and operations Bucket in step one.
{
  "Version": "2012-10-17",
  "Statement": [
    {
      "Effect": "Allow",
      "Action": [
        "iam:CreateServiceLinkedRole"
      ],
      "Resource": "*",
      "Condition": {
        "StringEquals": {
          "iam:AWSServiceName": "autoscaling.amazonaws.com"
        }
      }
    },
    {
      "Sid": "EC2InstanceProfileManagement",
      "Effect": "Allow",
      "Action": [
        "iam:PassRole"
      ],
      "Resource": "*",
      "Condition": {
        "StringLike": {
          "iam:PassedToService": "ec2.amazonaws.com*"
        }
      }
    },
    {
      "Effect": "Allow",
      "Action": [
        "ssm:GetParameters",
        "pricing:GetProducts",
        "ec2:DescribeImages",
        "ec2:CreateLaunchTemplate",
        "ec2:RebootInstances",
        "ec2:RunInstances",
        "ec2:StopInstances",
        "ec2:TerminateInstances",
        "ec2:CreateKeyPair",
        "ec2:CreateTags",
        "ec2:AttachVolume",
        "ec2:DetachVolume",
        "ec2:DescribeInstances",
        "ec2:DescribeLaunchTemplates",
        "ec2:DescribeLaunchTemplateVersions",
        "ec2:DescribeVolumes",
        "ec2:DescribeSubnets",
        "ec2:DescribeKeyPairs",
        "ec2:DescribeVpcs",
        "ec2:DescribeTags",
        "ec2:DeleteKeyPair",
        "ec2:CreateVolume",
        "ec2:DeleteVolume",
        "ec2:DeleteLaunchTemplate",
        "ec2:DescribeInstanceTypeOfferings",
        "autoscaling:CreateAutoScalingGroup",
        "autoscaling:DescribeAutoScalingGroups",
        "autoscaling:UpdateAutoScalingGroup",
        "autoscaling:DeleteAutoScalingGroup",
        "autoscaling:AttachInstances",
        "autoscaling:DetachInstances",
        "autoscaling:ResumeProcesses",
        "autoscaling:SuspendProcesses",
        "route53:CreateHostedZone",
        "route53:GetHostedZone",
        "route53:ChangeResourceRecordSets",
        "route53:ListHostedZonesByName",
        "route53:ListResourceRecordSets",
        "route53:DeleteHostedZone"
      ],
      "Resource": "*"
    },
    {
      "Effect": "Allow",
      "Action": [
        "s3:GetLifecycleConfiguration",
        "s3:PutLifecycleConfiguration",
        "s3:ListBucket"
      ],
      "Resource": "*"
    },
    {
      "Effect": "Allow",
      "Action": [
        "s3:GetLifecycleConfiguration",
        "s3:PutLifecycleConfiguration",
        "s3:ListBucket"
      ],
      "Resource": [
        "arn:aws-cn:s3:::{Replace with your message bucket !!!}",
        "arn:aws-cn:s3:::{Replace with your ops bucket !!!}"
      ]
    },
    {
      "Effect": "Allow",
      "Action": [
        "s3:PutObject",
        "s3:GetObject",
        "s3:AbortMultipartUpload",
        "s3:PutObjectTagging",
        "s3:DeleteObject"
      ],
      "Resource": [
        "arn:aws-cn:s3:::{Replace with your message bucket !!!}/*",
        "arn:aws-cn:s3:::{Replace with your ops bucket !!!}/*"
      ]
    }
  ]
}
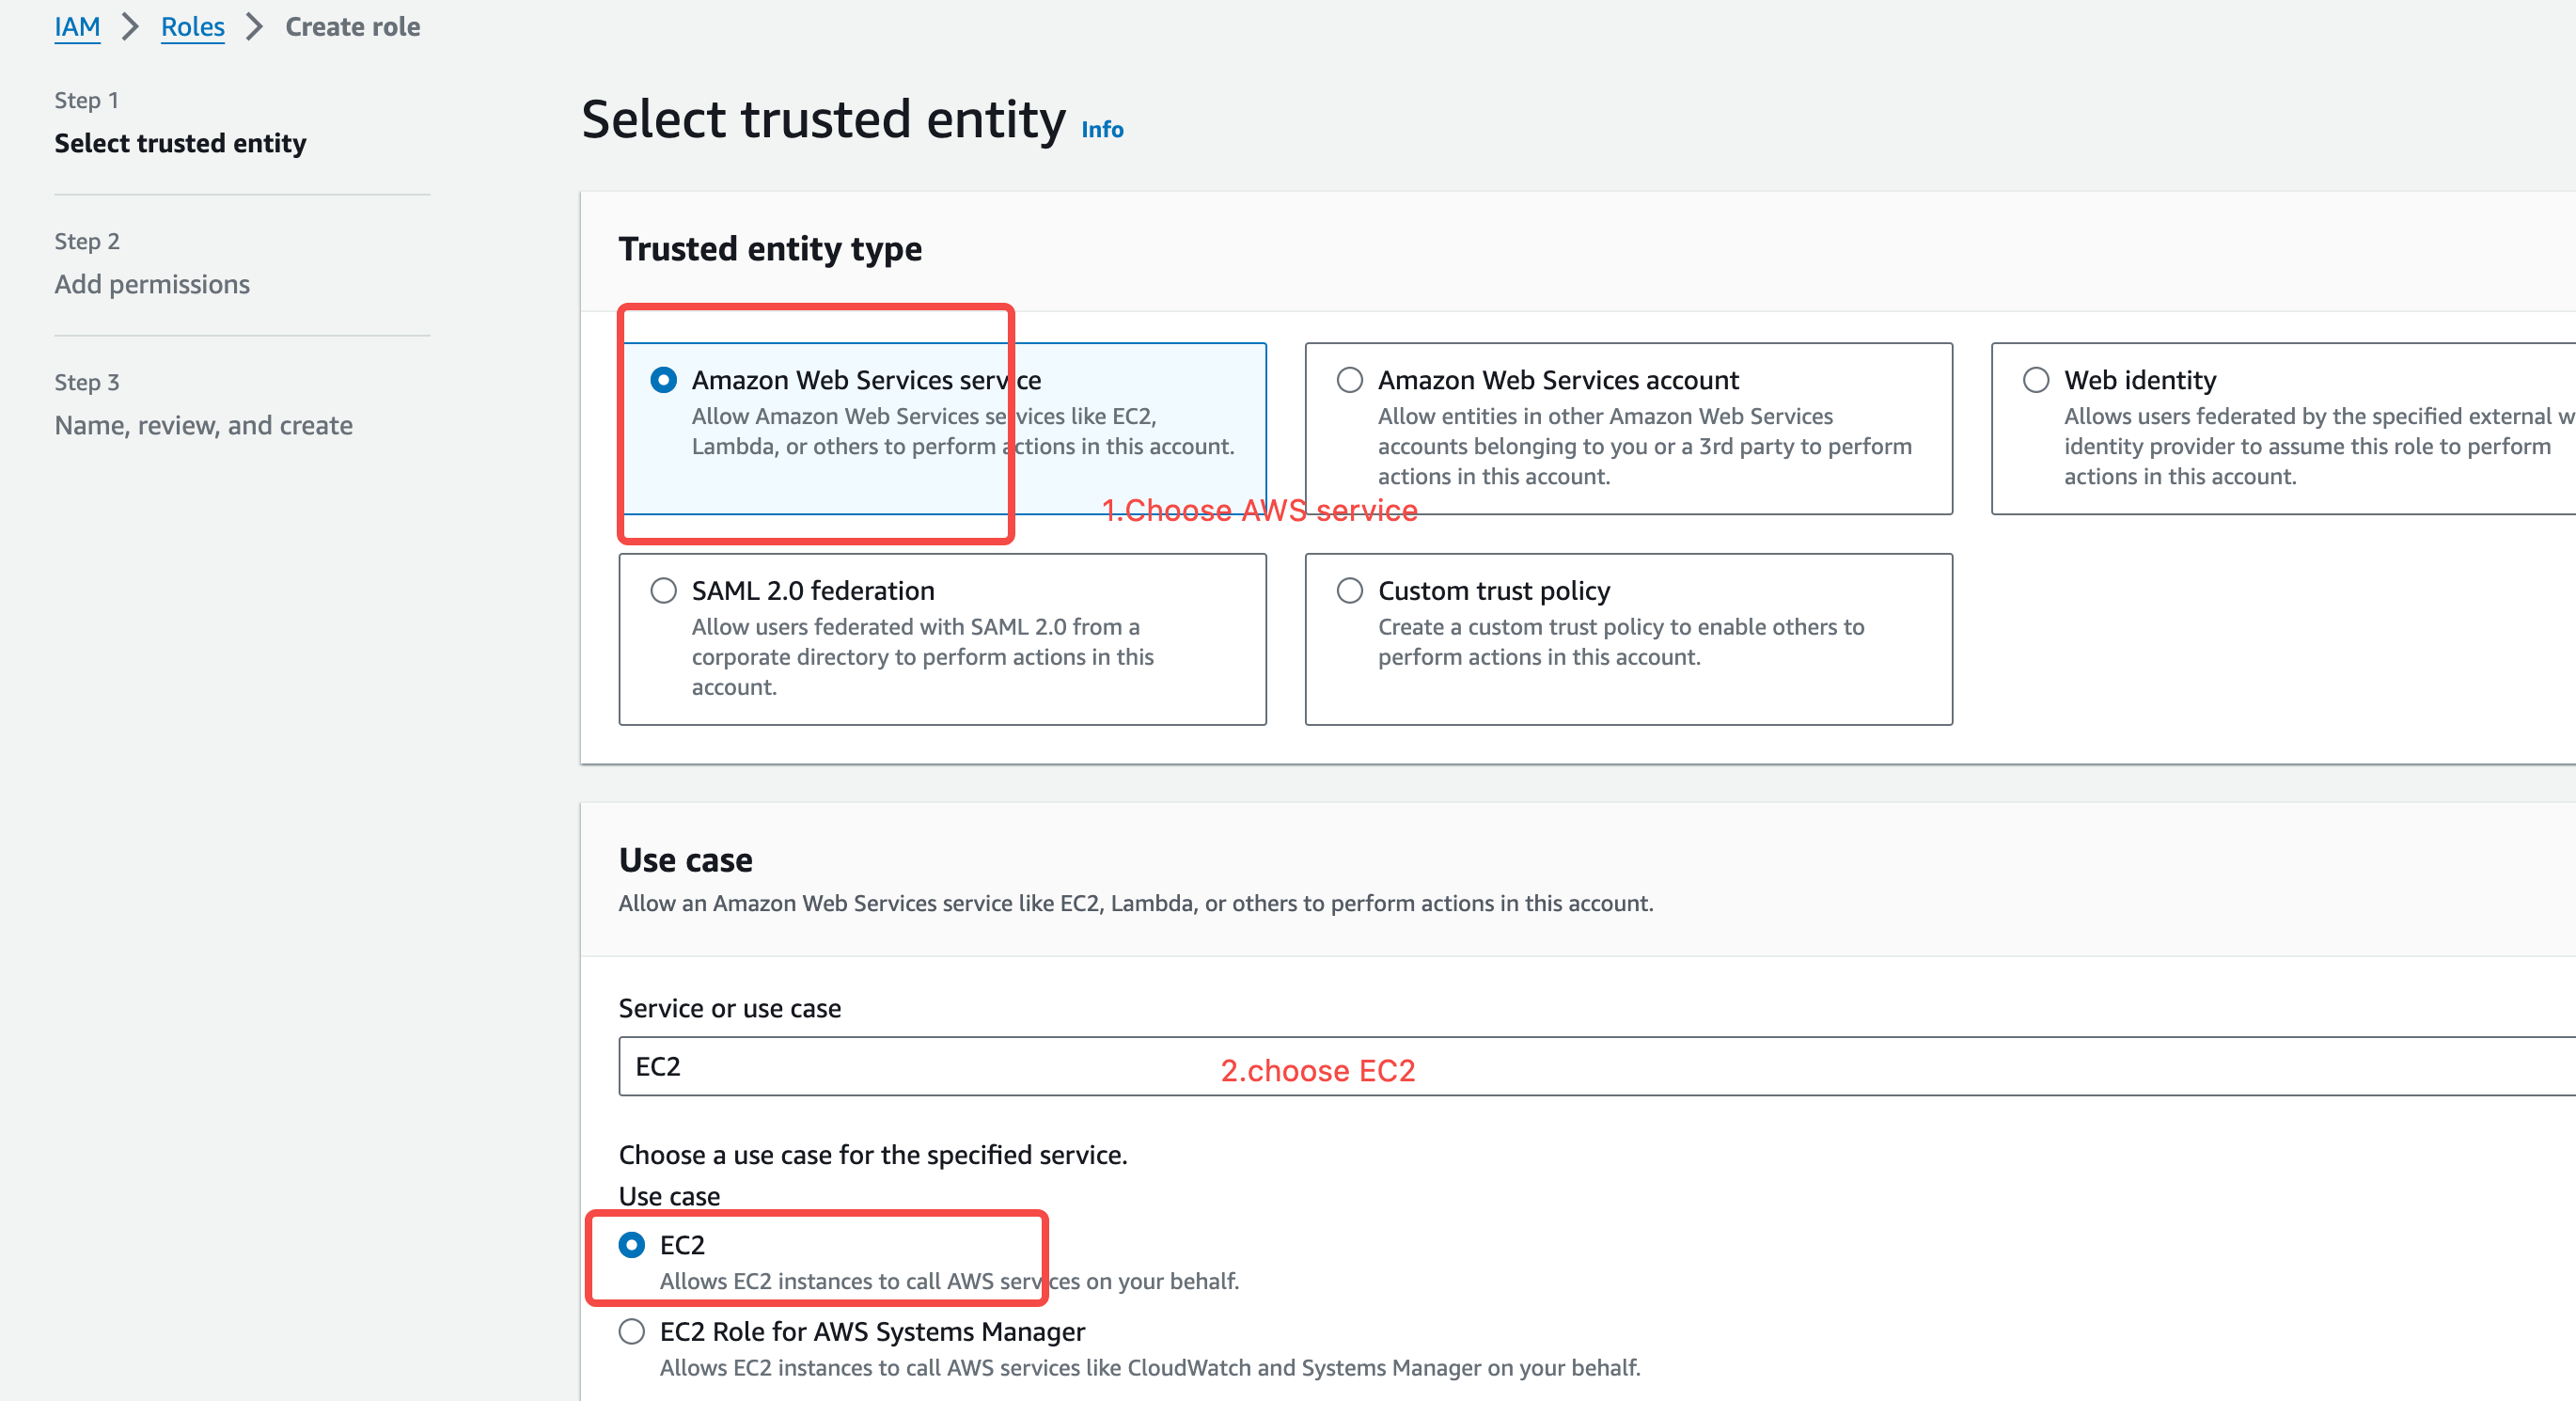
- Create and Authorize an IAM Role. Consult the IAM role authorization documentation to establish an IAM role, select AWS Services > EC2 as the trusted entity, and grant the specified IAM policy.

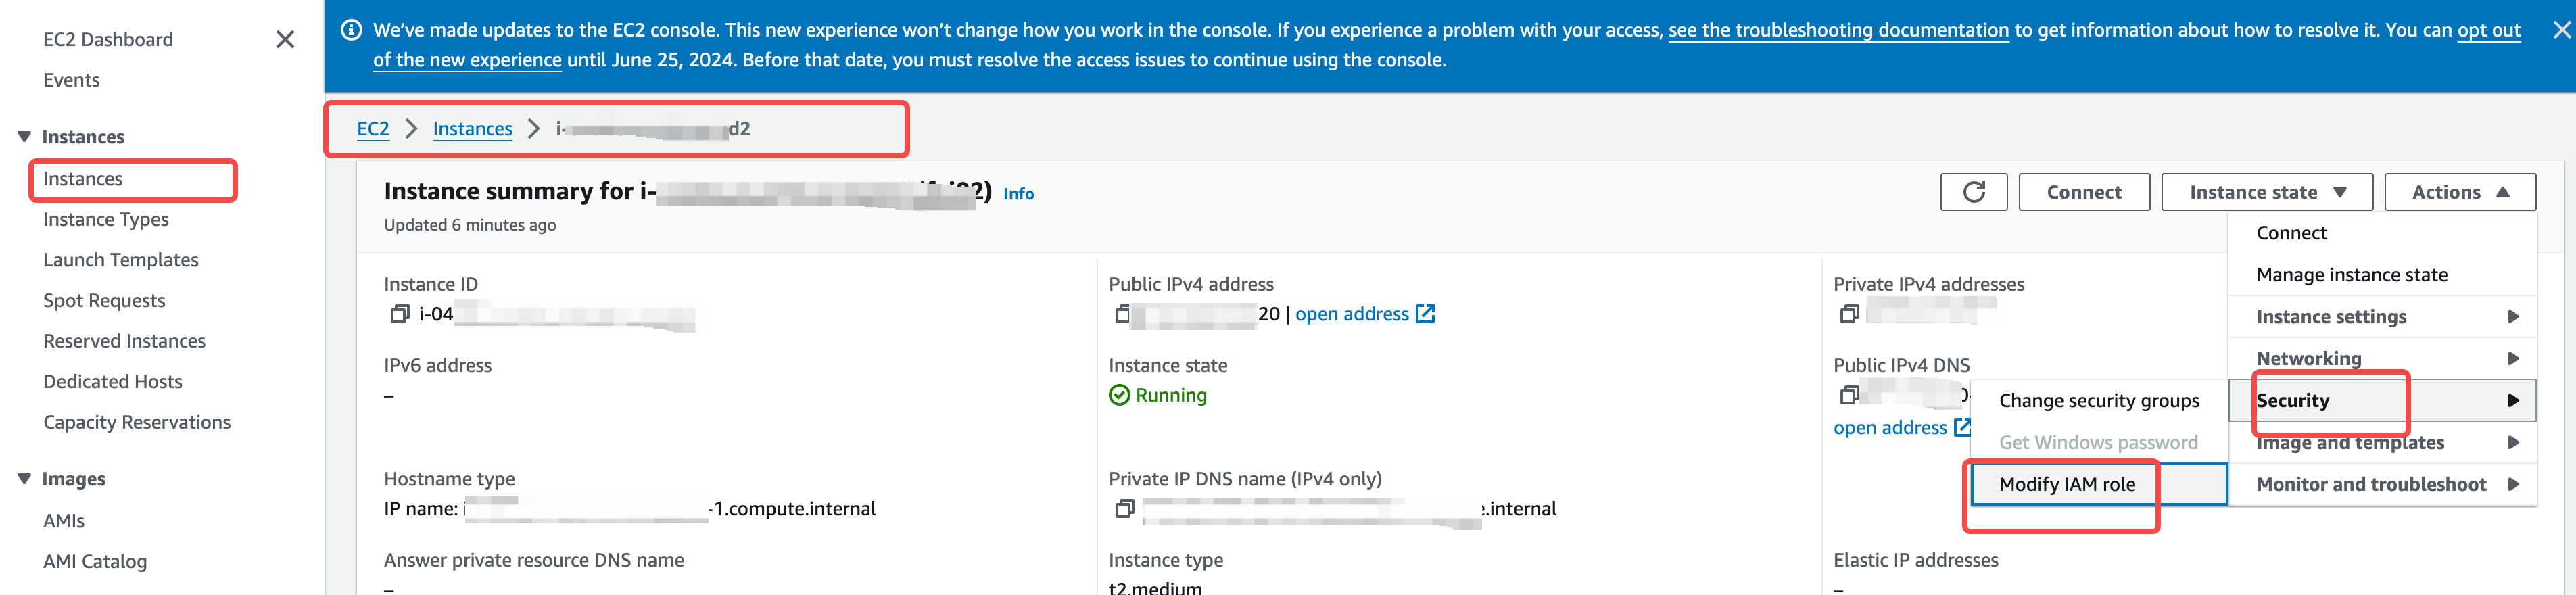
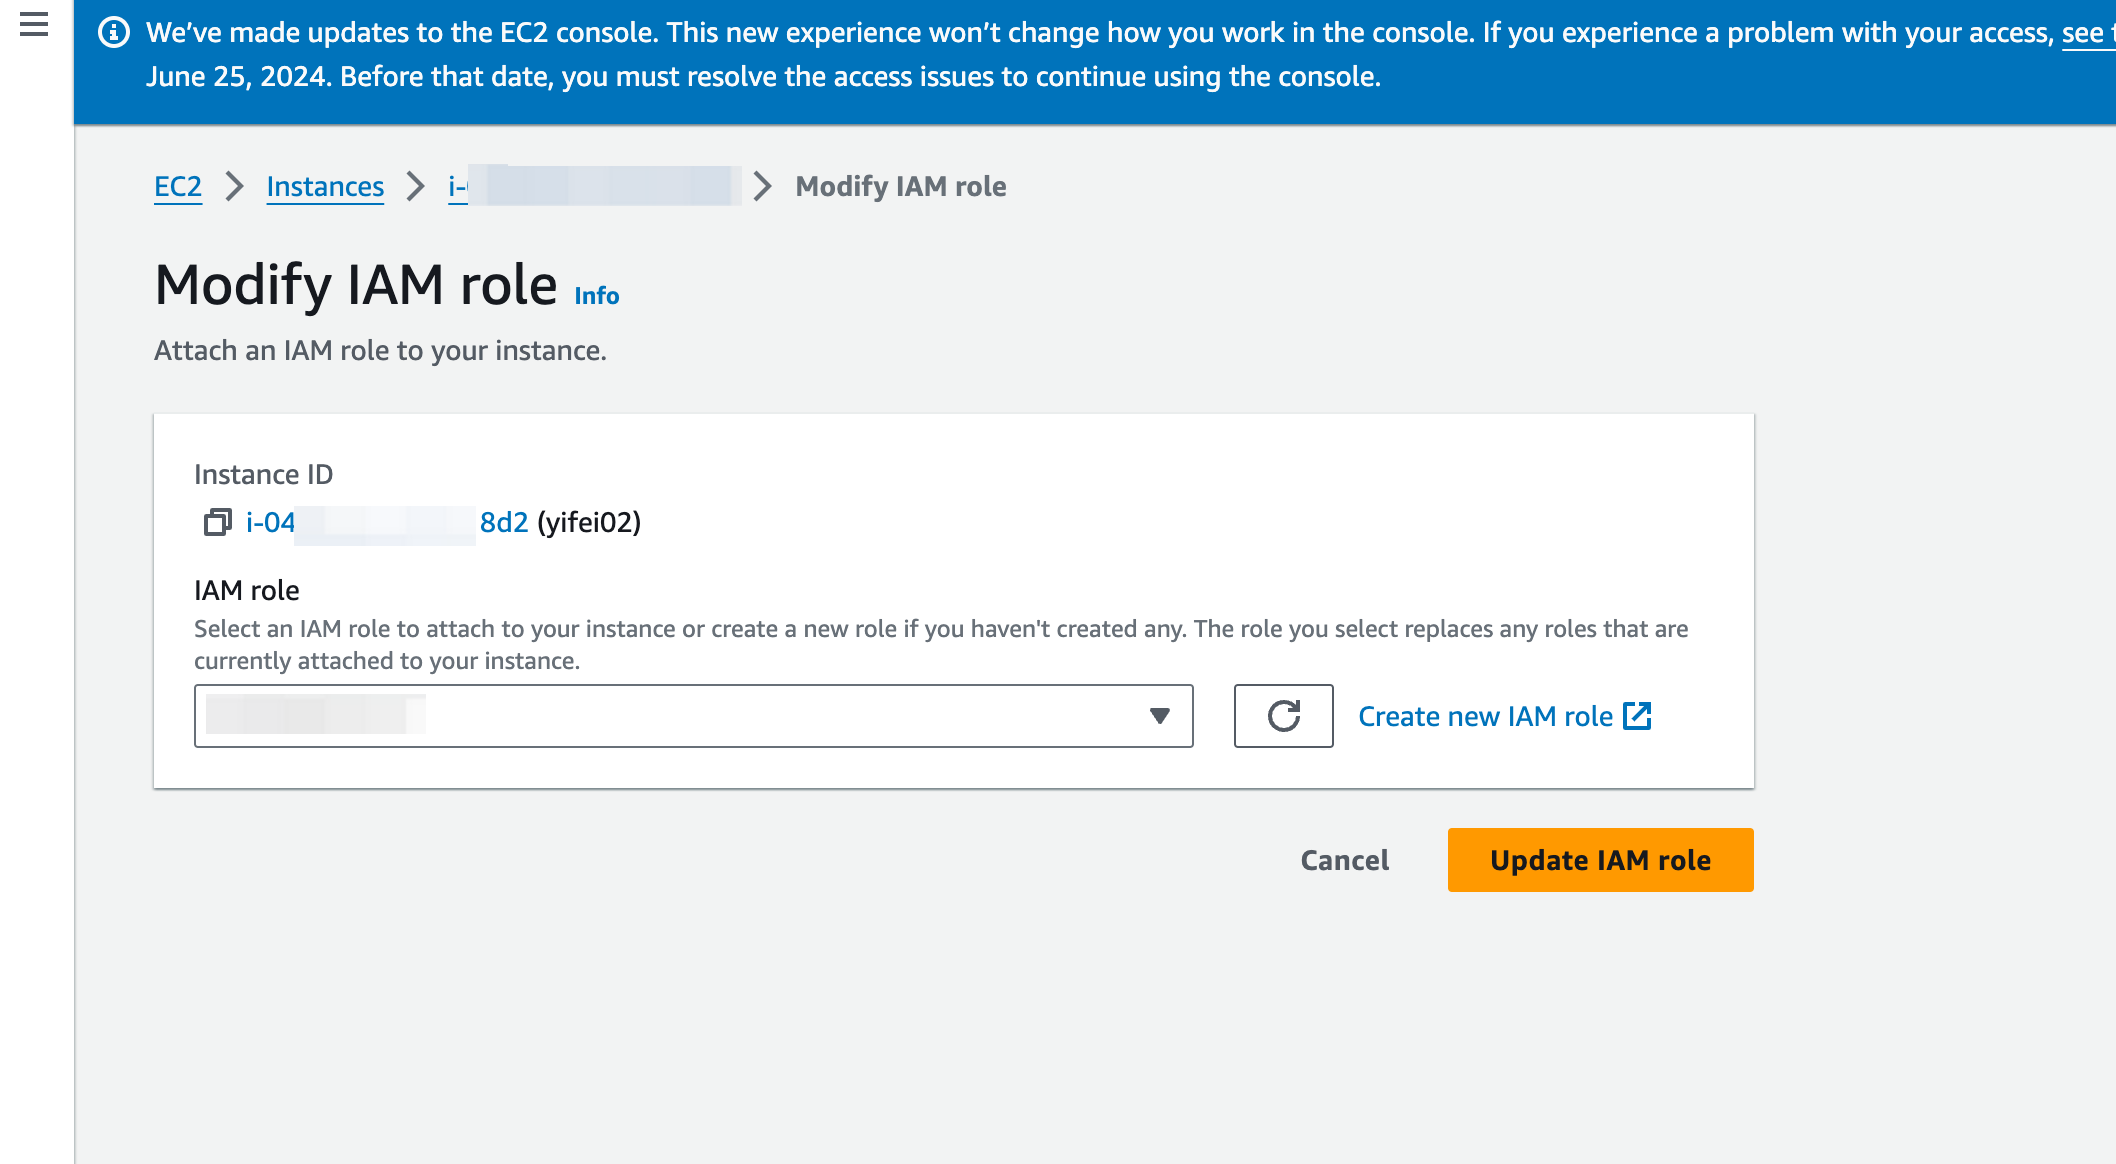
- Grant the ECS IAM Role to the Environment Console. Go to the AWS EC2 management console, choose to modify the IAM role, and assign the IAM role to the ECS hosting the AutoMQ environment.
- Enter the IAM Role. After the role is created and authorized, input the ARN of the corresponding instance configuration file into the environment initialization interface. The AutoMQ environment console will then confirm the role's authorization and integrity.

After initializing the environment, it is crucial to maintain the specified permission policies and roles; failure to do so may disrupt the functionality of the existing environment.
- Initialization Completed. Move on to the environment console.
Subsequent Steps
Following environment initialization, you have the liberty to explore the following products according to your needs:
- Experience AutoMQ for Kafka: AutoMQ's revolutionary Kafka service, re-engineered and hosted on cloud platforms, offers a cost efficiency that is tenfold superior to Apache Kafka. Experience AutoMQ for Kafka▸