Executing Migration
Once the Prerequisites▸ are met, you can proceed with the subsequent reassignment process. This article provides a detailed guide on the strategy and implementation steps for migrating from Apache Kafka® to AutoMQ.
Reassignment Plan
To migrate from Apache Kafka to AutoMQ, consider the following tasks:
Message data reassignment: Kafka stores historical consumed and unconsumed message data. The reassignment process needs to ensure that message data is copied to the new cluster as needed, without losing any messages.
Consumer progress metadata reassignment: The metadata of the consumer progress that has been processed in the source cluster needs to be recreated in the new cluster to prevent losing progress and re-consuming messages, which can cause a significant amount of duplication.
Producer switching: Apart from data synchronization, the reassignment process also needs to switch producer applications at the appropriate time to connect producers to the target cluster to produce new messages.
Consumer switching: Apart from data synchronization, the reassignment process also needs to switch consumer applications at the appropriate time to connect consumers to the target cluster to continue consuming messages from the previous progress.
Refer to the following flowchart for the overall reassignment plan:
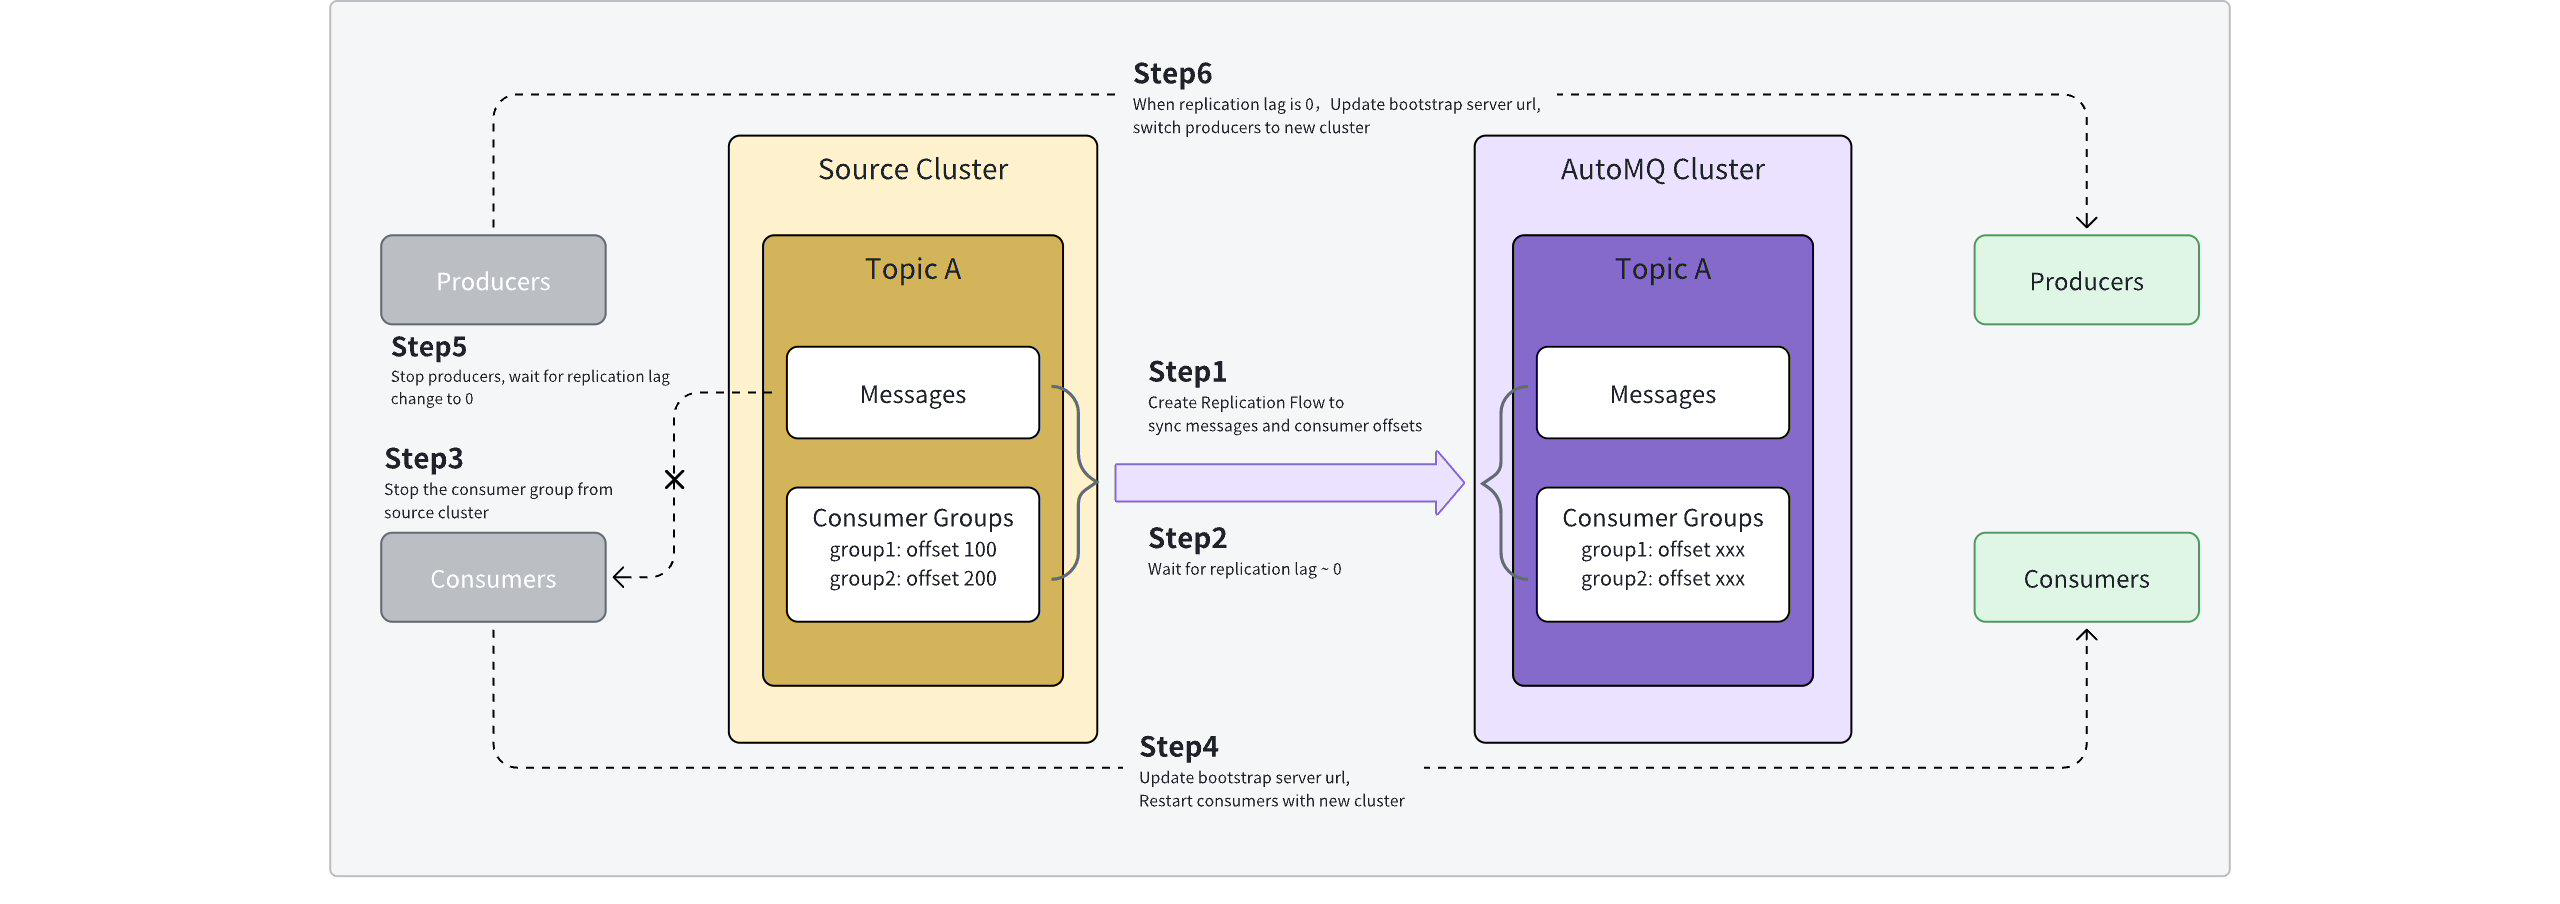
The migration steps are detailed as follows:
Step 1: Create reassignment tasks and synchronize data. Refer to the Overview▸ for details. AutoMQ Cloud offers an out-of-the-box reassignment tool that allows users to create reassignment tasks in batches, synchronizing Topic messages and related Consumer Group metadata from the source cluster to the target cluster.
Step 2: Monitor synchronization progress and wait for it to near completion. The AutoMQ Cloud reassignment tool supports task management and detailed views. Users should observe the number of accumulated messages and synchronization delay metrics, waiting for both metrics to approach zero.
Monitoring synchronization nearing completion is intended to shorten the subsequent observation and waiting time during application switchover.
- Step 3: Stop consumers in the source cluster. Switching applications requires first switching consumers. It is recommended to stop consumer applications, wait for the consumption progress data of the source cluster to synchronize to the target cluster, and then switch to the target cluster.
It is advisable to wait for a while to allow the consumption progress to be fully synchronized. The default waiting time is 10 seconds.
Alternatively, the application can first start new consumers of the same Consumer Group in the target cluster, and then stop the consumers in the source cluster. This will result in a period where both ends consume simultaneously.
- Step 4: Switch consumers to the target cluster. Restart the consumers using the new access point address to connect to the AutoMQ target cluster.
Based on the technical implementation of MirrorMaker2, during steps 3 and 4, consumers may experience some duplicate consumption. To reduce the probability of duplicates, you can customize configurations in the advanced parameters of the reassignment task.
- Step 5: Stop the producers in the source cluster. After the consumers have switched, you need to switch the producers as well. Similar to step 3, stop the message writing in the source cluster first and wait for all message data to sync to the target cluster.
Stopping the producer is necessary to prevent the target cluster from receiving messages from both the producer and MirrorMaker2 simultaneously, which can cause message disorder.
- Step 6: Switch the producers to the target cluster. Monitor the backlog and latency of the reassignment task, and once the backlog is confirmed to be 0, restart the producers using the new access point address to connect to the AutoMQ target cluster, completing the entire reassignment task.
After completing the reassignment and confirming that the application meets expectations, it is recommended to delete the reassignment task as soon as possible to free up machine resources and prevent ongoing resource costs.
Reassignment Process
Step 1: Create Reassignment Task and Synchronize Data
After completing the Prerequisites▸, you should have clearly identified the source cluster, target cluster, Topics, and Consumer Groups that need reassignment. The next step is to begin creating the reassignment tasks.
- Create the source cluster integration configuration. Use an Admin or Operator role to log in to the environment console and navigate to the integration page to create an Apache Kafka® integration.
Only one integration needs to be created for each source cluster, and this integration configuration can be reused for multiple reassignment tasks subsequently.
The Apache Kafka® integration configuration also supports other Kafka distributions; you only need to fill in the corresponding endpoint parameters.
To create an Apache Kafka® integration, you need to fill in the following parameters:
Integration Name: Used as an alias to identify the source cluster. It is customizable by the user for easier recognition later on.
Endpoint Protocol: Choose the appropriate endpoint protocol based on the type of source cluster.
Endpoint Address: Fill in the Bootstrap address list for the corresponding protocol.
The AutoMQ reassignment tool currently supports the PLAINTEXT protocol and does not support SASL_PLAINTEXT, SSL, and SASL_SSL protocols. If you have any requirements, please contact AutoMQ technical personnel for help and support.
- Create a reassignment task. Navigate to the reassignment page to create a reassignment task and fill in the relevant task parameters as guided.
Among these, the following parameters need to be filled out based on the actual situation:
| Parameter Name | Description |
|---|---|
| Task Name | Used to represent a group of reassignment tasks. It is generally recommended to use a short and easily recognizable phrase. |
| Source Cluster | Specify the source cluster that needs reassignment. Here, select the Apache Kafka integration created in the previous step. |
| Target Cluster | Specify the target cluster for the reassignment. Here, select the already created AutoMQ instance. |
| Starting Synchronization Position | Specify the starting position for message synchronization once the reassignment task begins. The following options are supported:
In a production environment, if the scale of historical data is large, choosing to sync from the earliest position should consider the cold read pressure caused by reading historical messages. If there are no strict time requirements for the reassignment, it is recommended to start syncing from the latest position until the data between the two clusters is nearly consistent. |
| List of Topics to Synchronize | Set the list of Topics covered by the reassignment task. This list supports wildcard input, allowing multiple Topics to be configured at once. The AutoMQ reassignment tool supports automatic synchronization of dynamic Topic updates. Once the reassignment task is created, whether it is creating new Topics or changing the number of partitions in existing Topics, as long as they meet the current list conditions, they will be automatically synchronized to the target cluster. |
In addition to basic configurations, AutoMQ reassignment tasks offer the following optional configurations to customize functionality behavior:
| Parameter Name | Description |
|---|---|
| Synchronize Consumer Progress | It is recommended to enable this option. When enabled, the reassignment task will map the consumption progress of the source cluster's Consumer Group to the target cluster, ensuring that consumers can continue from where they left off, thus avoiding a significant amount of duplicate processing. Note that the offsets of messages in the source and target clusters synchronized by MirrorMaker2 are not consistent, so the consumption progress of the source cluster will be remapped to the target cluster. This process may involve a slight rollback of offsets. |
| Run Health Check | The reassignment task can periodically perform heartbeat tests to verify the synchronization link. When enabled, it will periodically send test messages to the source cluster and synchronize them to the target cluster to verify integrity. This configuration is enabled by default. |
| Automatically Detect Topic Changes | The reassignment task can automatically detect changes in the Topics of the source cluster during the task's runtime, such as new Topics created in the source cluster, and synchronize them to the target cluster. This configuration is enabled by default. |
| Automatically Detect Group Changes | The reassignment task can automatically detect changes in the Consumer Groups of the source cluster during the task's runtime, such as new Groups added to the source cluster, and synchronize them to the target cluster. This configuration is enabled by default. |
| Exclude Topic List | If using wildcards in the list of Topics to be synchronized but needing to exclude certain Topics from synchronization, you can set the Topics to be excluded to remove the synchronization of related Topics. By default, this configuration does not synchronize Kafka system Topics, i.e., it will forcibly exclude “.*[-.]internal, .*.replica, __.*”. |
| Exclude Group List | If Group consumption progress synchronization is enabled but certain Consumer Groups need to be excluded from synchronization, you can set the Groups to be excluded to remove the state synchronization of related Groups. By default, this configuration does not synchronize Kafka system Groups, i.e., it will forcibly exclude “console-consumer-.*, connect-.*, __.*”. |
Step 2: Monitor Synchronization Progress and Wait for It to Approach Completion
After confirming the creation of the reassignment task, you can go to the task management page and details page to observe the synchronization progress and wait for the data synchronization task to run.
- View the task list to understand the summary information of the current synchronization task.
The AutoMQ reassignment tool provides summary information on the task list page:
Synchronization Delay: Synchronization delay refers to the time taken for messages of a reassigned Topic to be produced from the source cluster to the completion of synchronization. When multiple Topics are involved in a reassignment task, the maximum delay among all Topics is taken.
Synchronization Backlog: Synchronization backlog refers to the number of messages that have been produced but not yet synchronized in the reassigned Topic. When multiple Topics are involved in a reassignment task, the total backlog of all Topics is taken.
View task details to understand the configuration details, running status, and worker information of the reassignment task. During the execution of the synchronization task, users can temporarily pause or resume the task according to their needs, and the reassignment task can continue with the previous synchronization.
Wait for synchronization to approach completion. Refer to the description of the reassignment plan and regularly monitor the synchronization delay and synchronization backlog metrics. It is recommended to prepare for the next step of application switching when the synchronization delay is less than 1 minute.
Step 3: Stop Consumers on the Source Cluster
Once Step 2 is complete, begin migrating the consumer application. It is recommended to stop consumers on the source cluster before switching to the target cluster.
After stopping consumers on the source cluster, the consumption offsets in the source cluster will no longer update, allowing synchronization to the target cluster.
Once synchronization is complete, switch consumers to the target cluster to avoid duplicate consumption within the source and target clusters.
Step 4: Switch Consumers to the Target Cluster
After completing Step 3, modify the consumer configuration to update the access points with those provided by the AutoMQ instance, and restart the application.
Step 5: Stop Producers on the Source Cluster
For each Topic, ensure that Steps 3 and 4 are repeated for all consumers of the current Topic before stopping the producers on the source cluster.
Stopping the producer is necessary to prevent the target cluster from receiving messages from both the producer and MirrorMaker2 simultaneously, which can cause message disorder.
Step 6: Switch the Producer to the Target Cluster
Monitor and wait for Topic synchronization to complete. After completing Step 5, go to the task details page -> status details page, and observe the specified Topic synchronization delay and sync backlog. Both must drop to 0 to ensure that all data for the Topic has been fully synchronized.
Modify the producer configuration's access point. Replace it with the access point provided by the AutoMQ instance, then restart the application. At this point, new messages will be sent to the AutoMQ target instance.
After switching the producer, continuously monitor the upstream and downstream applications of the Topic to confirm they meet expectations.
Step 7: Repeat Steps 3 to 6 Until the Reassignment Is Complete, Then Delete the Reassignment Task
Continuously verify that all Topics have completed the reassignment. Steps 3 to 6 are performed at the granularity of each Topic and its associated producer and consumer applications. Therefore, you need to repeatedly verify until all Topics in the current reassignment task are completed.
Delete the reassignment task. After completing the reassignment of all Topics, click to confirm task deletion, and AutoMQ will clean up the underlying machine resources and configuration information.
Once a reassignment task is deleted, it cannot be restored. Even if a reassignment task with the same Topic is recreated, it will be considered a new task and will not continue the previous reassignment state. Therefore, ensure that the current reassignment task has successfully completed its work before deleting the task.
Rollback Process
During various stages of the reassignment process, if an unexpected exception occurs and the cause cannot be located in a short time, users can attempt the following rollback operations and pay attention to the impacts of the rollback.
| Reassignment Stage | Rollback Plan | Rollback Impact |
|---|---|---|
| Step 1, Create Task |
| This stage does not impact the application since the switch has not yet occurred |
| Step 2: Monitor the sync progress | ||
| Step 3: Stop the source cluster consumers |
| Data remains unaffected, only causing a pause and delay in consumption |
| Step 4: Switch consumers to the target cluster |
| Reverting to the source cluster will result in duplicate consumption of data during the switch |
| Step 5: The source cluster producer has been stopped |
| |
| Step 6: The producer has been switched to the target cluster |
| Messages produced to the target cluster during Step 6 cannot be reverse-synchronized back to the source cluster; application processing is required |
| Step 7: The reassignment task has been deleted |
| Not applicable |
Related References
For more information on the migration tools and migration solutions provided by AutoMQ Cloud, and to understand the operational principles, please refer to the following content: