Ceph
Foreword
Ceph [1] is an open-source distributed object, block, and file storage system. The project originated in 2003 as the result of Sage Weil's doctoral thesis and was released under the LGPL 2.1 license in 2006. Ceph has been integrated with the Linux kernel KVM and is included by default in many GNU/Linux distributions. Ceph is notable for providing object, block, and file system storage capabilities simultaneously, catering to various storage needs.
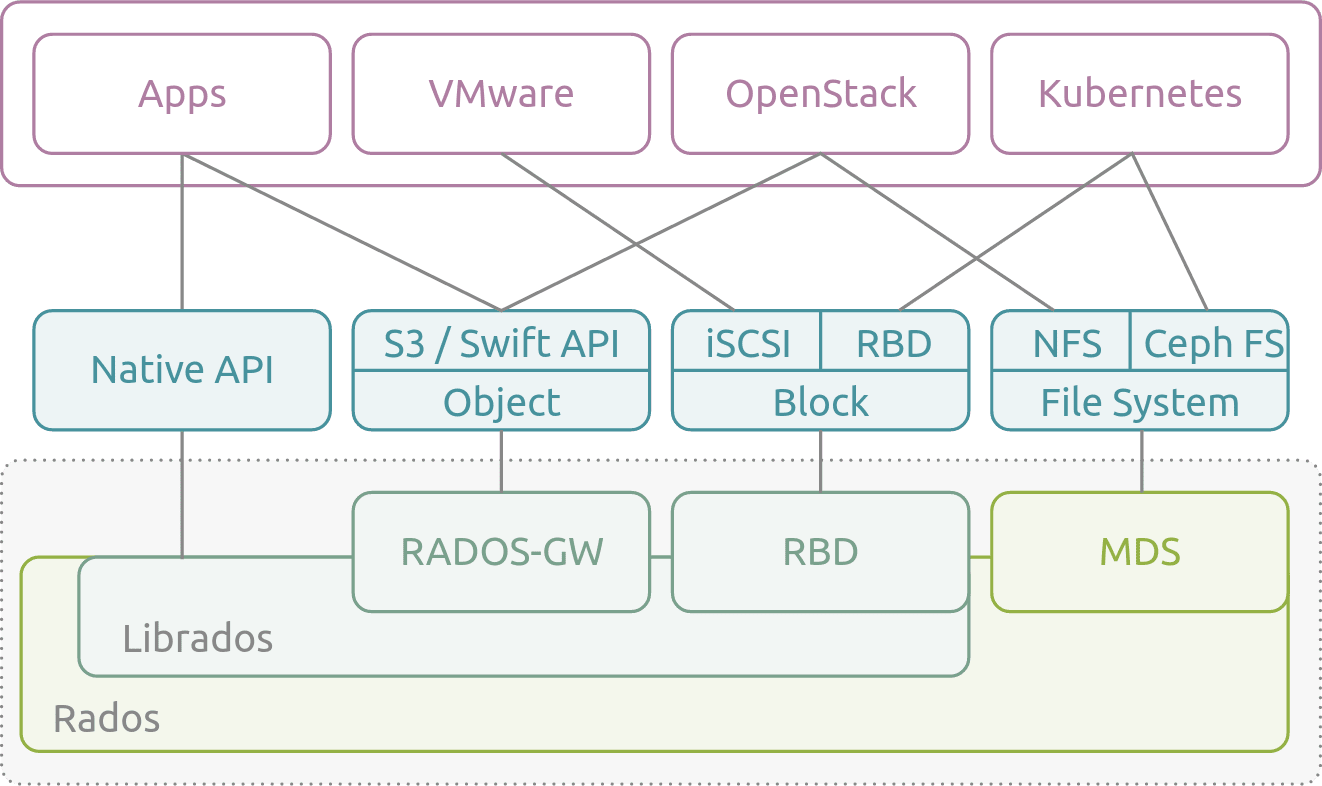
AutoMQ [2]'s innovative shared storage architecture requires the use of both low-latency block devices and cost-effective object storage. Ceph supports both POSIX and S3 access protocols, making it highly compatible with AutoMQ. Thanks to Ceph's compatibility with S3 and its support for both block storage and object storage protocols, you can deploy an AutoMQ cluster in a private data center to achieve a Kafka-compatible streaming system with better cost efficiency, extreme elasticity, and single-digit millisecond latency. This article will guide you on how to deploy an AutoMQ cluster on your private data center's Ceph.
Prerequisites
An available Ceph environment, which can be installed by referring to the official documentation.
Refer to the official documentation to install Ceph's S3-compatible component, RGW.
Prepare 5 hosts for deploying the AutoMQ cluster. It is recommended to use Linux amd64 hosts with 2 cores and 16GB of RAM, along with two virtual storage volumes. An example is as follows:
Role IP Node ID System Volume Data Volume CONTROLLER 192.168.0.1 0 EBS 20GB EBS 20GB CONTROLLER 192.168.0.2 1 EBS 20GB EBS 20GB CONTROLLER 192.168.0.3 2 EBS 20GB EBS 20GB BROKER 192.168.0.4 3 EBS 20GB EBS 20GB BROKER 192.168.0.5 4 EBS 20GB EBS 20GB Tips:
Ensure these machines are in the same subnet and can communicate with each other.
In non-production environments, you can deploy only one Controller, which by default also acts as a Broker.
Download the latest official binary package from AutoMQ GitHub Releases to install AutoMQ.
Create a bucket for Ceph.
- Set environment variables to configure the Access Key and Secret Key required by AWS CLI.
export AWS_ACCESS_KEY_ID=X1J0E1EC3KZMQUZCVHED
export AWS_SECRET_ACCESS_KEY=Hihmu8nIDN1F7wshByig0dwQ235a0WAeUvAEiWSD- Use AWS CLI to create an S3 bucket.
aws s3api create-bucket --bucket automq-data --endpoint=http://127.0.0.1:80
aws s3api create-bucket --bucket automq-ops --endpoint=http://127.0.0.1:80
Create a user for Ceph.
radosgw-admin user create --uid="automq" --display-name="automq"
The created user has full permissions required by AutoMQ by default. For minimal permission configuration, please refer to the official Ceph documentation for custom settings. The result after executing the above commands is as follows:
{
    "user_id": "automq",
    "display_name": "automq",
    "email": "",
    "suspended": 0,
    "max_buckets": 1000,
    "subusers": [],
    "keys": [
        {
            "user": "automq",
            "access_key": "X1J0E1EC3KZMQUZCVHED",
            "secret_key": "Hihmu8nIDN1F7wshByig0dwQ235a0WAeUvAEiWSD"
        }
    ],
    "swift_keys": [],
    "caps": [],
    "op_mask": "read, write, delete",
    "default_placement": "",
    "default_storage_class": "",
    "placement_tags": [],
    "bucket_quota": {
        "enabled": false,
        "check_on_raw": false,
        "max_size": -1,
        "max_size_kb": 0,
        "max_objects": -1
    },
    "user_quota": {
        "enabled": false,
        "check_on_raw": false,
        "max_size": -1,
        "max_size_kb": 0,
        "max_objects": -1
    },
    "temp_url_keys": [],
    "type": "rgw",
    "mfa_ids": []
}
Install and Start AutoMQ Cluster
Configure S3URL
Step 1: Generate S3 URL
AutoMQ provides the automq-kafka-admin.sh tool for quickly starting AutoMQ. By simply providing an S3 URL containing the required S3 access point and authentication information, you can start AutoMQ with a single click, without manually generating a cluster ID or performing storage formatting.
### Command Line Usage Example
bin/automq-kafka-admin.sh generate-s3-url \
--s3-access-key=xxx  \
--s3-secret-key=yyy \
--s3-region=cn-northwest-1  \
--s3-endpoint=s3.cn-northwest-1.amazonaws.com.cn \
--s3-data-bucket=automq-data \
--s3-ops-bucket=automq-ops
When using Ceph, you can generate a specific S3URL with the following configuration.
| Parameter Name | Default Value in This Example | Description |
|---|---|---|
| --s3-access-key | X1J0E1EC3KZMQUZCVHED | After creating the Ceph user, remember to replace this with the actual value |
| --s3-secret-key | Hihmu8nIDN1F7wshByig0dwQ235a0WAeUvAEiWSD | After creating a Ceph user, remember to replace this with the actual value |
| --s3-region | us-west-2 | This parameter is ineffective in Ceph and can be set to any value, such as us-west-2 |
| --s3-endpoint | http://127.0.0.1:80 | This parameter is the address where Ceph's S3-compatible component RGW provides external services. If multiple machines are used, it is recommended to use a Server Load Balancer (SLB) to aggregate them into one IP address. |
| --s3-data-bucket | automq-data | - |
| --s3-ops-bucket | automq-ops | - |
Output Result
Upon executing this command, the process will automatically proceed through the following stages:
Probe the basic features of S3 using the provided accessKey and secretKey to verify compatibility between AutoMQ and S3.
Generate an s3url based on the identity information and endpoint details.
Obtain a command example to start AutoMQ based on the s3url. In the command, replace --controller-list and --broker-list with the actual CONTROLLER and BROKER to be deployed.
############ Ping S3 ########################

[ OK ] Write s3 object
[ OK ] Read s3 object
[ OK ] Delete s3 object
[ OK ] Write s3 object
[ OK ] Upload s3 multipart object
[ OK ] Read s3 multipart object
[ OK ] Delete s3 object
############ String of S3url ################

Your s3url is:

s3://s3.cn-northwest-1.amazonaws.com.cn?s3-access-key=xxx&s3-secret-key=yyy&s3-region=cn-northwest-1&s3-endpoint-protocol=https&s3-data-bucket=automq-data&s3-path-style=false&s3-ops-bucket=automq-ops&cluster-id=40ErA_nGQ_qNPDz0uodTEA


############ Usage of S3url ################
To start AutoMQ, generate the start commandline using s3url.
bin/automq-kafka-admin.sh generate-start-command \
--s3-url="s3://s3.cn-northwest-1.amazonaws.com.cn?s3-access-key=XXX&s3-secret-key=YYY&s3-region=cn-northwest-1&s3-endpoint-protocol=https&s3-data-bucket=automq-data&s3-path-style=false&s3-ops-bucket=automq-ops&cluster-id=40ErA_nGQ_qNPDz0uodTEA" \
--controller-list="192.168.0.1:9093;192.168.0.2:9093;192.168.0.3:9093"  \
--broker-list="192.168.0.4:9092;192.168.0.5:9092"

TIPS: Please replace the controller-list and broker-list with your actual IP addresses.
Step 2: Generate the List of Startup Commands
Replace the --controller-list and --broker-list in the commands generated in the previous step with your host information, specifically the IP addresses of the 3 CONTROLLERs and 2 BROKERs mentioned in the environment preparation, using the default ports 9092 and 9093.
bin/automq-kafka-admin.sh generate-start-command \
--s3-url="s3://s3.cn-northwest-1.amazonaws.com.cn?s3-access-key=XXX&s3-secret-key=YYY&s3-region=cn-northwest-1&s3-endpoint-protocol=https&s3-data-bucket=automq-data&s3-path-style=false&s3-ops-bucket=automq-ops&cluster-id=40ErA_nGQ_qNPDz0uodTEA" \
--controller-list="192.168.0.1:9093;192.168.0.2:9093;192.168.0.3:9093"  \
--broker-list="192.168.0.4:9092;192.168.0.5:9092"
Parameter Description
| Parameter Name | Required | Description |
|---|---|---|
| --s3-url | Yes | Generated by the bin/automq-kafka-admin.sh generate-s3-url command line tool, contains authentication, cluster ID, etc. |
| --controller-list | Yes | At least one address is required, used as the IP and port list of CONTROLLER hosts. Format: IP1:PORT1;IP2:PORT2;IP3:PORT3 |
| --broker-list | Yes | At least one address is required, used as the IP and port list of BROKER hosts. Format: IP1:PORT1;IP2:PORT2;IP3:PORT3 |
| --controller-only-mode | No | Determines whether the CONTROLLER node assumes only the CONTROLLER role. The default is false, meaning the deployed CONTROLLER node also acts as a BROKER. |
Output
After executing the command, a command for starting AutoMQ will be generated.
############ Start Commandline ##############
To start an AutoMQ Kafka server, please navigate to the directory where your AutoMQ tgz file is located and run the following command.

Before running the command, make sure that Java 17 is installed on your host. You can verify the Java version by executing 'java -version'.

bin/kafka-server-start.sh --s3-url="s3://s3.cn-northwest-1.amazonaws.com.cn?s3-access-key=XXX&s3-secret-key=YYY&s3-region=cn-northwest-1&s3-endpoint-protocol=https&s3-data-bucket=automq-data&s3-path-style=false&s3-ops-bucket=automq-ops&cluster-id=40ErA_nGQ_qNPDz0uodTEA" --override process.roles=broker,controller --override node.id=0 --override controller.quorum.voters=0@192.168.0.1:9093,1@192.168.0.2:9093,2@192.168.0.3:9093 --override listeners=PLAINTEXT://192.168.0.1:9092,CONTROLLER://192.168.0.1:9093 --override advertised.listeners=PLAINTEXT://192.168.0.1:9092

bin/kafka-server-start.sh --s3-url="s3://s3.cn-northwest-1.amazonaws.com.cn?s3-access-key=XXX&s3-secret-key=YYY&s3-region=cn-northwest-1&s3-endpoint-protocol=https&s3-data-bucket=automq-data&s3-path-style=false&s3-ops-bucket=automq-ops&cluster-id=40ErA_nGQ_qNPDz0uodTEA" --override process.roles=broker,controller --override node.id=1 --override controller.quorum.voters=0@192.168.0.1:9093,1@192.168.0.2:9093,2@192.168.0.3:9093 --override listeners=PLAINTEXT://192.168.0.2:9092,CONTROLLER://192.168.0.2:9093 --override advertised.listeners=PLAINTEXT://192.168.0.2:9092

bin/kafka-server-start.sh --s3-url="s3://s3.cn-northwest-1.amazonaws.com.cn?s3-access-key=XXX&s3-secret-key=YYY&s3-region=cn-northwest-1&s3-endpoint-protocol=https&s3-data-bucket=automq-data&s3-path-style=false&s3-ops-bucket=automq-ops&cluster-id=40ErA_nGQ_qNPDz0uodTEA" --override process.roles=broker,controller --override node.id=2 --override controller.quorum.voters=0@192.168.0.1:9093,1@192.168.0.2:9093,2@192.168.0.3:9093 --override listeners=PLAINTEXT://192.168.0.3:9092,CONTROLLER://192.168.0.3:9093 --override advertised.listeners=PLAINTEXT://192.168.0.3:9092

bin/kafka-server-start.sh --s3-url="s3://s3.cn-northwest-1.amazonaws.com.cn?s3-access-key=XXX&s3-secret-key=YYY&s3-region=cn-northwest-1&s3-endpoint-protocol=https&s3-data-bucket=automq-data&s3-path-style=false&s3-ops-bucket=automq-ops&cluster-id=40ErA_nGQ_qNPDz0uodTEA" --override process.roles=broker --override node.id=3 --override controller.quorum.voters=0@192.168.0.1:9093,1@192.168.0.2:9093,2@192.168.0.3:9093 --override listeners=PLAINTEXT://192.168.0.4:9092 --override advertised.listeners=PLAINTEXT://192.168.0.4:9092

bin/kafka-server-start.sh --s3-url="s3://s3.cn-northwest-1.amazonaws.com.cn?s3-access-key=XXX&s3-secret-key=YYY&s3-region=cn-northwest-1&s3-endpoint-protocol=https&s3-data-bucket=automq-data&s3-path-style=false&s3-ops-bucket=automq-ops&cluster-id=40ErA_nGQ_qNPDz0uodTEA" --override process.roles=broker --override node.id=4 --override controller.quorum.voters=0@192.168.0.1:9093,1@192.168.0.2:9093,2@192.168.0.3:9093 --override listeners=PLAINTEXT://192.168.0.5:9092 --override advertised.listeners=PLAINTEXT://192.168.0.5:9092


TIPS: Start controllers first and then the brokers.
node.id is automatically generated starting from 0 by default.
Step 3: Start AutoMQ
To start the cluster, execute the list of commands from the previous step sequentially on the predefined CONTROLLER or BROKER hosts. For instance, to start the first CONTROLLER process on 192.168.0.1, execute the first command template from the generated startup command list.
bin/kafka-server-start.sh --s3-url="s3://s3.cn-northwest-1.amazonaws.com.cn?s3-access-key=XXX&s3-secret-key=YYY&s3-region=cn-northwest-1&s3-endpoint-protocol=https&s3-data-bucket=automq-data&s3-path-style=false&s3-ops-bucket=automq-ops&cluster-id=40ErA_nGQ_qNPDz0uodTEA" --override process.roles=broker,controller --override node.id=0 --override controller.quorum.voters=0@192.168.0.1:9093,1@192.168.0.2:9093,2@192.168.0.3:9093 --override listeners=PLAINTEXT://192.168.0.1:9092,CONTROLLER://192.168.0.1:9093 --override advertised.listeners=PLAINTEXT://192.168.0.1:9092
Parameter Explanation
When using the startup command, any unspecified parameters will adopt the default configurations of Apache Kafka. For new parameters introduced by AutoMQ, AutoMQ's default values will be used. To override the default configurations, you can add additional --override key=value parameters at the end of the command.
| Parameter Name | Required | Description |
|---|---|---|
| s3-url | Yes | Generated by the bin/automq-kafka-admin.sh generate-s3-url command line tool, it includes authentication, cluster ID, and other information. |
| process.roles | Yes | Options are CONTROLLER or BROKER. If a host serves as both CONTROLLER and BROKER, set the value to CONTROLLER,BROKER. |
| node.id | Yes | An integer that uniquely identifies a BROKER or CONTROLLER in the Kafka cluster. It must be unique within the cluster. |
| controller.quorum.voters | Yes | Information of hosts participating in the KRAFT election, including nodeid, IP, and port, for example: 0@192.168.0.1:9093,1@192.168.0.2:9093,2@192.168.0.3:9093. |
| listeners | Yes | The IP and port to listen on. |
| advertised.listeners | Yes | The access address provided by the BROKER for the client. |
| log.dirs | No | Directories where KRAFT and BROKER metadata are stored. |
| s3.wal.path | No | In a production environment, it is recommended to store AutoMQ WAL data on a new data volume mounted as a raw device. This can provide better performance, as AutoMQ supports writing data to raw devices, thereby reducing latency. Ensure that the correct path is configured to store the WAL data. |
| autobalancer.controller.enable | No | The default value is false, meaning traffic self-balancing is not enabled. When automatic traffic self-balancing is enabled, the AutoMQ auto balancer component will automatically reassign partitions to ensure overall traffic is balanced. |
Tips: To enable continuous traffic self-balancing or run Example: Self-Balancing When Cluster Nodes Change, it is recommended to explicitly specify the parameter --override autobalancer.controller.enable=true when starting the Controller.
Background Operation
If you need to run in background mode, add the following code at the end of the command:
command > /dev/null 2>&1 &
Prepare Raw Device Data Volume
AutoMQ uses raw devices as WAL data volumes to improve the efficiency of writing to the WAL. On Ceph, you can prepare raw devices as follows:
Refer to the Ceph official documentation for guidelines on mounting raw devices on a Linux host.
Configure the raw device path as /dev/vdb.
Specify the Data Volume Path.
Use the Linux lsblk command to view local data volumes. Unpartitioned block devices are considered data volumes. In the following example, vdb is an unpartitioned raw block device.
vda    253:0    0   20G  0 disk
├─vda1 253:1    0    2M  0 part
├─vda2 253:2    0  200M  0 part /boot/efi
└─vda3 253:3    0 19.8G  0 part /
vdb    253:16   0   20G  0 disk
By default, AutoMQ stores metadata and WAL data in the /tmp directory. However, it is important to note that if the /tmp directory is mounted on tmpfs, it is not suitable for production environments.
For production or formal testing environments, it is recommended to modify the configuration as follows: specify the metadata directory log.dirs and the WAL data directory s3.wal.path (writing to the raw device) to the raw device path.
bin/kafka-server-start.sh ...\
--override  s3.telemetry.metrics.exporter.type=prometheus \
--override  s3.metrics.exporter.prom.host=0.0.0.0 \
--override  s3.metrics.exporter.prom.port=9090 \
--override  log.dirs=/root/kraft-logs \
--override  s3.wal.path=/dev/vdb \
> /dev/null 2>&1 &
Tips: /dev/vdb is the raw device path we prepared using Ceph.
At this point, you have completed the deployment of an AutoMQ cluster based on Ceph, resulting in a low-cost, low-latency, and second-level elastic Kafka cluster. If you wish to further experience AutoMQ's second-level partition reassignment, self-balancing, and other features, you can refer to the official example.
References
[1] Ceph: https://ceph.io/en/
[2] What is ceph: https://ubuntu.com/ceph/what-is-ceph